
Can You Use Can Lights With a Ceiling Fan Without Flicker?

Recessed ceiling lights pair safely with a ceiling fan in any room. The only catch is keeping the light beams completely outside the path of the turning blades. Placing a light directly above or too close to those blades creates a rapid, flickering shadow across your floors and walls. That dizzying strobe effect causes instant headaches and leaves you stuck choosing between a cool breeze and comfortable lighting.
Getting this layout right comes down to three basic details: the total reach of your fan blades, the height of your ceiling, and the spread of your light bulbs. Narrow beams need less clearance, while wide floodlights need extra breathing room to avoid catching a blade edge. Even a few inches of spacing can make the difference between a calm room and a frustrating mistake. Here is how to map out the right distances before cutting into your ceiling.
The Flicker Problem: Why Lights Positioned Above Blades Create Moving Shadows
Recessed ceiling lights and ceiling fans often clash when they share the same ceiling space. When you turn on both fixtures at the same time, the spinning blades pass directly beneath the downward beam of light. Every single time a blade cuts across that beam, it blocks the illumination for a fraction of a second. This rapid, repetitive interruption creates what electricians and lighting designers call a strobe effect, which is a fast-moving, flickering shadow that ripples across your walls and floor.
This shadow flicker feels very different from a steady drop in room brightness. It behaves much like a spinning movie projector shutter or the blades of a low-flying helicopter passing under the midday sun. Your eyes constantly try to adjust to the fluctuating light levels several times each second. Over just a few minutes, this rhythmic pulsing can cause noticeable eye strain, dizziness, fatigue, and severe headaches. If you are trying to relax, read a book, or watch television in your living room, the moving shadows quickly make the space uncomfortable to sit in.
The core problem comes down to the shape of the light beam. A standard recessed can light does not shoot light straight down like a narrow laser pointer. Instead, it casts light outward in a wide, cone-shaped beam. Even if your recessed light fixture is mounted a few inches away from the stationary edge of a fan blade, the widening cone of light often catches the blade tips as they spin through the air. Many homeowners only inspect the ceiling while the fan is turned off, assuming that an inch or two of visible clearance is enough. The moment you flip the wall switch and the motor brings the blades up to full speed, the blade sweep intercepts the light cone and fills the entire living area with chopping shadows.
Safe Spacing Rules: How to Measure and Place Can Lights Around a Fan
To eliminate shadow flicker completely, you must map your ceiling layout so the expanding cone of light stays entirely outside the rotating blade path. Follow these five practical steps to measure your clearances and place your recessed lights correctly before making any permanent cuts in your ceiling drywall.
- Measure the total blade sweep of your ceiling fan. The blade sweep is the total circular footprint created by the fan blades as they rotate through the air. For a fan with an even number of blades, measure with a tape measure directly from the outer tip of one blade across the central motor housing to the tip of the opposite blade. For a fan with three or five blades, measure straight from the center of the motor hub to the outer tip of one blade, then double that measurement. Knowing the exact outer perimeter of the moving blades gives you the baseline boundary that your light fixtures must clear.
- Add a buffer distance of at least two to three feet past the blade tips. Take the outer edge of your fan blade sweep and measure outward across the ceiling drywall by an extra 24 to 36 inches to mark your fixture zones. A recessed ceiling light projects an expanding cone of illumination toward your floor, which means placing a fixture right at the edge of the blade tips will still clip the spinning blades. Giving yourself two to three feet of horizontal clearance ensures that the main beam hits the open floor without touching the blades.
- Factor in your ceiling height and the beam angle of your light fixtures. Check the packaging of your recessed lights to find their beam angle, which typically ranges from a narrow 30-degree flood to a wide 60-degree flood. A wider beam angle spreads out much faster as it drops down into the room. If your room features tall ceilings of nine feet or higher, that cone of light expands across an even larger horizontal area before touching the floor, requiring you to push your can lights closer to the outer walls or choose narrower beam spreads to avoid blade contact.
- Position your recessed lights in a balanced perimeter grid across the room. Lay out your can lights in an even grid along the outer perimeter of the ceiling rather than clustering them tightly near the center of the room. Placing four to six recessed lights evenly spaced between four and six feet apart along the walls creates smooth, uniform brightness across the entire space. This balanced placement illuminates your seating areas and walls comfortably while leaving the central fan zone open and shadow-free.
- Locate and verify ceiling joists before cutting any drywall openings. Run a reliable stud finder across your ceiling marks to confirm the exact position of the wooden ceiling joists and hidden framing beams. Discovering a solid wooden joist directly behind your planned fixture hole forces you to shift the can light a few inches off-target, which could accidentally slide the fixture right back into the path of the fan blades. Confirming open joist bays beforehand keeps your spacing accurate and prevents messy drywall repair work.
You can easily confirm your layout before cutting into the ceiling. Turn off the room lights, switch on the ceiling fan at low speed, and hold a bright portable flashlight flat against the ceiling at each of your planned marks. Point the light straight down toward the floor and watch the surrounding surfaces. If you see moving shadows cutting across the walls or carpet, push your mark outward toward the wall until the beam falls cleanly through open air.
Lighting Controls: Putting Recessed Cans and Ceiling Fans on Separate Switches
Proper physical spacing solves the flicker problem, but managing how you power the fixtures makes the room practical to use every day. In many older homes, builders wire the ceiling fan and the surrounding ceiling lights to a single wall toggle switch to save time and wire. When wired this way, flipping the switch forces the fan and the lights to turn on together. If you want a cool breeze while relaxing or sleeping, you are stuck with blazing ceiling lights, and if you turn off the switch to dim the room, you lose all your airflow.
Separating the fan and the recessed can lights onto their own individual wall switches gives you complete control over your living space. You can run the fan silently on hot afternoons without turning on a single bulb, or light up the room brightly on dark winter mornings without generating an unwanted draft. For the recessed lights, install a dedicated LED-compatible dimmer switch. Older wall dimmers designed for traditional incandescent bulbs regulate electrical current unevenly, which causes modern built-in LED can lights to hum, buzz, or flash intermittently.
You can also upgrade to modern wall controls to make adjustments even simpler. Installing smart home automation lights and dedicated multi-button wall switches lets you adjust fan speeds and dim recessed lights independently using preset schedules or voice commands. If running a brand new electrical wire down through your wall studs to a second switch box is too difficult, pairing your fixtures with app-controlled lights allows you to group, dim, and schedule your ceiling lights straight from your phone while leaving the fan on its own manual switch.
Ceiling Box Ratings and Safe Wiring Limits: When to Call a Professional
Hanging a ceiling fan and running recessed can lights requires careful attention to electrical safety and structural support. A standard junction box (the ceiling wiring box that holds the fixture) is built to hold stationary, lightweight lights that weigh between 35 and 50 pounds. A ceiling fan, however, introduces continuous dynamic weight and rotational vibration as the motor spins the blades. Never mount a ceiling fan to an ordinary plastic or lightweight metal light box. The constant vibration can loosen the mounting screws, crack the box, and cause the fan to fall from the ceiling.
Check the interior metal surface of your ceiling box to ensure it is explicitly stamped with a label stating "Acceptable for Fan Support." Fan-rated electrical boxes feature heavy-duty steel construction, larger machine screws, and strong metal brace arms that lock securely between two ceiling joists to handle the constant motion. If your existing ceiling box is made of thin plastic or wobbles when you touch it, replace it with an approved fan-rated brace box before hanging the fixture.
Electrical safety must always come first whenever you work with ceiling wiring. Always shut off the circuit breaker at the main electrical panel before removing an old fixture, opening a junction box, or stripping wires. Never assume that turning off the wall switch cuts power to the ceiling, as hot wires often feed continuously through ceiling boxes to power other parts of the room. Use a reliable non-contact voltage tester to verify that every wire inside the box is completely dead before your hands touch any copper.
Know your limits and stop to call a licensed electrician if you run into any of the following warning signs:
- Your ceiling junction box contains brittle, crumbling wire insulation or older fabric-wrapped wiring.
- There is no bare copper equipment grounding wire present inside the ceiling electrical box.
- You need to add a new physical switch leg through finished walls and cramped attic framing.
- The circuit breaker trips instantly when you restore power to your newly installed fixtures.
- Your wall switch box is overcrowded with wires, making it impossible to install a modern dimmer safely.
Choosing a Screw-In Socket Fan Light for Existing Recessed Cans
If your room already has recessed can lights installed directly in the middle of the ceiling, tearing open the drywall to run new cables and hang a full-size ceiling fan can be costly and messy. In small bedrooms, laundry rooms, home offices, and rental spaces, a socket fan light offers a practical alternative. These compact units combine a small cooling fan with an integrated light fixture, designed to twist directly into a standard screw-in bulb base (E26 medium base) just like a normal household light bulb.
When selecting a socket fan light to solve airflow and lighting problems in a room with existing fixtures, verify a few key details before making your purchase. Check the brightness in lumens to ensure the built-in light provides enough actual illumination for your daily activities. While old incandescent bulbs were measured by wattage, lumens tell you the true brightness output. Look for a unit that provides adjustable color tone or warmth (Kelvin), allowing you to switch between a warm soft white (around 2700K) for relaxing and a crisp daylight (around 5000K) for active tasks.
You also need to inspect the physical socket depth of your existing recessed can. Recessed fixtures sit recessed inside metal housings, so look for socket fan lights that include an optional socket extender if the blades need to drop down below the ceiling trim to spin freely. Make sure the model includes an independent remote control so you can turn the fan motor and the light on or off separately without having to install any new wall switches or pull new electrical lines through your ceiling.
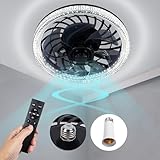
- LFR Score8.9
LFR Score is a ranking system developed by lightfansreviews.com. LFR Score has no relationship or impact from any manufacturers or sales agent websites. Learn more
- BrandCybaaLuxzus
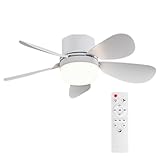
- LFR Score7.1
LFR Score is a ranking system developed by lightfansreviews.com. LFR Score has no relationship or impact from any manufacturers or sales agent websites. Learn more
- BrandASALL
Last update on 2026-10-18 / Affiliate links / Images, Product Titles, and Product Highlights from Amazon Product Advertising API
FAQs
How far should can lights be from ceiling fan blades?
Keep your recessed can lights at least two to three feet away from the outer tips of the spinning fan blades. This measurement accounts for the horizontal spread of the downward light beam, which widens as it travels toward the floor. Maintaining this buffer prevents the outer edges of the light cone from clipping the rotating blades and creating a dizzying strobe effect.
Can I replace an existing recessed can light with a full-size ceiling fan?
You can replace a recessed can light with a standard ceiling fan, but you cannot mount the fan to the existing recessed light housing. You must first remove the can light frame and install a structural junction box stamped as acceptable for fan support. This fan-rated box anchors directly to your ceiling joists to safely bear the dynamic weight and vibration of the spinning motor.
Why are my recessed lights flickering even when the ceiling fan is turned off?
Flickering that happens while the fan blades are completely stationary is usually caused by an electrical issue rather than a shadow problem. The most common culprit is an incompatible wall dimmer switch that sends irregular electrical pulses to modern LED bulbs, which causes buzzing and flashing. Loose wire nuts inside the ceiling junction box or voltage drops along the electrical circuit can also make recessed bulbs flicker.
Does the beam angle of a recessed light affect shadow flicker?
The beam angle plays a major role in whether your lights cast moving shadows across the room. A narrow spot or flood beam of 30 to 40 degrees directs light tightly downward, allowing you to mount the fixture slightly closer to the fan perimeter without blade contact. A wide flood angle of 60 degrees expands broadly outward, requiring you to push the can light much farther away from the fan to avoid clipping the blades.


Best Lighting For Makeup 2026 Bright Ideas For Flawless Looks

Best Wall Sconces For Staircase 2026 Brighten Your Home

Best Lighting For Computer Desk 2026 For Focused Work

Best Boat Black Lights 2026 For Nighttime Adventure

Best Black 30 Inch Light Bar Reviews – Top Picks of 2026

Best Black Light For Aquarium 2026 For Vibrant Glow

Best Black Light for Authenticating Glass 2026 Top Picks

Best Waterproof Spotlight 2026 That Outshines Expectations






