
How to Change a Ceiling Fan Light Pull Chain Easily
Replacing or repairing a ceiling fan light pull chain can feel tricky, but with the right approach, it's surprisingly straightforward. Start by turning off power to ensure safety and prevent any electrical mishaps. Removing the light cover carefully prevents damage and provides full access to the pull chain mechanism. Observe the existing chain setup, noting how the links connect to the switch assembly; this step prevents confusion during reassembly.
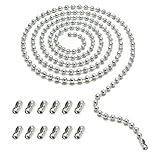
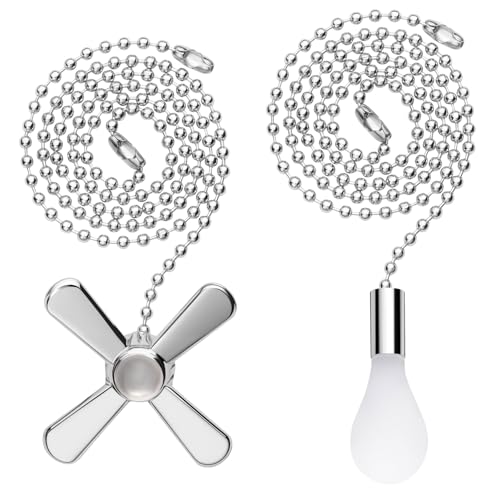
Choose a replacement pull chain that matches the style and length of the original. Many options come with decorative ends or adjustable links to fit various ceiling fan designs. Installing the new chain requires patience, threading it through the mechanism gently while ensuring smooth operation without binding. Lubricating the switch lightly can also help maintain effortless pull motion.
Once installed, test the chain multiple times to confirm it activates the light without sticking or slipping. Reattach the light cover securely, making sure it aligns properly with the fan body. Performing a final check under power ensures the light responds consistently to the pull chain commands. Regular inspection of the chain and switch prevents wear and extends the life of your fan components.
By following these detailed steps, anyone can manage a ceiling fan light pull chain repair or replacement efficiently. A little attention to detail, combined with patience and care, ensures the fan remains functional and safe. This approach minimizes frustration while providing reliable results, keeping your fan's lighting in perfect working order for years to come.
How to Change a Ceiling Fan Light Pull Chain
Nothing disrupts a cozy evening faster than a ceiling fan light that refuses to respond. The small, often overlooked pull chain can suddenly become the source of frustration, leaving rooms dim or dark. Learning to tackle this task without fuss saves both time and irritation, making sure your fan operates smoothly. Step-by-step attention to the mechanism, chain length, and connections ensures reliable performance without unnecessary strain.
Pull Chain Replacement Basics
Start by cutting the power to your fan to eliminate the risk of shocks or short circuits. Removing the light fixture cover carefully prevents scratches and allows full access to the switch mechanism. Observe how the old chain links connect to the switch; this prevents misalignment when installing a new chain. Having the correct replacement chain with matching length and decorative ends simplifies installation and ensures smooth operation.
Threading the new chain requires patience, making sure the links slide without binding. Lightly lubricating the switch can prevent stiffness and preserve the effortless pull action. Confirm the chain moves freely before replacing the fixture cover. A consistent pull motion enhances daily usability and keeps the fan's lighting dependable over time.
Paying attention to small details like link orientation or chain twist prevents recurring problems. Even minor misalignments can lead to uneven tension, making the light switch inconsistent. Ensuring that the chain is snug without being tight contributes to long-term reliability. Testing several times before securing the cover confirms proper functionality.
Regular checks help maintain the integrity of the pull chain. Inspecting for frayed links or loose connections early prevents total failure. Knowing how to replace it efficiently saves money on professional repairs and keeps your fan operational through daily use.
Choosing the Right Replacement Chain
Selecting a chain compatible with your ceiling fan ensures both aesthetics and functionality. Consider the chain's material, decorative ends, and length to match the existing setup. A chain that's too short or too long can interfere with the fan's operation or hanging position. Proper fit and quality prevent common problems such as jamming or excessive wear.
Some replacement chains come with adjustable links or ornamental pulls to complement your room décor. Even subtle design differences affect grip comfort and the ease of use. Choosing a chain with a smooth finish minimizes friction and ensures smooth engagement with the switch. Reliability in material and design is a key factor for long-lasting operation.
Review the fan's manual for manufacturer-specific recommendations. Using chains outside specifications may void warranties or cause misalignment. Matching the chain to the switch type single or multi-function enhances overall performance. A well-matched chain minimizes stress on the mechanism and extends the lifespan of the fan.
Installing a compatible chain ensures the fan responds predictably to every pull. The right chain makes repeated use comfortable while reducing strain on fingers and wrists. Prioritize durability and operational ease when selecting replacements. High-quality chains contribute directly to the strength and reliability of your fan's lighting control.
Step-by-Step Installation Process
Begin by removing the fan's light cover carefully to avoid damage. Keep screws and components organized to simplify reassembly. Observe the current pull chain mechanism to understand the routing and connection points. Knowing the setup prevents mistakes and ensures smooth functionality after installation.
Thread the new chain through the switch assembly, ensuring it doesn't twist or kink. Each link should move freely within the mechanism, providing smooth pull action. Connect the chain to the switch as observed in the old setup, confirming a snug fit without excessive slack. Attention to detail here is crucial for long-term operation.
Test the pull chain multiple times before securing the light cover. Check that it turns the light on and off without sticking or slipping. Reattach the cover carefully, making sure it aligns properly with the fan body. A precise fit reduces wobble and prevents accidental strain on the chain.
Verify operation once the cover is in place. Pull the chain through its full range to confirm consistency. Minor adjustments at this stage prevent issues during everyday use. Consistent performance ensures the fan light remains reliable for years.
Common Problems and Fixes
Frayed chains or stiff mechanisms are frequent culprits behind malfunctioning fan lights. Replacing worn chains immediately prevents further damage to the switch. A chain that slips or sticks may need minor adjustments or lubrication. Maintaining the pull mechanism and link integrity keeps the fan functioning efficiently.
Sometimes the switch itself may wear out, even with a new chain installed. Testing the old chain for smooth motion helps identify whether the issue is the chain or switch. Replacing a faulty switch is an important step for long-term reliability. Combining a new chain with a functional switch restores optimal operation.
Misalignment can cause the pull chain to bind or fail to engage the switch. Ensuring proper routing of the chain during installation resolves most operational problems. Use gentle pressure and correct orientation to maintain mechanical integrity. Even minor tweaks improve the ease of use dramatically.
Regular maintenance prevents recurring issues. Inspect chains periodically for wear, tension, and movement. Addressing problems early preserves the durability and effectiveness of your fan light control. A proactive approach avoids emergency repairs and extends component lifespan.
Safety Considerations and Precautions
Powering off the fan before any work is essential for safety. Double-checking that the circuit is inactive prevents shocks or short circuits. Using insulated tools adds another layer of protection. These precautions safeguard both the user and the fan's electrical components.
Securely supporting the fan or standing on a stable surface ensures safe handling. Avoiding unstable ladders reduces the risk of falls. Keeping screws and small parts organized prevents accidental loss and damage. Stability and careful handling are critical to a successful repair.
Do not force the chain through the mechanism. Excessive tension can damage the switch or links. Gentle, precise movements maintain the structural integrity of the pull chain and switch assembly. Controlled handling prevents unnecessary wear or breakage.
Follow the fan's manufacturer guidelines whenever possible. Using approved components reduces risk and ensures compatibility. Proper attention to safety measures enhances reliability and longevity of the ceiling fan light system. Safety is a crucial investment in both function and peace of mind.
Tools Needed for Replacement
A screwdriver set, replacement chain, and optional light lubricant are usually sufficient. A small container for screws keeps everything organized. Insulated pliers or tweezers help maneuver small links precisely. Having all tools on hand before starting streamlines the process and prevents interruptions.
Measuring tape ensures the replacement chain is the correct length. Some chains can be adjusted with pliers, but knowing the proper size reduces extra effort. Correct tool usage maintains accuracy and safety during installation. Preparation is key to avoiding mistakes and preserving mechanism integrity.
Light lubricant aids smooth movement of the pull chain. Applying sparingly prevents buildup and potential grime accumulation. This small step ensures effortless operation from the first pull onward. Using the right tools maximizes both safety and functionality.
Organizing tools and components before starting saves time. It allows for focused work on the pull chain replacement without fumbling for necessary items. Preparedness reduces frustration and guarantees a clean, professional result.
Identifying Worn Chains and Switches
Visual inspection reveals frayed or twisted links that may fail soon. Loose or misaligned chains indicate excessive wear or mechanical issues. Identifying these problems early prevents failure during regular use. Early detection extends the life of both chain and switch.
Listening for unusual resistance or clicks when pulling can also signal a worn switch. Smooth, consistent motion is a hallmark of a healthy mechanism. Irregular feedback during operation suggests maintenance or replacement is needed. Maintaining the strength and function of the pull system ensures reliable performance.
Documenting observations with photos or notes helps track changes over time. This approach allows comparison and planning for timely replacement. Paying attention to subtle signs reduces emergency repairs. Proper monitoring protects the mechanical integrity and keeps the fan operational.
Combining visual, tactile, and functional checks provides a comprehensive assessment. Multiple perspectives increase the likelihood of catching minor issues before they escalate. Proactive attention to the chain and switch guarantees smoother fan operation and less frustration.
Advanced Techniques for Changing a Ceiling Fan Light Pull Chain
Even after replacing a ceiling fan light pull chain once, many struggle with ensuring long-term smooth operation. Loose connections or subtle misalignments can cause repeated frustration. Focusing on precision, alignment, and component quality prevents recurring issues and keeps your fan performing efficiently. Attention to these details saves both time and stress, especially in high-usage areas.
Detailed Disassembly Tips
Properly accessing the switch assembly requires careful disassembly. Start by removing screws holding the light kit and gently lowering the fixture. Observing the wiring and chain placement prevents accidental damage. For complex fan models, following a how to disassemble a ceiling fan guide ensures safe handling and preserves mechanical integrity.
Label wires and components to simplify reassembly. Small details, like retaining washer placement, affect how the chain operates. Avoid forcing any part, as pressure can warp the switch housing or pull mechanism. Taking measured steps maintains durability and function.
For fans with decorative elements, remove covers carefully to prevent scratches. Protective handling also prevents unintentional bending of metal components. The correct sequence of disassembly ensures all elements return securely in place, keeping the fan aesthetic and functionality intact.
Inspect the chain path for any friction points. Smooth alignment ensures a consistent pull and extends the lifespan of both chain and switch. Minor corrections now prevent major repairs later, emphasizing the importance of proper disassembly.
Switch and Chain Integration
Aligning the new pull chain with the switch mechanism is crucial. The chain should slide freely without catching or twisting. Test fit before securing components to ensure optimal functionality. Proper integration reduces stress on the switch and prevents early wear.
Some switches allow optional lubrication to reduce resistance. Using a non-abrasive lubricant on pivot points improves smooth operation without attracting dust. Avoid over-applying, which can lead to gumming up the mechanism.
Ensure the chain’s decorative end does not obstruct the light fixture. Even subtle interference can cause uneven tension. Correct positioning maintains consistent pull strength and extends the chain’s lifespan.
Reinstall the fixture carefully, verifying the chain moves freely through its full range. A functional pull ensures reliable daily operation and minimizes user frustration. Proper alignment and smoothness are essential to long-term performance.
Testing and Adjustments
Once installed, cycle the pull chain multiple times. Each pull should turn the light on and off without hesitation or sticking. Any resistance signals a need for minor adjustment. Consistent testing ensures the mechanical efficiency and reliability of the fan.
Observe the switch operation under actual power conditions. Minor tweaks in chain length or switch tension can prevent binding. Ensuring smooth motion before final assembly avoids unnecessary wear. Attention to fine-tuning and operational feedback guarantees dependable use.
Check for interference with other fan components. Misaligned chains can rub against wires or housing, causing friction. Correcting this enhances durability and ease of use. Smooth, friction-free operation preserves the lifespan of both chain and switch.
Documenting the adjustments made can serve as a reference for future maintenance. This practice allows quick corrections if the chain wears or stretches over time. Maintaining adjustment history streamlines any future replacements or repairs.
Upgrading to High-Quality Fans
Replacing a chain repeatedly can signal the need for a better-quality ceiling fan. Fans designed for durability reduce chain wear and mechanical issues. Considering best high end ceiling fans provides models with stronger pull chains, smoother switches, and better overall longevity. Investing in high-quality components prevents recurring problems.
Premium fans often feature improved internal mechanisms that reduce chain stress. These enhanced features translate to less maintenance and a more dependable lighting experience. Even subtle upgrades, like reinforced pull links, make daily operation effortless.
High-end fans may also offer easier disassembly and chain replacement options. Ergonomic design and user-friendly mechanisms simplify future maintenance. Leveraging durability and ease of access ensures long-term satisfaction and fewer surprises.
Upgrading can also improve energy efficiency and lighting quality. Smooth, reliable chains contribute to user convenience, allowing focus on comfort rather than repeated fixes. Prioritizing reliability and performance is a key factor in selecting a superior ceiling fan model.
Routine Maintenance Practices
Periodic checks of the pull chain prevent sudden failures. Inspect links for wear, tension, and alignment. Even minor adjustments maintain operational efficiency and prevent future issues.
Lubricate pivot points lightly to sustain smooth motion. Avoid over-lubrication, which can attract dust or create gumming. Correct lubrication enhances pull consistency and lifespan of the mechanism.
Ensure the chain does not rub against wires or fixtures. Friction points can degrade both chain and switch over time. Proper routing and tension maintain durability and smooth performance.
Keep spare links or chains accessible. Quick replacements reduce downtime and inconvenience. Preparing for maintenance ensures the fan remains functional and reliable.
Common Troubleshooting Scenarios
Chains that stick or fail to activate the light usually indicate misalignment or wear. Check that the links move freely and the switch is intact. Resolving these issues quickly maintains functional reliability.
Intermittent operation may signal a worn switch rather than the chain itself. Testing the mechanism separately identifies the source of the problem. Replacing faulty switches preserves mechanical integrity and ensures smooth function.
Twisted or kinked chains cause uneven tension and premature wear. Straightening or replacing the affected section restores operational efficiency. Preventative care minimizes recurring issues and extends the chain’s life.
Noise or unusual resistance during pulls may indicate debris or misalignment. Cleaning and adjusting the mechanism eliminates friction and preserves chain strength. Routine monitoring prevents minor problems from escalating.
Enhancing User Experience
Small modifications, such as adding a comfortable pull handle, improve ease of use. A properly weighted or decorative end ensures consistent grip and reduces strain. Focusing on ergonomics and convenience enhances daily interaction.
Labeling chains for multiple switches in complex fans prevents confusion. Clear identification maintains operational clarity and reduces errors. This is especially useful in multi-light ceiling fans or shared spaces.
Ensuring the chain length is appropriate for the room prevents accidental bumps or awkward reaches. Correct sizing improves efficiency and comfort. A well-placed pull enhances the overall user experience.
Combining smooth motion, proper length, and ergonomic design elevates the functionality and satisfaction of ceiling fan lighting. Attention to these details ensures reliable operation and enjoyable daily use.


Best Small Flush Mount Ceiling Fans 2026 Ultimate Picks

Best Smart Ceiling Fan India 2026 For Effortless Comfort

Best Smart Ceiling Fans with Lights for 2026: Top Picks

Best Smart Home Non Ceiling Fans 2026 For Ultimate Comfort

Best Outdoor Misting Ceiling Fan 2026 For Ultimate Comfort

Best Ceiling Fans With Lights For Vaulted Ceilings 2026 Top Picks

Best Outdoor Ceiling Fans For Porch 2026 With Style And Breeze

Best WiFi Enabled Ceiling Fan 2026 For Effortless Comfort





