
How to Change a Ceiling Fan Light Switch Easily
Changing a ceiling fan light switch can seem daunting, but it’s more approachable than many think. A few practical tools, careful planning, and understanding the wiring basics can save you time and frustration. Swapping out a faulty switch not only restores functionality but also ensures your lighting setup operates safely. The process involves identifying the correct wires, handling connections with care, and securing the new switch properly to avoid future issues.
Attention to detail is critical when working with electricity. Ensuring the power is off before touching wires is non-negotiable. Familiarity with different types of ceiling fan switches, whether pull chain, toggle, or rotary, helps in selecting the appropriate replacement. Many homeowners overlook the importance of using the right tools, like voltage testers and insulated screwdrivers, which enhance safety and precision during installation.
Once the old switch is removed, carefully inspect the wiring for signs of wear or damage. Connecting the new switch correctly requires matching wires accurately and tightening terminals securely. Testing the installation before reassembling the fan is essential to confirm proper operation. Finishing touches like securing the switch housing and checking for smooth functionality complete the upgrade.
Replacing a ceiling fan light switch also provides an opportunity to improve convenience. Upgrading to a switch that allows dimming or integrating with smart home systems adds functionality and modern appeal. Even small adjustments, like ensuring smooth chain movement or accessible toggle placement, contribute to a more satisfying user experience. Overall, thoughtful execution turns a routine task into a long-term improvement for home lighting.
How to Change a Ceiling Fan Light Switch
Facing a flickering ceiling fan light or a non-responsive switch can throw off the rhythm of your home lighting. That annoying hesitation before the bulb finally glows isn’t just frustrating; it signals that your ceiling fan light switch might need attention. Simple steps and a bit of focus can save you the headache of constant troubleshooting. Knowing what to look for and how to handle the wiring safely makes the process surprisingly straightforward and efficient.
Ceiling Fan Switch Basics
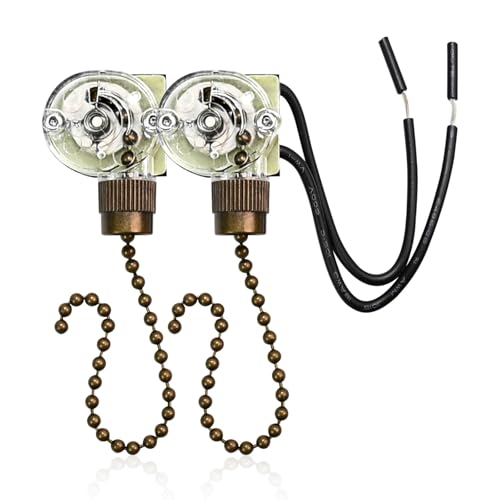
Every ceiling fan switch connects the fan’s motor and light kit through a series of wires. Identifying whether you have a pull chain, toggle, or rotary switch helps in selecting the correct replacement. Pay attention to the wire colors and terminal positions; these small details are critical for safe installation. A bit of preparation upfront prevents miswiring and protects your electrical system.
Switches age differently depending on usage frequency. Frequent toggling can loosen connections or wear down internal components, leading to intermittent lighting issues. Recognizing the signs of wear early saves time and prevents unnecessary frustration. Often, replacing the switch restores functionality instantly.
Voltage testing before touching wires is non-negotiable. This step ensures you won’t accidentally short-circuit the system. Using an insulated screwdriver and proper tools makes the job safer and more precise, highlighting the importance of proper equipment during the switch replacement process.
Having a clear work area around the fan prevents accidents and allows for better handling of components. Loose tools or cables can create hazards, so organizing your space is a subtle but effective time and safety factor. Efficient preparation streamlines the process and minimizes risk.
Selecting the Right Replacement Switch
Matching your fan switch type is crucial. Pull chain switches require compatible chain lengths and connector types, while toggle switches need terminal alignment with existing wiring. Ensuring the new switch fits precisely guarantees smooth operation and longevity.
Quality matters more than price in this case. Opt for switches with sturdy materials and reliable mechanisms to withstand repeated usage. This reduces the chance of recurrent failures and enhances switch durability. Paying attention to build quality saves long-term hassle.
Check if the replacement switch offers additional features, like dimming capability or smart integration. These enhancements improve lighting control and can boost energy efficiency. Thoughtful upgrades are a subtle yet valuable benefit factor when replacing older switches.
Some switches are designed for universal compatibility, allowing for smoother integration across different fan models. Selecting a versatile switch provides flexibility and ensures you won’t face compatibility issues in future fan upgrades. Planning ahead always pays off.
Power Off And Safety Precautions
Cutting power at the breaker is the first non-negotiable step. Even brief exposure to live wires can be dangerous. Confirming zero voltage before handling connections protects you and emphasizes the critical safety factor.
Using a voltage tester ensures accuracy in detecting live circuits. It adds an extra layer of confidence and reduces the risk of mistakes. Proper tools amplify safety assurance during the replacement.
Protective gloves and eye protection add another layer of precaution. Tiny sparks or accidental contact with terminals can cause injury. A cautious approach reflects a proactive safety mindset and prevents potential accidents.
Maintain a clear, well-lit workspace. Shadows or clutter can obscure wire connections, leading to errors. A clean environment directly supports precision and control in the switch installation.
Removing the Old Switch
Start by gently detaching the switch cover and exposing the wiring. Keep track of screws and small components to avoid losing essential parts. Organization during disassembly is an underrated efficiency factor.
Loosen the terminal screws and carefully disconnect wires. Avoid pulling or twisting, as this can damage wires or terminals. Preserving the integrity of the wiring simplifies the reinstallation process.
Inspect wires for signs of fraying, corrosion, or burn marks. Addressing these issues before installing the new switch enhances long-term reliability. Minor repairs now prevent major electrical problems later.
Labeling wires during removal helps ensure correct reconnection. This small step reduces guesswork and potential miswiring. Clear labeling is a subtle but essential organizational benefit.
Installing the New Switch
Connect wires to the corresponding terminals on the new switch, ensuring firm attachment. Proper torque prevents loose connections that could cause flickering or shorts. Secure connections are a key factor for safe operation.
Double-check wire placement against your labels or fan wiring diagram. Accurate wiring minimizes errors and ensures smooth functionality. Attention to detail reflects the precision benefit of careful installation.
After connections, mount the switch back into its housing and fasten screws securely. A snug fit avoids wobble and keeps the switch protected. Stability during operation is a subtle durability factor that prolongs switch life.
Restore power and test the switch functionality. Confirming smooth operation and proper light response validates your efforts. Functional testing reinforces confidence and reliability in the replacement process.
Wiring Variations And Troubleshooting
Ceiling fan wiring can vary significantly between models. Single-pole switches, dual switches, or integrated controls require attention to detail. Recognizing the differences in wiring prevents mistakes and streamlines troubleshooting.
Loose connections are a common cause of flickering lights. Regular inspection and tightening of terminals can prevent recurrent issues. Maintaining wire integrity is a strength factor in electrical reliability.
Labeling complex wire setups simplifies future maintenance. Having a clear map of connections reduces stress and error potential. Planning ahead enhances the long-term usability of your fan system.
Voltage inconsistencies may indicate deeper issues beyond the switch. Understanding the symptoms helps differentiate between minor and significant problems. Identifying the root cause ensures efficient problem-solving and avoids unnecessary replacements.
Common Mistakes To Avoid
Skipping the power-off step is the most critical error. It dramatically increases the risk of electrical shock. Prioritizing safety above speed is a fundamental risk reduction factor.
Incorrect terminal connections lead to intermittent lighting or complete failure. Following diagrams and labeling wires reduces this risk. Precision during wiring is a functional assurance factor.
Using incompatible switches can create fit or performance issues. Double-checking switch specifications prevents post-installation frustration. Compatibility is a key benefit for seamless operation.
Neglecting proper testing after installation can hide problems until later. Immediate verification ensures functionality and prevents rework. Testing reinforces the reliability factor of your upgrade.
Enhancing Switch Functionality
Upgrading to a switch with dimming or smart features adds modern convenience. Smooth dimming enhances ambiance, while smart integration provides remote control. These upgrades deliver functional benefits beyond basic operation.
Chain length adjustments or ergonomic toggle placements improve user experience. Small tweaks make daily interactions effortless and more enjoyable. User-centric adjustments are subtle usability factors that matter in the long run.
Energy-efficient switches can reduce electricity usage slightly but consistently over time. Opting for modern designs contributes to sustainable living. Efficient choices are a practical benefit that also impacts utility bills positively.
Combining aesthetic considerations, like matching switch color or style, integrates the installation with your room decor. Thoughtful visual integration enhances overall satisfaction. Design-conscious choices reflect the appeal factor beyond functionality.
Advanced Techniques for Ceiling Fan Light Switch Upgrades
Sometimes, simply replacing a ceiling fan light switch isn’t enough. You might notice uneven lighting, erratic operation, or even subtle buzzing when the fan runs. Addressing these issues involves a deeper look into wiring configurations, load balancing, and switch quality. Correct upgrades enhance both safety and efficiency, making everyday use far more comfortable.
Optimizing Electrical Connections
Proper wiring is the backbone of a reliable switch. Ensuring that all connections are tight and corrosion-free prevents flickering and overheating. Using wire nuts or terminal blocks correctly is a key factor in sustaining long-term performance. Poor connections can cause intermittent failures that frustrate users unnecessarily.
Grounding is another critical component. It protects both the fan and home occupants from electrical faults. Double-checking grounding wires enhances overall safety and stability. Many minor issues are eliminated with consistent attention to grounding practices.
Separate circuits for high-load fixtures prevent strain on the switch. Overloaded switches wear faster and pose safety hazards. Balancing circuits ensures the strength and longevity of your installation. This proactive approach avoids future troubleshooting headaches.
Using quality connectors and avoiding splices wherever possible keeps resistance low and performance reliable. Resistance buildup can cause heat and shorten switch life. Focusing on these subtle efficiency factors enhances the system’s durability.
Smart Upgrades And Automation
Modern switches offer integration with dimmers or smart home systems. Upgrading to these provides precise lighting control and energy savings. The convenience and flexibility are strong benefits that elevate your home environment.
Remote operation reduces the need for manual adjustment, particularly for ceiling fans in hard-to-reach spaces. This increases user comfort and makes frequent adjustments effortless. Ergonomic improvements serve as a functional advantage for everyday use.
Combining smart dimmers with motion sensors or timers can enhance efficiency. Lights operate only when needed, cutting electricity consumption and extending bulb life. Energy-conscious setups highlight a practical benefit beyond aesthetics.
Integration requires compatibility checks to ensure seamless operation. Ensuring your switch matches fan load and wiring avoids glitches or malfunctions. Thoughtful installation delivers both reliability and peace of mind.
Managing Fan Load And Efficiency
Ceiling fans draw electricity differently depending on switch type. Understanding load distribution ensures that the fan and lights operate without overtaxing circuits. Proper attention to this performance factor prevents premature switch failure.
High-wattage bulbs increase energy usage and heat, potentially stressing the switch. Balancing wattage with switch ratings maintains safe operation. This small consideration serves as a strength factor for sustained functionality.
Fans with multiple speeds may require specific switch configurations. Ensuring compatibility between fan speed controls and light switches avoids interference and noise. Coordinated setups highlight the importance of proper integration.
Energy-efficient bulbs can reduce load and heat. Using LEDs instead of incandescent bulbs offers immediate benefits in safety and cost. Minor upgrades can yield long-term savings and smoother performance.
Maintaining Aesthetic And Functional Balance
Switch design impacts both room decor and usability. Selecting switches that complement the fan style keeps the setup visually cohesive. Aesthetic alignment adds subtle value and satisfaction to home improvements.
Ergonomic placement ensures easy reach and reduces strain. Well-positioned switches minimize awkward stretching or bending. Attention to positioning emphasizes user comfort and accessibility.
Switch colors and finishes can match or contrast décor intentionally. Coordinated choices improve visual harmony and appeal. Small aesthetic improvements are often an overlooked benefit factor.
Upgraded switches may offer tactile feedback or smoother toggles. Enhanced interaction quality improves day-to-day use. Functional feel is an important strength point that encourages consistent engagement.
Troubleshooting Advanced Issues
Intermittent flicker or buzzing can indicate subtle wiring faults or voltage fluctuations. Identifying these problems requires methodical testing and observation. Addressing these issues increases system reliability and reduces frustration.
Loose screws or worn terminals often cause transient faults. Regular maintenance prevents these minor issues from escalating. Preventive actions serve as a key maintenance factor.
Environmental factors such as humidity or dust can affect switch performance. Proper sealing and occasional cleaning improve longevity. Attention to these external factors highlights a durability benefit.
Advanced troubleshooting sometimes involves multimeter readings or circuit tracing. Accurate diagnosis ensures problems are solved effectively without unnecessary replacements. This enhances overall efficiency and confidence in your upgrades.

Ensuring Safety With Upgrades
Electrical safety is paramount. Using rated switches and observing installation standards prevents hazards. Compliance with safety norms remains a critical factor during any upgrade.
Switch insulation and protective casings reduce the risk of shorts and shocks. Proper selection and installation reinforce user protection and peace of mind. Overlooking insulation can compromise long-term safety.
Regular inspections post-installation catch potential wear early. Identifying small issues before they escalate saves time and prevents accidents. Routine checks are an essential benefit factor for continued safe operation.
Educating users about the function and limits of upgraded switches ensures proper handling. Awareness reduces accidental misuse and promotes operational confidence. Informed use complements physical safety measures effectively.
Energy Considerations And Cost Management
Ceiling fan lights contribute to household energy consumption. Understanding their impact helps in planning upgrades efficiently. Thoughtful choices lead to both energy savings and cost reduction.
High-efficiency bulbs paired with modern switches lower electricity bills noticeably. LEDs combined with smart dimmers provide lasting efficiency without sacrificing brightness. Small investments now yield measurable long-term benefits.
Scheduling lights to operate only when needed reduces waste. Timers or automation features optimize use while maintaining convenience. Efficient operation emphasizes a practical benefit for everyday life.
Assessing the ongoing cost of operation, as detailed in are ceiling fans expensive to run, helps make informed decisions. Evaluating consumption alongside performance ensures your upgrade provides maximum value and cost efficiency.
Complementary Lighting Enhancements
Integrating specialized bulbs or lighting setups can enhance visual clarity and ambiance. For instance, using low-glare or blacklight options offers distinct advantages in certain settings. Products like best black light for uranium glass demonstrate niche applications where upgraded switches enable better performance.
Coordinating bulb types with switch capabilities ensures full control over brightness and energy use. Proper matching improves lighting quality and reliability. Overlooked combinations can reduce effectiveness and longevity.
Consider multi-level or dimmable setups for rooms that serve multiple functions. This flexibility adds practical benefits for varied daily needs. Adapting lighting to activity improves comfort and satisfaction.
Regular assessment of your lighting system post-upgrade ensures continued efficiency. Tweaking or replacing bulbs in response to wear or preference keeps performance optimal. Maintaining functional excellence enhances user confidence in your home lighting.


Best Small Flush Mount Ceiling Fans 2026 Ultimate Picks

Best Smart Ceiling Fan India 2026 For Effortless Comfort

Best Smart Ceiling Fans with Lights for 2026: Top Picks

Best Smart Home Non Ceiling Fans 2026 For Ultimate Comfort

Best Outdoor Misting Ceiling Fan 2026 For Ultimate Comfort

Best Ceiling Fans With Lights For Vaulted Ceilings 2026 Top Picks

Best Outdoor Ceiling Fans For Porch 2026 With Style And Breeze

Best WiFi Enabled Ceiling Fan 2026 For Effortless Comfort





