
How to Change a Projector Lamp Bulb Safely
How to change a projector lamp bulb isn’t just a maintenance task; it’s a moment where care and precision make all the difference. Many people wait until the screen goes dim or the warning light flashes, then panic sets in. Truth is, replacing a lamp is more about understanding your projector’s rhythm than brute force. Done right, it can feel surprisingly smooth, almost routine.
Projector lamps are sensitive, high-intensity components, and mishandling them can shorten their lifespan fast. Oils from your fingers, rushed installation, or skipping cooldown steps can quietly sabotage performance. That’s why knowing the proper sequence, from powering down to securing the lamp housing, matters more than speed. A calm, step-by-step approach keeps both you and the projector out of trouble.
Another key factor is compatibility, because not all lamps are created equal. Using the correct replacement designed for your specific model helps maintain brightness, color accuracy, and internal airflow. A mismatched lamp might work briefly, then cause overheating or system errors. Sticking with the right fit protects your investment and avoids repeat replacements.
There’s also a confidence boost that comes from doing it yourself. Instead of hauling the projector to a service center, you handle the fix at home and get back to movies or presentations sooner. Once you’ve done it once, future replacements feel far less intimidating. That sense of control is a quiet win that sticks.
Why projector lamps fail sooner than expected
Many people assume projector lamps burn out suddenly, but the reality is more subtle. Heat buildup, dust circulation, and inconsistent power supply quietly chip away at lamp life. Over time, brightness fades, colors lose punch, and the image feels tired even before a warning appears. Recognizing these early signals makes how to change a projector lamp bulb less reactive and far more controlled.
One overlooked factor is usage habits. Frequent power cycling without proper cooldown stresses the filament and internal housing. Projectors rely on fans to regulate temperature, and interrupting that process accelerates wear. That’s why manufacturers often recommend waiting several minutes before unplugging, even after shutdown.
Environmental conditions matter more than most people think. Dusty rooms clog filters, forcing lamps to run hotter than designed. Poor ventilation traps heat, turning a normal viewing session into a slow burn for the lamp assembly. Keeping airflow clear isn’t optional; it’s a quiet form of protection.
There’s also the misconception that brightness loss means immediate failure. In many cases, the lamp still works but no longer delivers acceptable clarity. Replacing it earlier restores visual quality and prevents stress on surrounding components. That proactive mindset changes the entire experience.
Preparing the right way before opening the projector
Preparation is where confidence begins, especially with how to change a projector lamp bulb. Rushing straight to the access panel is how mistakes sneak in. The projector must be powered off completely and left to cool until the casing feels neutral to the touch. Lamps operate at extreme temperatures, and impatience here invites damage or injury.
Workspace setup plays a bigger role than expected. A flat surface with good lighting keeps screws from vanishing and parts from shifting. Static-free handling reduces the risk of electrical discharge affecting sensitive components. Even something as simple as washing hands beforehand helps prevent oil transfer.
Another key step is verifying the replacement lamp. Model numbers matter, and similar-looking lamps are not interchangeable. Using the wrong unit can trigger error codes or uneven airflow. Matching the lamp exactly ensures compatibility and stable performance.
Documentation shouldn’t be ignored either. Manufacturer guides outline specific access points and torque limits for screws. Skipping these details might not break the projector immediately, but it shortens its lifespan quietly. Preparation turns a delicate task into a predictable routine.

Safe removal techniques that protect internal components
Opening the lamp compartment reveals more than just a bulb; it exposes the heart of the projector. That’s why gentle handling is essential when practicing how to change a projector lamp bulb. Most lamp modules slide out as a single unit, designed to minimize direct contact. Pulling at an angle or forcing resistance is where trouble starts.
Metal housings can retain heat longer than expected. Even after cooling, internal edges may still feel warm. Wearing clean, lint-free gloves reduces direct contact and keeps surfaces uncontaminated. This small habit prevents residue buildup that can affect heat dispersion.
Placement after removal matters too. Setting the old lamp on a stable, non-flammable surface avoids accidental damage. Cracked housings or shattered bulbs release debris that’s difficult to clean safely. Controlled handling keeps the process clean and predictable.
It’s also wise to inspect the compartment before inserting the new lamp. Dust or loose fragments can obstruct airflow or seating. A quick visual check saves future headaches. Precision here protects more than just the lamp.
Installing the new lamp without risking early failure
Installation is where patience pays off most. Sliding the new lamp into place should feel smooth, not forced. If resistance appears, alignment is likely off. Correct positioning ensures proper electrical contact and cooling efficiency.
Securing screws evenly prevents vibration during operation. Over-tightening can warp the housing, while loose screws invite rattling and misalignment. Balanced pressure keeps everything stable once the projector powers on. This balance is a hidden factor in lamp longevity.
Direct contact with the bulb surface should always be avoided. Oils from skin create hot spots that weaken the lamp over time. If accidental contact happens, cleaning gently with isopropyl alcohol helps restore surface integrity. Small precautions extend usable life significantly.
Once installed, replacing the access panel properly is non-negotiable. Many projectors won’t operate if the panel isn’t secured. This safety design prevents exposure to heat and light leakage. Respecting these safeguards keeps the system intact.
Resetting lamp timers and confirming proper operation
After installation, many people forget a crucial digital step. Projectors track lamp usage internally, and failing to reset the timer causes false warnings. Accessing the menu and resetting the counter aligns software with reality. This step completes the physical work logically.
Initial power-up should be deliberate. Listen for fan behavior and watch how the image stabilizes. Flickering, unusual noise, or dim output signal alignment or seating issues. Addressing them early prevents cumulative damage.
Brightness consistency during the first session matters. A stable image indicates proper airflow and electrical connection. Any rapid dimming suggests deeper issues that shouldn’t be ignored. Observation during this stage is protective, not paranoid.
Once confirmed, routine habits keep the lamp healthy. Regular filter cleaning and mindful shutdown practices reduce stress on the new component. These habits tie directly into other lighting decisions at home, such as choosing fixtures suited for specific environments like lighting tips or outdoor accents such as solar lights. Even specialized setups, including grow lighting, follow the same principle of respecting heat and airflow.
Common mistakes that shorten projector lamp lifespan
Even after learning how to change a projector lamp bulb, many users unknowingly repeat habits that undo their efforts. One of the most common mistakes is cutting power immediately after use. Projectors depend on internal fans to cool the lamp gradually, and skipping that process traps heat inside. Over time, this habit causes micro fractures that reduce brightness and reliability.
Another frequent issue is ignoring air filters. Clogged filters restrict airflow, forcing the lamp to operate at higher temperatures than intended. This heat stress doesn’t show instant damage, but it steadily eats away at lamp life. Regular filter cleaning is a low-effort habit with a high payoff.
Placement also plays a role people tend to underestimate. Setting a projector near walls or inside tight cabinets limits ventilation. Heat has nowhere to escape, and the lamp takes the hit. Open space around vents isn’t optional; it’s part of the design.
Finally, there’s the temptation to buy the cheapest replacement lamp available. While it may fit physically, inconsistent quality often leads to uneven brightness or premature failure. Investing in a compatible, well-reviewed lamp protects both image quality and internal electronics. Saving a few dollars upfront can cost much more later.
How environment and room setup affect lamp performance
The room where a projector lives shapes how often how to change a projector lamp bulb becomes necessary. Dust-heavy environments slowly clog intake vents, increasing internal temperatures. Even homes that look clean can accumulate fine particles near electronics. Routine maintenance offsets this invisible threat.
Ambient temperature matters more than most expect. Projectors used in warm rooms work harder to stay cool, pushing lamps closer to their limits. Simple steps like improving ventilation or lowering room temperature during use make a measurable difference. Heat management is quiet but powerful.
Lighting choices in the room also influence projector strain. When ambient light is poorly balanced, users crank up projector brightness to compensate. That extra output shortens lamp life significantly. Thoughtful lighting placement, similar to selecting the right floor lamp for sensitive spaces, reduces the need for excessive brightness.
Reflective surfaces and wall colors add another layer. Light-colored or glossy walls reflect more ambient light back to the screen, again encouraging higher brightness settings. Managing these elements keeps the projector working within comfortable limits. Balance beats brute force every time.
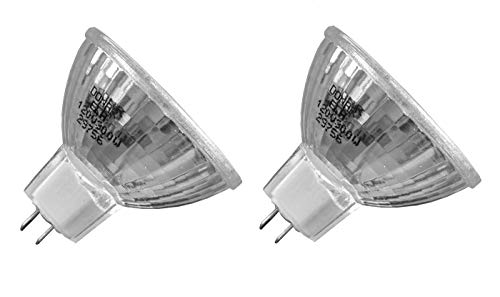
Signs it is time to replace the lamp before failure
Waiting for total failure isn’t always the smartest move with how to change a projector lamp bulb. Gradual dimming is often the first warning sign. Colors lose depth, whites look gray, and contrast feels flat. These changes happen slowly, making them easy to ignore.
Another signal comes from startup behavior. Longer warm-up times or occasional flickering suggest the lamp is struggling. These symptoms indicate uneven output rather than complete burnout. Replacing the lamp early restores stability and prevents stress on power components.
Warning messages or indicator lights shouldn’t be dismissed. While projectors estimate lamp life conservatively, those alerts exist for a reason. Continuing to run a lamp beyond its rated hours increases the risk of rupture. Proactive replacement avoids messy internal damage.
Sound can also be a clue. If fans suddenly run louder than usual, they may be compensating for excess heat. That heat often traces back to an aging lamp. Paying attention to these subtle cues keeps maintenance predictable instead of urgent.
Comparing original lamps and third party alternatives
Choosing between original and third-party lamps is a common crossroads in how to change a projector lamp bulb. Original manufacturer lamps offer consistency and precise compatibility. They’re engineered for airflow, voltage, and brightness specific to each model. That reliability often justifies the higher price.
Third-party lamps vary widely in quality. Some reputable brands match original specifications closely, while others cut corners. Inconsistent materials lead to uneven brightness or color shifts. Reading detailed reviews becomes essential when exploring alternatives.
Warranty considerations matter too. Some projector manufacturers limit coverage if non-original lamps are used. While this doesn’t always void warranties outright, it complicates service claims. Knowing these terms ahead of time prevents unpleasant surprises.
Ultimately, the decision hinges on usage patterns. Occasional home users may find quality third-party lamps acceptable. Heavy users or professional settings benefit from original components. Matching the lamp choice to usage intensity keeps expectations realistic.
Long term habits that extend projector and lamp life
Maintenance doesn’t stop after learning how to change a projector lamp bulb. Small, consistent habits stretch both lamp and projector lifespan. Allowing full cooldown before unplugging becomes second nature over time. That single habit reduces internal heat stress dramatically.
Scheduled cleaning prevents silent damage. Dusting vents, wiping housings, and checking filters keep airflow unobstructed. These tasks take minutes but protect hundreds of hours of use. Prevention beats replacement every time.
Power management is another quiet hero. Using a surge protector shields the lamp from voltage spikes that weaken internal components. Stable power keeps brightness consistent and electronics healthy. It’s an inexpensive layer of insurance.
Finally, aligning room lighting reduces unnecessary strain. Thoughtful choices, similar to selecting a balanced pendant light for ambient illumination, help maintain comfortable brightness levels. When the projector doesn’t have to fight the room, it lasts longer. Good habits turn maintenance into a background routine rather than a recurring headache.


Best Outdoor Light Bulb Reviews: Top-Rated Picks for 2026

Best Yellow Fog Light Bulb 2026 For Clearer Night Drives

Best Z Wave Light Bulb 2026 Top Picks For Smart Control

Best Vintage Light Bulb 2026 With Style And Glow

Best LED Reading Light Bulb Reviews - Top Picks for 2026

Best Light Bulb to Mimic Sunlight - Top Picks 2026

7 best light bulb to heat dog house picks that work

Best Bluetooth Speaker Light Bulb 2026 With Style And Power





