
How to Change Ceiling Fan Pull Chain Switch Easily
Changing a ceiling fan pull chain switch might sound tricky, but it’s more manageable than most think. With the right approach, you can replace or repair the switch without struggling with tangled wires or awkward angles. A properly functioning pull chain switch ensures your fan operates seamlessly, from gentle breezes to full-speed airflow.
Many stumble over removing the old switch or identifying the correct wiring. Attention to detail can prevent common pitfalls like reversed connections or loose fittings. Small adjustments and proper alignment make the replacement process smoother, reducing the risk of damaging other components. Safety and precision are key.
Once replaced, the fan’s pull chain responds instantly, restoring effortless control. Quick troubleshooting tips, such as checking for corrosion or worn contacts, help maintain long-term performance. Adequate lighting and a stable ladder also contribute to safer, more efficient installation. The combination of practical know-how and simple tools turns a potentially frustrating task into a straightforward upgrade.
Regular maintenance of the pull chain switch can prevent sudden failure, ensuring consistent performance over the years. Understanding the mechanics of the chain and switch connection helps anticipate wear and respond before complete malfunction. With proper guidance, replacing the switch enhances your ceiling fan’s reliability and overall comfort.
How to Change Ceiling Fan Pull Chain Switch
Few annoyances compare to a ceiling fan that refuses to respond to your pull. Sluggish or broken pull chains disrupt comfort and can turn a relaxing evening into a fiddly frustration. Tackling this issue requires knowing which parts matter most and how to replace them without accidentally harming the fan or yourself. A little patience and attention to detail can make the replacement process smooth and surprisingly quick, bringing a sense of control back to your room’s airflow.
Pull Chain Switch Basics
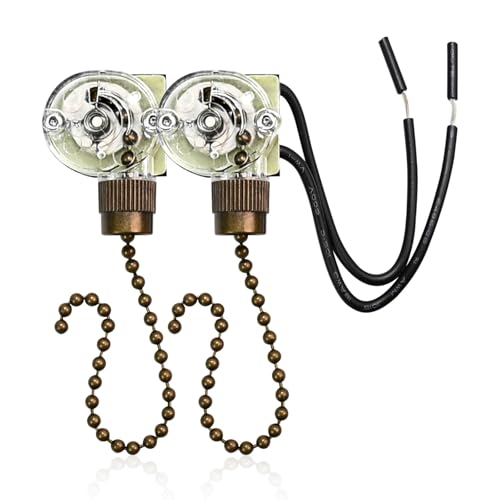
The pull chain switch is the central mechanism that dictates fan speed and light operation. These switches wear out over time, especially in high-use households. Identifying a faulty switch early prevents repeated frustration with inconsistent fan response. Ensuring you have the right replacement switch, matching your fan's model and voltage, is critical to success.
Loose or damaged chains often lead to partial engagement, where the fan reacts unpredictably. Recognizing the signs like intermittent speed changes or a chain that hangs oddly helps prevent further mechanical stress. Proper inspection also highlights worn contacts and bent connectors, which are common culprits behind a non-responsive fan.
Replacing the switch restores full functionality and smooth operation. It’s important to work with the fan powered off and, ideally, from a stable ladder to avoid strain or accidents. Tools like needle-nose pliers and screwdrivers are essential for safe removal and installation.
Maintenance also plays a role. Keeping the pull chain clean and free from dust accumulation extends the switch’s lifespan, reducing the frequency of replacements. Proper lubrication of internal contacts can further enhance responsiveness and longevity, ensuring that the fan operates quietly and reliably.
Tools and Safety Measures
Before diving into the replacement, assemble essential tools: screwdrivers, a voltage tester, pliers, and possibly a small flashlight. These items address both convenience and safety, minimizing the risk of short circuits or accidental damage. Checking power status with a voltage tester ensures that wires are safe to handle.
Wearing gloves can improve grip and prevent minor cuts, while a secure ladder prevents slips and awkward reaches. Positioning the ladder correctly and keeping the area well-lit allows for better visibility of wiring and components. Clear workspace also reduces accidental bumps that could damage the fan blades or surrounding walls.
Marking wire positions or taking a photo before disconnecting anything ensures a smooth reinstallation process. This small step prevents miswiring, which can result in reversed operation or potential hazards. Following manufacturer guidelines keeps the replacement process aligned with mechanical integrity standards.
Inspecting the fan body for cracks, bent blade brackets, or worn connectors is also crucial. Identifying structural weaknesses allows for corrective action before replacing the switch, ensuring the entire fan remains reliable. Solid preparation sets the stage for a hassle-free replacement and reliable post-installation performance.
Removing the Old Switch
Accessing the pull chain switch requires careful removal of the fan’s light kit or canopy. Loosening screws gradually prevents misalignment or damage. Observing how the switch fits within the housing helps avoid unnecessary force, which could break delicate components.
Detach the chain gently, noting its attachment method and any retaining clips. Pulling too hard can snap the chain or bend the switch terminals, complicating installation. Ensuring that wires remain intact and labeled minimizes confusion later.
Sometimes, the switch may be stuck due to dust or rust. Applying a small amount of lubricant or gently rocking the switch can free it without causing internal damage. Patience here preserves the fan’s overall mechanism strength.
Once removed, examine the old switch for signs of wear, such as bent contacts or burnt connectors. This evaluation can indicate why the previous chain failed, guiding care during the new installation. Retaining the old switch temporarily also helps confirm compatibility if the replacement is slightly different in configuration.
Selecting the Right Replacement
Choosing a compatible pull chain switch is critical. Match the voltage, speed configuration, and connector type with your fan’s specifications. Incompatible switches can result in erratic speed control or damage to the fan motor. Checking the fan model and consulting the manufacturer ensures correct selection.
Consider features like built-in lighting control or speed presets. These enhancements can add convenience without requiring additional components. Some switches offer smoother operation and longer life due to higher-quality contacts, which reduces future maintenance needs.
Pay attention to chain length and durability. A chain that’s too short or fragile increases the likelihood of snapping again. Upgrading to a sturdier chain or switch mechanism can prevent recurring issues, providing both reliability and user confidence.
Using replacement parts from reputable suppliers ensures adherence to electrical safety standards. Avoid generic or off-brand switches that may fail prematurely or create hazards. Investing in quality parts pays off in longer-lasting performance and less frustration.
Installation Procedure
Begin by connecting the wires carefully, matching them according to the previously noted or photographed configuration. Secure each connection with wire nuts and check for tightness to prevent loose contacts, which can lead to flickering or inconsistent fan speed.
Attach the new switch firmly within the housing, ensuring it aligns with the pull chain slot. Misalignment can cause the chain to jam or wear prematurely. Gently pull the chain to verify smooth movement before fully reassembling the canopy or light kit.
Replace any screws or mounting brackets removed during disassembly. Maintaining the original tension prevents vibrations that can loosen the switch over time. Testing the fan before full reassembly confirms proper function across all speeds and any connected lighting.
Finally, tidy up the wiring and ensure no strands are exposed. Proper insulation and arrangement reduce the risk of shorts and prolong switch durability. The fan should respond instantly to chain pulls, restoring both comfort and ease of control.
Dealing with Common Issues
Occasionally, the replacement switch may not function as expected. Check for reversed wiring, loose connections, or faulty replacement parts. Troubleshooting early prevents repeated removals and further wear on components.
Sticky or stiff chains often indicate minor alignment issues or insufficient lubrication. Adjusting the switch position slightly or applying a small amount of contact-safe lubricant can restore smooth operation. Maintaining the correct chain path minimizes friction and prolongs lifespan.
Electrical surges or poor voltage regulation can cause premature wear. Installing a surge protector or monitoring household voltage can prevent early failure of the pull chain switch. Stable power supply enhances performance and reduces maintenance frequency.
Environmental factors, such as high humidity or dust accumulation, also affect switch longevity. Regular cleaning and ensuring a dry installation environment can prevent corrosion and sticking, keeping the fan responsive over years of use.
Maintaining Switch Longevity
Routine care significantly extends the life of your ceiling fan pull chain switch. Clean the chain and switch housing periodically to remove dust and debris. This simple step prevents buildup that could interfere with movement.
Inspect the chain for kinks or wear marks. Replacing a slightly damaged chain before complete failure prevents stress on the switch mechanism. Smooth operation reduces strain on both the chain and internal contacts.
Consider gentle lubrication of internal contacts with manufacturer-approved oils. Avoid excessive application, which can attract dirt. Consistent maintenance keeps the switch responsive and quiet, preserving both function and user satisfaction.
Document any adjustments or replacements. Keeping track of maintenance schedules can prevent unexpected failures and ensures that the key factors safety, efficiency, and smooth operation remain intact.
Troubleshooting Unexpected Problems
If the fan behaves erratically after installation, recheck connections and confirm correct wire matching. Loose or misaligned wires can cause speed inconsistencies or prevent light operation.
Test the fan at each speed setting to verify that all contacts engage properly. Intermittent function often signals a contact issue inside the switch, requiring slight adjustments. Regular observation helps catch problems before they escalate.
Listen for unusual sounds, such as clicks or hums, indicating mechanical interference or electrical resistance. These subtle indicators often reveal hidden issues that, if addressed promptly, prevent larger repairs.
Replacing the switch with another unit may sometimes be necessary if defects exist. Ensuring the new unit matches specifications avoids repeated troubleshooting and ensures consistent performance for the long term.
Enhancing Fan Control Experience
Modern pull chain switches offer improved ergonomics and smoother control. Longer chains with comfortable grips enhance ease of use, reducing awkward stretching. Selecting switches with clear tactile feedback improves speed recognition without needing to count pulls.
Adding features like multi-speed presets or integrated light control can upgrade the fan experience. This streamlines operation and eliminates guesswork when adjusting settings. Smooth, responsive chains make daily use more satisfying and reduce frustration.
Small improvements, like replacing worn chains or adding chain extensions, directly affect usability. Users benefit from consistent response and effortless adjustment, keeping the fan’s functionality in peak condition.
Combining practical maintenance with thoughtful upgrades maximizes comfort and longevity. Attention to control quality, chain strength, and speed precision ensures a ceiling fan operates reliably, quietly, and efficiently for years.
Advanced Techniques for Ceiling Fan Pull Chain Switch Repair
Even after replacing a ceiling fan pull chain switch, subtle issues can persist. Fans may click, skip speeds, or respond inconsistently due to wiring misalignment or mechanical wear. Addressing these problems ensures your fan runs smoothly and quietly, preventing frustration and repeated tinkering. Knowing how to troubleshoot and fine-tune the switch enhances both comfort and confidence during maintenance tasks.
Fine-Tuning the Pull Chain Mechanism
Adjusting the pull chain for optimal tension prevents the switch from sticking or skipping. Chains that are too loose or tight can strain internal contacts, leading to premature failure. Regularly checking the chain's alignment ensures effortless operation, while minor tweaks can restore smooth response. This attention to detail improves both durability and reliability of the switch.
Lubricating moving parts with contact-safe oils reduces friction, which helps maintain consistent speed engagement. Avoid over-lubricating, as excess can attract dust and cause binding. Smooth operation prevents sudden jerks or partial activation that often frustrates users.
Some fans include adjustable link points within the chain mechanism. Positioning these correctly balances pull force and travel distance, enhancing the key factor of user control. Simple adjustments like this reduce wear on both the chain and switch housing.
Proper tension also ensures that the switch fully engages each speed setting, eliminating inconsistent airflow or unintended light toggling. Well-calibrated chains extend the life of your mechanical components while keeping operation quiet and seamless.
Addressing Electrical Issues
Erratic fan operation often stems from wiring or contact problems within the switch. Loose connections or reversed wires can cause speeds to skip or lights to flicker. Rechecking each connection ensures the main key of proper electrical contact is restored. Using a voltage tester can confirm safe and consistent current flow.
Oxidation or corrosion on switch terminals may also reduce conductivity. Cleaning contacts gently with a soft brush or contact cleaner improves performance and prevents arcing. Regular inspections prevent minor faults from escalating into larger issues.
Fans experiencing intermittent operation may benefit from surge protection. Fluctuating voltage can wear out switch contacts prematurely. Ensuring stable power supply supports long-term switch functionality and avoids repeated replacements.
Integrating proper electrical care with mechanical maintenance creates a robust system, keeping the fan responsive, quiet, and safe for daily use. This combination addresses the common pain points of inconsistent speeds and chain failures.
Dealing with Noisy or Clicking Fans
Clicking or humming sounds can indicate friction, loose parts, or defective components within the pull chain switch. Identifying the exact source reduces guesswork and prevents further damage. Tightening screws, realigning chains, or replacing worn contacts often eliminates these noises.
Fans may also click if blades are misaligned or mounting brackets are loose. Ensuring all mechanical parts are secured reinforces switch stability and overall fan performance. Minor adjustments can dramatically reduce vibration and operational noise.
For persistent clicks, checking the switch itself for internal wear is crucial. Some replacement switches include higher-grade contacts that minimize sound during speed changes. Upgrading to these components improves the key factors of responsiveness and longevity.
Properly addressing noise not only enhances comfort but also signals that all mechanical and electrical components are aligned and functioning optimally. Users can enjoy smooth, silent operation without repeated interruptions.
Optimizing Lighting Control Integration
Fans with integrated lights require careful attention to the pull chain switch’s dual control. Ensuring separate contacts for fan and light functions prevents accidental toggling. Proper wiring and correct switch type are critical for stable operation.
Some fans benefit from upgrading to switches with distinct speed and light settings. These allow precise adjustment without interfering with the other function. The result is a stronger and more reliable control system that meets daily comfort needs.
Adjusting the pull chain so that both fan and light operate independently reduces wear on contacts. Smooth, distinct activation enhances both safety and performance. Maintaining clear differentiation between controls prevents confusion and accidental overload.
Integrating high-quality LED lighting also enhances energy efficiency and visual comfort. Consider pairing with best led recessed light fixtures for improved illumination without compromising fan control responsiveness.
Replacement Tips for Hard-to-Reach Fans
Ceiling fans mounted on high or vaulted ceilings can make pull chain replacement challenging. Using an adjustable ladder and lightweight tools enhances safety and efficiency. Stability is key to ensuring that wiring and switch components are handled without stress.
Fans in difficult locations may benefit from extending the pull chain or installing auxiliary handles for easier access. Correct positioning prevents excessive pulling force, which can wear down the switch. Small modifications significantly improve key factor usability.
For fans prone to clicking due to high ceilings or vibrations, applying the techniques in how to fix clicking ceiling fan can complement switch replacement efforts. These adjustments reinforce mechanical reliability and minimize noise.
Combining safety practices with precise installation ensures that even hard-to-reach fans operate smoothly and respond to the pull chain as intended, restoring comfort across rooms.

Maintaining Long-Term Performance
Regular inspection of the pull chain and switch is critical for preserving durability and efficiency. Check for signs of wear, kinks, or loose contacts every few months. Timely intervention prevents larger issues and extends component lifespan.
Periodic cleaning of contacts, chains, and housing ensures smooth operation. Dust or debris accumulation can impair response, leading to uneven fan speeds. Maintaining a clean mechanism supports consistent functionality and user confidence.
Consider adding surge protection or stabilizing voltage to protect the switch from electrical fluctuations. Preventing contact degradation maintains responsiveness and reduces replacement frequency. These measures directly enhance the main key factors of reliability and comfort.
Documenting maintenance routines allows for timely replacements or upgrades. A proactive approach ensures that the fan continues to provide smooth, responsive airflow and lighting control for years.
Practical Upgrades for Enhanced Control
Modern pull chain switches offer advanced features, including multi-speed presets, tactile feedback, and ergonomic chain handles. These enhancements improve comfort and precision, allowing effortless adjustments. Upgrading to high-quality switches enhances both key factors and long-term performance.
Installing additional accessories, like extension chains or decorative handles, improves usability without interfering with function. These minor changes prevent overextension and reduce wear on the switch mechanism. User experience benefits immediately.
Advanced switches also accommodate dimmable lighting or programmable speeds, providing both convenience and energy savings. Pairing with best ceiling fan for vaulted ceiling designs can maximize airflow and aesthetic integration.
Simple upgrades, combined with routine maintenance, ensure that your ceiling fan operates reliably, quietly, and efficiently. This approach addresses the most common pain points while enhancing day-to-day usability.
Routine Checks and Troubleshooting
Even after successful replacement, occasional troubleshooting helps maintain performance. Look for loose screws, worn chain links, or inconsistent electrical contacts. Timely correction prevents minor issues from escalating.
Listen for unusual sounds like clicking, humming, or irregular fan speed changes. These often indicate mechanical misalignment or electrical wear. Prompt action keeps the key factors of safety, smooth operation, and durability intact.
Document observations and any minor interventions. Tracking changes allows for better planning of future maintenance or upgrades, ensuring that the pull chain switch continues to meet user expectations.
Consistent care, combined with the tips and techniques outlined, guarantees that ceiling fans remain fully functional, responsive, and comfortable to operate throughout their lifespan.


Best Small Flush Mount Ceiling Fans 2026 Ultimate Picks

Best Smart Ceiling Fan India 2026 For Effortless Comfort

Best Smart Ceiling Fans with Lights for 2026: Top Picks

Best Smart Home Non Ceiling Fans 2026 For Ultimate Comfort

Best Outdoor Misting Ceiling Fan 2026 For Ultimate Comfort

Best Ceiling Fans With Lights For Vaulted Ceilings 2026 Top Picks

Best Outdoor Ceiling Fans For Porch 2026 With Style And Breeze

Best WiFi Enabled Ceiling Fan 2026 For Effortless Comfort





