
How to Check Fluorescent Ballast: Your Essential Guide
How to check fluorescent ballast – a seemingly complex task, but crucial for maintaining your lighting systems. A well-functioning fluorescent ballast ensures the longevity of your lights and ultimately contributes to cost and energy savings. In this guide, you'll grasp an understanding of this often overlooked yet essential component of your fluorescent lighting system.
We’ll delve into the ins and outs of examining your fluorescent ballast, spotlighting the signs of a faulty ballast and how to address them. By the end, you will be equipped with the skills necessary to troubleshoot common fluorescent ballast issues, promoting a safer and more efficient lighting environment. So, fasten your seatbelts for this illuminating journey into the world of fluorescent ballasts!
Deciphering the Complexities of Fluorescent Ballasts
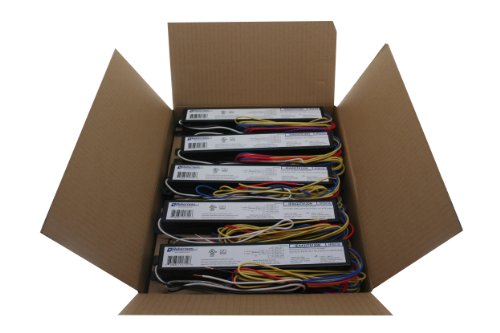
Let's start by demystifying the often complex world of fluorescent ballasts. In simplest terms, a ballast is an electrical component used in fluorescent lights to regulate the current passing through the tube. It serves a crucial role in initiating the start-up process and maintaining optimal light output without overheating the bulb. The ballast performs this duty by transforming the power from your electrical grid into a suitable form for your light fixture. Without a well-functioning ballast, your fluorescent lights may flicker, buzz, or even fail to turn on.
It's easy to overlook the importance of a well-functioning ballast until your fluorescent lights start misbehaving. Fortunately, you don't need to be an electrical whiz to check if your ballast is in good shape or requires replacement. A malfunctioning ballast may cause your lights to flicker, fail to start, or shine less brightly than usual. Moreover, in extreme cases, a defective ballast can even pose a fire hazard, making it crucial to spot and resolve any issues swiftly.
While professional electricians are well-versed in handling these components, having some knowledge about checking a ballast's health can save you from potential hazards and costs. Whether you're a DIY enthusiast or someone seeking to understand your home's lighting system better, a basic understanding of how to check a fluorescent ballast can prove beneficial.
It's worth noting that there are different types of ballasts: magnetic and electronic. Magnetic ballasts are older, bulkier, and operate at a higher temperature. In contrast, electronic ballasts are more efficient, run cooler, and are often quieter. They are, however, more complex and can be more challenging to diagnose.
Preliminary Symptoms and Observations
Before we dive into the technical details of checking a fluorescent ballast, it's worth paying attention to some preliminary symptoms and observations. Sometimes, you can diagnose a problem simply by observing the behavior of your fluorescent light. For instance, flickering or dimming lights often point towards a problematic ballast.
One common sign of a defective ballast is a buzzing or humming noise. If your light is producing an unusually loud buzzing sound, it could indicate that your ballast is on its last legs. Another symptom is a delay in the light turning on. If the light takes more than a few seconds to start, or doesn't turn on at all, there's a good chance the ballast is the culprit.
Sometimes, the signs are more subtle. If your lights are burning out quicker than they should, the problem might not be with the bulbs but with the ballast. A faulty ballast can send too much current through the bulbs, causing them to burn out prematurely. In extreme cases, the ballast can even become too hot to touch, posing a safety risk.
However, remember that these signs are not definitive proof of a faulty ballast. Other issues, such as wiring problems or defective starters, can cause similar symptoms. Therefore, further testing is required to confirm the issue.
A Step-by-Step Guide to Checking Your Ballast
Once you've observed the preliminary symptoms, it's time to move on to a more detailed check. Remember, safety is paramount when dealing with electrical components. Always switch off and unplug your light fixture before starting any testing.
Firstly, you'll need to access the ballast. It's usually located behind the light fixture. You may need to remove the cover, depending on your fixture's design. Once you've located the ballast, check for any visible signs of damage, such as bulging, leaking, or scorch marks. Any of these could indicate a faulty ballast.
Secondly, test the voltage. To do this, you'll need a multimeter, an essential tool for any DIY electrician. Set your multimeter to the voltage setting, then place one probe on the hot wire and the other on the neutral wire. The reading should match the voltage listed on the ballast. If the voltage is significantly lower, it's a sign your ballast needs replacement.
Thirdly, you can use your multimeter to check the continuity of the ballast. Set your multimeter to the ohms setting, then touch the probes to the ballast's input wires. If you get a reading of zero or a very low number, this indicates good continuity. A high number or no reading at all suggests your ballast is faulty.
Lastly, for electronic ballasts, you may need to test the output voltage. This process is more complex and typically best left to professionals. If you've made it this far and your ballast still appears faulty, it might be time to call in an electrician.
Making the Decision: Repair or Replace?
Now that you've done your checks and identified a faulty ballast, the next step is to decide whether to repair or replace it. This decision primarily hinges on the type of ballast and the extent of the damage.
If you have a magnetic ballast, it might be worthwhile to consider an upgrade. As we noted earlier, magnetic ballasts are less efficient, noisier, and more prone to overheating. Replacing a faulty magnetic ballast with an electronic one can bring benefits in terms of energy efficiency and performance.
However, if your electronic ballast is defective, the decision is more complex. If the damage is minor, a repair might be possible. But keep in mind that electronic ballasts are intricate devices. Repairs should only be carried out by a qualified electrician and can sometimes be more expensive than a replacement.
Additionally, you should weigh up the cost of repair or replacement against the potential risk. Remember, a faulty ballast can be a safety hazard, especially if it's overheating. The peace of mind from replacing a defective ballast might be worth more than the cost saving from a repair.
Enlightening Your Future: Understanding Fluorescent Ballasts
Throughout this journey, we've illuminated the intricacies of fluorescent ballasts and provided a clear path to follow when troubleshooting these crucial components. Now, not only do you know the symptoms of a faulty ballast, but you also understand how to check it and make an informed decision on repair or replacement.
There's no denying the importance of a functioning ballast in the health of your fluorescent lights. But more than that, understanding how to check a fluorescent ballast empowers you to take control of your lighting system, making your space safer and more efficient.
As you continue to enlighten your knowledge in this area, always remember the key points discussed in this article: the role of a ballast, the signs of a faulty one, the steps to check it, and when to decide between repair or replacement. With this knowledge in hand, you're ready to shine a light on any ballast issues that come your way.


Best Rechargeable LED Light Bulbs 2026 For Brighter Living
Best Grow Light For Single Plant 2026 Top Picks

Best Track Lighting for Vaulted Ceiling 2026 Top Picks

Best Track Lighting For Studio 2026 Top Picks And Insights
Best Color Light for Tracking Bloodtrail 2026 Top Picks

Best Track Lighting Heads Pendants 2026 Brighten Spaces Smartly
Best Track Lighting for Small Kitchen 2026 Brighten Every Corner

Best Track Lighting For Painting Studio 2026 Top Picks





