
How To Check Table Fan Capacitor With Multimeter
How To Check Table Fan Capacitor With Multimeter becomes a real lifesaver once a fan starts acting up out of nowhere. One day it spins smoothly, then suddenly the blades crawl like they’re stuck in mud, or worse, the motor hums without moving at all. Plenty of people toss the whole fan aside thinking the motor’s dead, yet a tiny capacitor often causes the mess. That little part quietly controls startup power, and once it weakens, airflow drops fast and frustration kicks in.
Burning smells, sluggish spinning, rattling noises, and overheating usually don’t happen randomly. Those warning signs point toward electrical imbalance inside the fan, especially around the capacitor. A multimeter helps narrow things down without ripping every component apart or wasting money on unnecessary replacements. Also, checking the capacitor early can prevent extra strain on the motor, which matters because replacement motors aren’t always cheap or easy to find.
Plenty of table fans sit unused in storage because troubleshooting feels intimidating. Honestly, the process isn’t nearly as scary as it sounds. A basic multimeter, a little patience, and a safe setup can reveal whether the capacitor still holds charge properly or has completely failed. Small maintenance steps like this save time, reduce clutter, and help avoid tossing out appliances that still have years left in them.
How To Check Table Fan Capacitor With Multimeter also matters for people dealing with inconsistent cooling during hot afternoons or humid nights. Weak airflow can make a room feel stuffy even when the fan runs nonstop. Instead of blaming dust buildup or worn blades every single time, testing the capacitor gives a more accurate picture of what’s really happening inside the housing. That clarity helps avoid guesswork and keeps repairs practical instead of chaotic.
Another thing people often overlook is how different capacitor problems create different symptoms. A completely dead capacitor may stop the blades entirely, while a weak one might only reduce speed or require a manual push to start spinning. Those tiny clues make troubleshooting easier once you know what to watch for. So yeah, paying attention to startup behavior can tell you a lot before you even touch the multimeter.
Safety matters too, and that’s where many beginners hesitate. Capacitors can still hold electrical charge after the fan gets unplugged, which surprises plenty of first-timers. Proper discharge steps and careful testing routines reduce the risk dramatically. Once the process becomes familiar, checking a capacitor feels less like complicated electrical work and more like routine household maintenance.
How To Check Table Fan Capacitor With Multimeter
A fan that hums, stalls, or needs a finger push before spinning can make a hot room feel ten times more annoying. The motor may sound alive, yet the blades barely move, and that gap between noise and airflow usually points toward a weak capacitor. Learning how to check table fan capacitor with multimeter helps separate a simple electrical fault from a worn motor, a dirty shaft, or a jammed blade assembly. That matters because a small capacitor replacement can often save a fan that still has plenty of life left.
Capacitor Clues
A table fan capacitor has one main job: it gives the motor the starting boost needed to rotate the blades from a dead stop. Once that part gets weak, the motor may still hum because electricity reaches it, but the blade won’t spin with normal force. That’s why a fan can seem “almost working” and still feel useless during a hot afternoon. This half-alive behavior is one of the biggest clues that the capacitor deserves testing before anything else gets replaced.
Slow startup is another common sign, especially if the fan takes several seconds to reach speed. A healthy fan should move with a clean, confident start, not crawl into action like it just woke up from a nap. A weak run capacitor can also make speed settings feel oddly similar, so low, medium, and high don’t feel very different. That small detail can save a lot of guesswork because speed control problems often get blamed on the switch too quickly.
A buzzing sound with no blade movement should get attention right away. That sound suggests the motor is energized but not receiving the phase shift it needs to start properly. Letting the fan sit there and buzz can heat the motor winding, which isn’t worth the risk. So, unplugging the fan and checking the capacitor with a multimeter is the smarter move before the problem spreads.
Capacitor issues can look a lot like dust buildup, dry bearings, or bent blade guards, so don’t jump to one cause too fast. Spin the blade by hand after unplugging the fan and feel for drag, scraping, or stiffness. Smooth blade movement paired with poor startup makes the capacitor suspicion stronger. That simple check keeps the repair process grounded instead of turning into a parts-swapping circus.
Safety First
Capacitors can hold a charge even after the fan is unplugged, and that catches plenty of people off guard. The voltage in a small table fan capacitor usually isn’t as intimidating as large appliance components, but it still deserves careful handling. Always unplug the fan before opening the housing, then give the circuit a moment before touching internal parts. A safe repair starts with patience, not speed.
Discharging the capacitor is a basic step before testing. Many people use an insulated screwdriver or a resistor method, but the safer habit is to avoid touching bare terminals with your fingers at any stage. The goal is to remove stored energy without creating a spark show or damaging the part. Using insulated tools and working on a dry surface keeps the process calmer and cleaner.
Good lighting matters more than it sounds. Fan wiring can be cramped, dusty, and awkward, especially in compact table models with tight rear housings. Take a quick phone photo before removing wires so reconnection doesn’t turn into a guessing game. That one tiny habit protects the original wiring layout and helps prevent a simple capacitor test from becoming a new electrical problem.
Household repairs often overlap with other projects, so keep tools organized instead of scattering screws across the floor. Separately, if a home project also involves refreshing lighting fixtures, compare paint for fabric lamp shade for a cleaner finish without making the shade stiff or blotchy. The same practical mindset applies here: small details, careful prep, and a steady hand usually beat rushing. Table fan capacitor testing rewards that same slower, cleaner approach.
Multimeter Setup
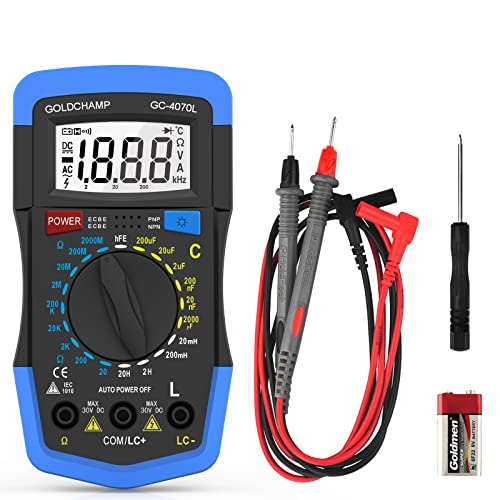
A digital multimeter with a capacitance setting makes this job much easier. Look for the symbol often marked as “CAP” or a setting that measures microfarads, shown as µF. Most table fan capacitors are labeled with a microfarad value on the body, such as 1.5µF, 2µF, or 2.5µF, though the exact rating depends on the motor design. Matching the meter reading against that printed rating is the heart of capacitor diagnosis.
Before measuring, disconnect at least one capacitor lead from the circuit. Testing while the capacitor stays connected can give a misleading reading because other components may influence the result. That’s a small nuisance, sure, but it keeps the result more honest. A clean reading from the capacitor alone is far more useful than a number polluted by the fan’s internal wiring.
Set the multimeter to capacitance mode, then place one probe on each capacitor terminal. Polarity usually doesn’t matter for typical AC fan capacitors, but steady probe contact does. If the reading lands close to the labeled value, the capacitor is likely still usable. If it reads far below the printed rating, shows zero, or refuses to stabilize, the capacitor may be failing.
Some basic meters don’t include a capacitance setting. In that case, the resistance mode can offer a rough clue, though it’s not as reliable. A working capacitor may briefly show movement on the meter, then drift as it charges from the meter’s small test current. That behavior isn’t a perfect pass, but a dead short, no movement, or constant zero points toward a bad electrical component.

Reading The Results
The label on the capacitor tells you what the reading should be near, but real-world parts often have tolerance. A capacitor marked 2µF may not read exactly 2.00µF, and that’s normal within a reasonable range. Trouble starts when the reading drops far below the printed value or jumps around without settling. That unstable behavior often explains weak startup, uneven speed, and the fan needing help to begin spinning.
A reading of zero usually means the capacitor has failed open or the meter isn’t making proper contact. Check the probes, clean the terminals gently, and test again before blaming the part. If the result stays at zero, the capacitor probably can’t store energy anymore. That makes replacement the practical next step, especially if the fan already showed humming or stalled blades.
A very low resistance reading can suggest a shorted capacitor, which is more serious. A shorted part may stress the motor and wiring, so don’t keep powering the fan to “see what happens.” That’s asking for heat, smell, and more damage. Replacing a shorted capacitor with the correct rating protects the fan motor from extra strain.
Repair work also teaches the value of matching control tools to the device, not just grabbing whatever looks close. For a separate camera setup that needs steadier hands-off shooting, explore remote control for canon 80d to reduce shake during stills and video. The lesson carries over nicely: right tool, right rating, right connection. A table fan capacitor should be replaced by capacitance value, voltage rating, and physical fit, not by guesswork.
Common Testing Mistakes
One common mistake is testing the capacitor while the fan is still plugged in. That’s dangerous and completely unnecessary. The meter provides its own tiny test signal, so household power has no place in the process. Unplugging the fan, discharging the capacitor, and isolating the part are the basic safety steps that keep the test controlled.
Another mistake is ignoring the printed voltage rating. The microfarad value controls the motor behavior, but the voltage rating tells you what the capacitor can safely handle. A replacement can have the same capacitance and an equal or higher voltage rating, but a lower voltage rating is a bad idea. That detail protects the capacitor body from overheating, swelling, or failing early.
Loose probe contact can also fool the meter. Dust, oxidation, or oily residue on terminals may create jumpy readings that look like a bad part. Wipe the terminals carefully and hold the probes steady before deciding the capacitor is dead. A clean contact point gives a cleaner answer, and that’s worth the extra minute.
Some fan problems still won’t be capacitor-related, even after the symptoms seem suspicious. A seized bearing, damaged switch, loose wire, or burnt motor winding can mimic capacitor failure. That’s why the best repair habit is to combine visual inspection, blade movement, smell, wire condition, and multimeter readings. The capacitor test is powerful, but it’s not magic.
Replacement Choices
Replacing a failed capacitor starts with reading the old one carefully. Match the microfarad rating first, then check the voltage rating, terminal style, and body size. A capacitor that won’t fit inside the housing can create pressure on wires or prevent the cover from closing correctly. That’s a small physical detail, but it matters for safety and long-term reliability.
Cheap unknown parts can be tempting, especially for a low-cost table fan. Still, a poor capacitor can fail early, run hot, or make the fan behave inconsistently. The better approach is to choose a replacement with clear markings and proper AC motor-run use. That helps the fan regain steady startup torque without turning the repair into a repeat job next month.
Large airflow problems sometimes send people toward bigger cooling upgrades rather than repair. Separately, if a room needs broader air movement beyond a tabletop fan, compare a large ceiling fan for wider coverage and less clutter on desks or counters. A repaired table fan still makes sense for spot cooling, but room-wide circulation calls for a different setup. That distinction keeps expectations realistic.
After installing the new capacitor, secure the wires away from the blade path and moving parts. Reassemble the cover properly before testing the fan, because an exposed running fan is a bad idea. Start on the lowest speed first and listen for smooth startup, steady rotation, and normal sound. A clean start usually confirms that the capacitor replacement solved the real problem.
Testing Ceiling Fan Capacitor Problems With A Multimeter
Some fan problems don’t show up all at once. Airflow slowly weakens, the motor sounds rougher every week, and eventually the blades stop reacting the way they should. Plenty of people keep cleaning the grill, oiling the shaft, or blaming dust buildup while the real issue sits quietly inside a worn capacitor. A careful multimeter test helps expose those hidden electrical problems before the motor suffers long-term damage.
Weak Airflow Patterns
A struggling capacitor changes airflow in ways people notice long before they think about electrical parts. The fan may still rotate, yet the breeze feels thin even at the highest setting. That weak circulation becomes especially frustrating during humid nights where every bit of airflow matters. A fading capacitor often creates this drop in motor efficiency because the startup and running phase lose consistency.
Some table fans also hesitate while switching between speeds. Low speed may sound rough, medium may barely improve airflow, and high speed could feel unstable instead of smooth. Those uneven transitions matter because healthy fan motors usually shift cleanly between settings. Strange speed behavior often points toward capacitor imbalance rather than a simple dirty blade issue.
Heat buildup around the motor housing deserves attention too. Warm operation is normal after long use, but excessive heat paired with slow airflow tells a different story. The motor works harder while receiving weaker electrical assistance from the capacitor. That extra strain can shorten the lifespan of the motor winding if ignored too long.
Outdoor cooling setups face similar airflow frustrations during humid weather. For broader patio circulation in rainy climates, compare wet rated outdoor ceiling fans that handle moisture exposure more safely than standard indoor models. Different cooling setups solve different problems, but the goal stays the same: stable airflow without unnecessary electrical stress.
Capacitor Location Tips
Many people open a table fan for the first time and immediately feel lost staring at wires, screws, and cramped plastic housing. The capacitor usually sits near the motor assembly inside a small cylindrical or box-shaped casing. Manufacturers often secure it with clips, adhesive, or brackets to prevent vibration damage during operation. Spotting that compact electrical component becomes easier once you know what shape to expect.
Fan capacitors normally include printed specifications directly on the outer shell. You’ll often see values like 1.5µF, 2µF, or voltage markings such as 250VAC or 450VAC. Those numbers matter because replacement parts must match the motor’s electrical requirements closely. Ignoring those ratings can lead to unstable performance, overheating, or premature failure.
Older table fans sometimes hide the capacitor deeper inside the rear motor cover. Dust buildup around the wiring can make identification annoying, especially if labels faded from age or heat exposure. A flashlight helps quite a bit here. So does taking your time instead of yanking wires around and risking damage to the internal connections.
Capacitor placement also varies depending on fan style and motor layout. Compact desk fans may squeeze everything into tight plastic housings, while larger standing fans often leave more working space. That difference changes how easy the repair feels, not necessarily how difficult the electrical test becomes. Patience matters more than fancy tools during this stage.
Signs Of A Swollen Capacitor
A damaged capacitor sometimes reveals itself visually before the multimeter even touches it. Bulging ends, cracked casing, leaking residue, or burn marks usually signal that the component has reached the end of its usable life. Those physical clues shouldn’t get ignored because they often line up with serious electrical instability. A capacitor in rough shape can stress nearby wiring and motor components too.
Not every failed capacitor looks dramatic, though. Plenty of weak capacitors appear completely normal from the outside while their internal electrical capacity drops far below safe operating levels. That’s why relying only on appearance can create false confidence. The multimeter provides the actual performance reading needed to confirm whether the capacitor still functions correctly.
Strong burning smells deserve extra caution. That odor can point toward overheating insulation, stressed wiring, or a capacitor breaking down internally. Continuing to run the fan in that condition isn’t worth the gamble. Unplugging the fan and checking the electrical system immediately helps prevent bigger repair costs later.
Heat and humidity speed up wear on electrical parts more than many people realize. Fans used daily in kitchens, garages, or non-air-conditioned rooms often experience capacitor aging sooner because constant warmth stresses internal materials. Those environmental conditions slowly weaken performance until startup issues become impossible to ignore.
Multimeter Reading Mistakes
Meter readings can confuse beginners because numbers don’t always settle instantly. Some people panic the moment the display jumps around for a second or two. Small fluctuations during initial contact are normal while the capacitor reacts to the meter. Stable readings matter far more than brief movement during the first moment of testing.
Incorrect meter settings create another common headache. Testing capacitance while the multimeter stays in voltage or resistance mode can produce useless readings that lead people toward the wrong diagnosis. Double-check the selected mode before touching the probes to the terminals. That tiny habit protects both the meter accuracy and the repair process.
Cheap probes with loose tips can also create inconsistent readings. The problem may look like capacitor failure even though the issue sits with poor electrical contact. Steady pressure and clean terminals help stabilize results quickly. Good contact points provide a much clearer view of the capacitor’s actual electrical condition.
Battery strength inside the multimeter matters more than expected too. Weak internal batteries can throw readings off and make healthy components appear suspicious. If measurements seem wildly inconsistent across multiple tests, checking the multimeter battery is worth the effort. Reliable tools create more dependable diagnostics from start to finish.
Motor Problems Beyond The Capacitor
A failed capacitor isn’t always the whole story. Some fans still struggle after capacitor replacement because the motor bearings dried out or internal winding damage already developed. That’s frustrating, sure, but it happens more often in older fans that ran for years with poor maintenance. A healthy capacitor can’t fully compensate for a worn mechanical system.
Dry bearings usually create scraping sounds, resistance while spinning the blade manually, or uneven rotation during operation. A capacitor problem alone normally won’t create grinding noises. Distinguishing electrical symptoms from mechanical drag helps narrow the repair path faster. That balance between observation and testing keeps troubleshooting practical instead of random.
Loose wiring inside the switch assembly can also imitate capacitor trouble. The fan may randomly shut off, lose speed control, or start only after tapping the housing. Those intermittent behaviors often involve connection issues rather than failed capacitance values. Inspecting the wiring carefully prevents unnecessary replacement of a still-functional electrical component.
Some people push aging table fans beyond realistic limits during extreme heat. Tiny desk fans can help personal cooling, but larger spaces sometimes need stronger circulation systems entirely. To improve airflow across wider outdoor areas, explore high velocity outdoor ceiling fan options that move air more aggressively than compact indoor fans. Matching the fan style to the environment reduces strain and keeps cooling performance more consistent.
Maintaining Better Fan Performance
Regular cleaning makes capacitor and motor problems easier to spot early. Dust buildup traps heat around the motor housing and blocks airflow through the rear vents. That trapped heat slowly affects internal electrical parts over time. Keeping the fan clean supports better motor cooling and steadier long-term operation.
Blade balance matters too. Bent or loose blades force the motor to work unevenly, which increases vibration and stress across internal components. That constant shaking can shorten capacitor lifespan because electrical parts dislike repeated vibration. Tightening loose screws and checking blade alignment helps protect the entire fan assembly.
Storage habits also affect capacitor longevity more than many people think. Fans left in damp garages or exposed to extreme seasonal heat often develop electrical deterioration faster. Moisture, dust, and temperature swings quietly attack internal materials while the fan sits unused. A dry storage area supports more stable electrical performance over time.
Periodic multimeter checks can catch declining capacitor performance before airflow collapses completely. That simple maintenance step takes far less time than replacing a burnt motor later. A table fan doesn’t need complicated servicing routines to stay reliable. Small checks, steady cleaning, and early troubleshooting usually keep daily cooling far less frustrating.


Best Small Flush Mount Ceiling Fans 2026 Ultimate Picks

Best Smart Ceiling Fan India 2026 For Effortless Comfort

Best Smart Ceiling Fans with Lights for 2026: Top Picks

Best Smart Home Non Ceiling Fans 2026 For Ultimate Comfort

Best Outdoor Misting Ceiling Fan 2026 For Ultimate Comfort

Best Ceiling Fans With Lights For Vaulted Ceilings 2026 Top Picks

Best Outdoor Ceiling Fans For Porch 2026 With Style And Breeze

Best WiFi Enabled Ceiling Fan 2026 For Effortless Comfort





