
How To Connect Electrical Wires For Ceiling Fan Safely
How To Connect Electrical Wires For Ceiling Fan can feel like staring at a bowl of colored spaghetti the first time around. One wire looks familiar, another disappears into the ceiling box, and suddenly the whole project feels way more stressful than expected. Plenty of people start confidently, then freeze once they see black, white, blue, and green wires hanging overhead. A shaky connection or crossed wire can leave the fan humming strangely, wobbling, or refusing to power on at all.
Ceiling fan wiring gets even trickier in older homes where wire colors don’t always follow modern standards. Some setups include separate switches for lights and fan speed, while others bundle everything onto a single wall control. That’s where clear guidance matters. Proper wire connections, secure wire nuts, and stable grounding help prevent flickering lights, overheating, or those annoying moments where the breaker trips out of nowhere.
Small details make a huge difference during installation. Tightening wire connectors correctly, matching the fan’s wiring diagram, and supporting the fan box properly can save hours of frustration later. A loose neutral wire might seem harmless at first, but wow, it can create inconsistent performance that drives people nuts over time. Careful prep work often matters more than rushing through the final assembly.
Electrical safety should never feel optional with ceiling fan projects. Turning off the breaker, testing wires with a voltage tester, and double-checking every connection can help avoid dangerous surprises. Plenty of wiring headaches happen because someone assumed the power was off without actually testing it. A few extra minutes spent verifying connections usually beats dealing with burnt wiring or damaged fan motors later.
Fan wiring also changes depending on whether the setup includes remote controls, dimmer switches, or dual-function wall switches. Some modern fans use receiver modules tucked inside the canopy, which adds another layer of complexity during installation. Others keep things refreshingly simple with standard black-to-black and white-to-white connections. Understanding the layout before touching a single wire helps the whole process move smoother.
How To Connect Electrical Wires For Ceiling Fan becomes far less intimidating once the wire functions start making sense. Black wires typically handle power, white wires manage neutral connections, green or bare copper wires provide grounding, and blue wires usually connect lighting kits. Piece by piece, the setup starts looking less chaotic and more logical. That confidence shift changes everything during installation.
Separately, if stable airflow and quieter operation matter too, explore fan models with balanced blade systems and stronger mounting brackets. A properly wired fan still depends on solid hardware to reduce wobbling and long-term wear. Reliable installation combines both electrical precision and sturdy mechanical support. Skipping either side usually creates headaches sooner or later.
How To Connect Electrical Wires For Ceiling Fan
A ceiling box can look calm from the floor, then turn into a tiny mess of colored wires once the canopy comes down. How to connect electrical wires for ceiling fan starts with sorting out power, neutral, ground, and any light-kit wire before a single connector gets tightened. Safe wiring keeps the fan from buzzing, flickering, overheating, or tripping the breaker after installation. A careful setup also protects the motor, the switch, and the person standing on the ladder with tired arms.
Wiring Basics
Ceiling fan wiring usually comes down to a few wire roles, even if the ceiling box looks like trouble at first glance. The black wire normally carries power to the fan motor, while the white wire handles the neutral return path. The green or bare copper wire is the ground connection, which helps redirect fault current safely if something goes wrong. The blue wire, often found on fan units with lights, usually powers the light kit.
Wire color rules are helpful, but older homes love throwing curveballs. A faded black wire may look brown, a white wire may be marked with tape, and a ceiling box may include extra conductors from a previous switch setup. That’s why a voltage tester matters more than guesswork. A clean installation starts with confirming which wire is hot, which wire is neutral, and which wire belongs to the grounding path.
Single-switch wiring keeps the process fairly simple because the fan and light often share one power feed. In that setup, the fan’s black and blue wires may connect to the hot supply wire, while the fan’s white wire connects to the ceiling’s neutral wire. The green or bare ground connects to the ceiling box ground or mounting bracket ground. Tight connectors and neat wire folds help the canopy fit without pinching anything.
Dual-switch wiring adds one more layer because the fan motor and light can be controlled separately. One hot wire may feed the fan motor, while another switched hot wire feeds the light kit. That setup feels nicer in daily use, especially in bedrooms where separate airflow and lighting control make sense. It does require extra attention, though, because mixing those wires can leave the fan running from the wrong switch.
Power Safety
Breaker control is the first real step, not an afterthought. Turning off a wall switch isn’t enough because some ceiling boxes still hold live power from another circuit path. Shut off the breaker feeding the room, then test the ceiling wires before handling them. A non-contact voltage tester gives quick feedback, but a multimeter can provide a clearer reading if the wiring layout feels questionable.
Electrical shock risk doesn’t care how simple the job looks. Even a basic fan installation can involve live wires, shared neutrals, or old junction boxes with confusing routing. The National Fire Protection Association notes that electrical failures or malfunctions remain a major cause of home structure fires, which is exactly why secure connections matter in everyday projects. Loose wires hidden above a canopy can create heat, arcing, and long-term trouble.
Fixture support matters just as much as wire matching. A ceiling fan needs a fan-rated electrical box because fan motors vibrate and add movement that light fixtures don’t create. A standard ceiling light box may not hold the fan safely over time, especially with heavier models. The phrase “fan-rated” on the box or bracket is not decorative, it’s a load safety detail.
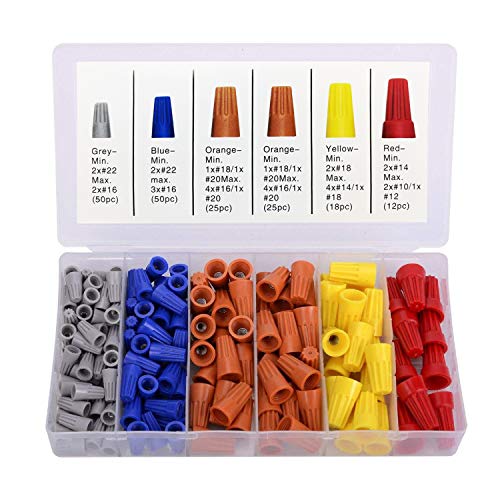
Wire connectors should grip firmly without exposed copper sticking out below the cap. Twisting wires evenly before securing the connector can help, but the connector itself must be sized for the number and gauge of wires inside it. Give each finished connection a gentle tug. If a wire slips out, that connection isn’t ready to be tucked into the ceiling box.
Fan Wire Roles
Black fan wires usually feed the motor, so they control whether the blades spin. In a simple installation, the fan’s black wire connects to the ceiling’s hot wire. If the fan includes a pull chain and no separate wall fan control, this setup is common. A bad connection here often leaves the light working while the fan sits there doing absolutely nothing.
Blue fan wires usually power the light kit, and they can confuse people because not every fan includes one. With a single wall switch, the blue wire often joins the black fan wire and the ceiling’s hot wire in the same connector. With separate wall switches, the blue wire may connect to a second switched hot wire. That separation gives independent light control, which feels cleaner once the fan is installed.
White neutral wires complete the electrical circuit and should connect together cleanly. The fan’s white wire connects to the ceiling’s white neutral wire in most standard setups. A loose neutral can cause flickering lights, weak motor behavior, or odd power symptoms that feel hard to trace. Keeping the neutral connection tight saves a lot of head-scratching later.
Green and bare copper wires create the grounding path. The fan’s green wire may come from the downrod, mounting bracket, or fan body, depending on the model. These ground wires should connect to the home’s bare copper or green ground wire and often to the metal ceiling box if the box is grounded. Grounding won’t make the fan run better, but it adds fault protection that should never be skipped.
Switch Setup Choices
Wall switch layout changes the wiring plan more than many people expect. A single switch usually sends power to both the fan and light at once, then pull chains or a remote handle separate functions. A dual switch can split the motor and light into two controls. That setup feels more flexible, but only if the ceiling box has the right conductors already available.
Remote receiver wiring can make the canopy feel crowded. Many modern fans use a receiver module that sits between the ceiling wires and the fan wires. The ceiling hot and neutral feed the receiver, then the receiver sends controlled power to the fan motor and light. Those modules are handy, but cramped wiring inside the canopy can cause pinched wires if everything gets shoved in carelessly.
Dimmer switches deserve caution because many old-style dimmers are not designed for fan motors. A light dimmer connected to a fan motor can cause humming, poor speed control, or motor damage. Fan speed controls need to be rated for ceiling fans, not just lights. To avoid mismatched lighting terms while planning bulbs and controls, compare bulb language through non led light bulbs before mixing older fixtures with newer fan kits.
LED lighting kits may behave differently from older incandescent fixtures, especially with dimmers or remote modules. Flickering can come from an incompatible dimmer, weak neutral, or low-grade bulb driver. Car lighting uses different electrical behavior, but the lesson about load matching still applies, so study signal load basics through install load resistors if electrical load problems keep showing up in other projects. The ceiling fan circuit still needs parts rated for home wiring, not automotive fixes.
Connection Steps
Preparation makes the wiring cleaner before the fan ever reaches the bracket. Lay out the fan parts, read the wiring diagram, and separate the motor wires, light wires, ground wires, and receiver wires if included. Strip only the amount of insulation recommended by the connector or fan manual. Too much exposed copper creates risk, while too little can make the wire nut grip poorly.
Ground wires should usually be connected early because they often attach to the bracket and fan body. Connect the ceiling ground to the bracket ground and fan ground as the instructions require. A metal box may also need bonding if it is part of the grounding path. This step keeps the fan housing safer if a hot wire ever contacts metal.
Neutral connections come next in many standard installations. Join the fan’s white wire to the ceiling’s white neutral wire, or connect the receiver neutral wires as shown in the fan diagram. Keep the copper ends even before twisting on the connector. A neat neutral bundle helps prevent intermittent light flicker and weird motor behavior.
Hot wire connections depend on the switch setup. For a single switch, the ceiling hot may connect to both the fan black wire and blue light wire, unless a remote receiver changes the path. For dual switches, one switched hot may connect to the black fan wire, while the other connects to the blue light wire. After every connection is capped, fold the wires gently into the box so no connector is crushed by the canopy.
Common Wiring Mistakes
Skipping the tester is one of the fastest ways to turn a simple fan job into a dangerous mess. A wall switch may be off while a ceiling wire remains live because power enters the box first. Shared circuits in older homes can make this even trickier. Testing before touching wires is boring, sure, but it’s the kind of boring that keeps people safe.
Mixing up the blue and black wires can cause strange switch behavior. The fan might spin from the light switch, or the light might only work when the fan control is on. That mistake is easy to make when the ceiling has multiple hot wires. Labeling wires with tape before disconnecting an old fixture can save the day.
Using the wrong ceiling box creates a mechanical problem that wiring can’t fix. A fan-rated box is built to handle movement, weight, and vibration. If the box wiggles, shifts, or lacks proper bracing, stop before hanging the fan. A solid fan installation needs both correct wiring and strong support.
Overstuffed canopies cause trouble after everything looks finished. Large wire nuts, remote receivers, extra wire length, and cramped brackets can press against each other. That pressure may loosen a connector or damage insulation over time. Budget shoppers should still factor in safe hardware and support, so compare practical options through ceiling fans with lights before grabbing the cheapest model on the shelf.
How To Wire A Ceiling Fan With Light And Switch
One loose connector hiding inside a ceiling canopy can turn a relaxing evening into a nonstop cycle of flickering lights and annoying humming noises. How to wire a ceiling fan with light and switch usually sounds simple until extra wires, remote modules, and old switch boxes start complicating everything. A clean wiring layout helps the fan run smoother, keeps the light stable, and reduces long-term wear on the motor. Small details matter here, especially once the fan starts spinning daily through hot afternoons and humid nights.
Remote Receiver Setup
Remote-controlled ceiling fans often include a small receiver tucked inside the canopy near the mounting bracket. That little box changes the wiring path because the ceiling wires feed the receiver first instead of connecting directly to the fan motor and light kit. The receiver then distributes power to the fan and lighting circuits separately. Tight canopy spacing can make this part frustrating fast, especially with shorter downrods and bulky connectors.
Receiver placement matters more than people expect. Crushed wires inside the canopy may create intermittent problems that only appear after the fan vibrates for a few days. A pinched neutral wire can trigger flickering lights, while an overcrowded canopy may strain wire connectors over time. Careful wire folding keeps the setup cleaner and reduces stress on the connections.
Signal interference can also create strange fan behavior. Some remotes lose range near thick walls, crowded electrical boxes, or older wiring setups. If the fan responds inconsistently, the issue may not be the motor at all. Exploring troubleshooting examples through flashlight attachment ark setups can help explain how signal placement and power routing sometimes affect electronic accessories in unexpected ways.
Battery condition inside the remote deserves attention too. Weak batteries can mimic wiring problems because the fan responds slowly or skips commands entirely. Plenty of people assume the wiring failed when the remote itself is actually the problem. Testing the remote first can save a whole lot of unnecessary rewiring.
Dealing With Older Wiring
Older ceiling boxes can make modern fan installation feel messy in a hurry. Some homes still contain cloth-covered wiring, faded insulation, or color patterns that don’t match current electrical standards. A black wire may no longer look black after decades inside a dusty ceiling cavity. That confusion is exactly why a voltage tester matters before touching anything.
Shared neutral circuits sometimes appear in older homes, especially where multiple fixtures were added over the years. A fan may appear wired correctly yet still behave unpredictably because another circuit influences the neutral path. Flickering lights, inconsistent speeds, or warm switch plates often point toward deeper electrical issues. In those situations, slowing down and tracing each wire carefully becomes far more important than rushing the installation.
Metal ceiling boxes from older homes may still provide solid support if they are fan-rated and securely mounted. Some older boxes hold surprisingly well, while others wobble the second the fan starts spinning. Movement inside the box can loosen connectors gradually over time. A stable bracket and secure grounding make the fan safer and quieter once everything is running.
Wall switches in older rooms sometimes control outlets instead of overhead fixtures. That setup confuses people because the ceiling box may already carry constant power even with the switch off. Tracing switch behavior before installation helps avoid wiring mistakes later. One extra check now beats reopening the canopy three times after the fan refuses to respond properly.
Balancing Airflow And Wiring
Electrical performance and airflow quality actually influence each other more than many people realize. A struggling motor fed by weak or inconsistent wiring may hum louder, run hotter, or spin unevenly. That strain can shorten the motor’s lifespan over time. Smooth power delivery helps maintain consistent blade rotation and quieter operation.
Blade balance also affects how secure the wiring connections remain over the years. A wobbling fan creates constant vibration that slowly stresses connectors inside the canopy. Even a properly tightened wire nut can loosen after months of shaking if the blades are badly balanced. Fixing wobble early helps protect both the fan hardware and the electrical setup.
Fan direction settings can improve comfort without increasing electrical load unnecessarily. During warmer months, counterclockwise rotation creates stronger downward airflow. Cooler seasons often benefit from clockwise rotation at lower speeds to circulate warm air gently. That small adjustment can reduce heating or cooling strain while keeping the room more comfortable.
Motor noise sometimes points toward wiring trouble, but not always. A faint hum may simply come from a dimmer switch that isn’t rated for ceiling fans. Buzzing from inside the canopy, though, deserves attention because loose connections or overloaded circuits can create heat buildup. Strong airflow should never come with the smell of hot insulation.

Light Kit Wiring Problems
Light kit wiring tends to cause headaches because several small connectors often hide inside tight spaces beneath the fan housing. One loose plug or weak neutral connection can leave the lights flickering randomly. LED bulbs make the issue even more obvious because they react quickly to unstable current. Tracking the problem usually means reopening the housing and checking every connector carefully.
Bulb compatibility matters with modern fan light kits. Some LED bulbs don’t cooperate well with older dimmer switches or remote receiver systems. The result might be flickering, delayed startup, or low buzzing sounds. Matching the bulb type with the fan’s control system usually solves the issue faster than replacing the entire fixture.
Heat buildup inside enclosed light kits can also shorten bulb life. Small glass covers trap warmth, especially in rooms where the fan runs for hours every day. Lower-wattage LEDs typically reduce that heat compared to older incandescent bulbs. That change helps protect the light sockets and keeps the fixture cooler overall.
Wire pinching becomes common while reinstalling the light housing. A trapped wire may still allow the light to function temporarily before intermittent problems start appearing later. Taking a few extra seconds to route wires neatly prevents future frustration. A fan should feel stable and reliable after installation, not like a mystery waiting to happen.
Fan Support And Stability
Ceiling support strength affects long-term reliability more than most people expect. A fan that hangs from a weak bracket may wobble harder over time, especially at higher speeds. That movement strains mounting screws, electrical connectors, and the fan-rated box itself. Tight structural support protects both the hardware and the wiring system.
Downrod length changes the fan’s movement pattern too. Longer downrods create more leverage, which increases stress on weak ceiling mounts. Tall ceilings benefit from proper downrod sizing, but the mounting bracket must stay firmly anchored. A shaky mount combined with long blades can create nonstop vibration problems.
Fan weight varies more than people think. Decorative fans with larger motors, wood blades, or oversized light kits place additional load on the mounting hardware. Lightweight budget fans may feel easier to install, but some produce more noise or imbalance over time. Reading product specs carefully helps avoid support issues later.
Motor housing alignment should look centered once installation finishes. Crooked alignment may signal uneven blade mounting, loose hardware, or improper bracket installation. Even small imbalances can become obvious once the fan reaches medium or high speed. Some homeowners researching reliability comparisons also look into minka ceiling fans good discussions before replacing older or unstable fan setups.
Testing The Final Connections
Breaker restoration should happen only after the canopy is secured and no exposed copper remains visible. Turn the breaker back on, then test the fan at every speed setting. Watch for delayed startup, flickering lights, unusual humming, or wobbling. A properly wired fan should respond smoothly without hesitation.
Wall switch response tells a lot about the installation quality. A single-switch setup should control power consistently, while dual-switch setups should separate the fan motor and light correctly. If the switches operate backward or unpredictably, one of the hot wires may be crossed. Fixing that immediately prevents long-term confusion.
Heat checks matter during the first hour of operation. The canopy, switch plate, and motor housing should remain reasonably cool during standard use. Warmth is normal near the motor, but excessive heat or burning smells point toward electrical trouble. Shut the system down immediately if anything smells like melting insulation.
Long-term reliability depends on the details hidden above the canopy. Tight connectors, proper grounding, stable mounting, and balanced blades all work together to keep the fan running smoothly. A careful installation usually stays quiet and dependable for years without constant adjustments or annoying electrical surprises.


Best Small Flush Mount Ceiling Fans 2026 Ultimate Picks

Best Smart Ceiling Fan India 2026 For Effortless Comfort

Best Smart Ceiling Fans with Lights for 2026: Top Picks

Best Smart Home Non Ceiling Fans 2026 For Ultimate Comfort

Best Outdoor Misting Ceiling Fan 2026 For Ultimate Comfort

Best Ceiling Fans With Lights For Vaulted Ceilings 2026 Top Picks

Best Outdoor Ceiling Fans For Porch 2026 With Style And Breeze

Best WiFi Enabled Ceiling Fan 2026 For Effortless Comfort





