
How to Fix a Bent Ceiling Fan Blade Fast
How to fix a bent ceiling fan blade sounds simple until the fan starts wobbling like it’s about to shake loose from the ceiling. That annoying ticking noise, uneven airflow, or slight tilt usually starts with one blade getting warped, twisted, or knocked out of alignment. A lot of people ignore it at first, but over time the imbalance can wear down the motor, loosen screws, and make the whole fan feel unstable. Small problems tend to snowball, and ceiling fans are no exception.
Dust buildup, accidental bumps while moving furniture, or even years of moisture exposure can slowly bend a blade without making it obvious right away. Some fans start spinning unevenly after a blade absorbs humidity and changes shape little by little. Others get damaged after someone cleans them too aggressively or tightens screws unevenly. Either way, the wobble becomes hard to ignore once the fan reaches medium or high speed. That’s usually the moment frustration kicks in.
Blade alignment, balance, and screw tension all play a bigger role than most people expect. A blade doesn’t need to look dramatically bent to throw the entire fan off balance. Even a slight angle difference can create vibration that rattles light fixtures, pulls on mounting hardware, and produces constant humming noises. Fixing the issue often comes down to careful adjustments rather than replacing the entire ceiling fan. That’s the good news.
Plenty of homeowners jump straight into buying replacement parts without checking the simpler fixes first. Sometimes the blade iron is bent instead of the blade itself. In other cases, one loose screw creates enough movement to mimic a warped blade. A steady hand, a measuring tape, and a little patience can solve problems that seem much bigger at first glance. Honestly, that’s where most people save money and avoid unnecessary headaches.
How to fix a bent ceiling fan blade also depends on the blade material. Wooden blades may warp from humidity, while MDF blades can sag over time and plastic blades sometimes twist after heat exposure. Each material reacts differently, so forcing a repair the wrong way can crack or weaken the blade even more. Slow adjustments usually work better than aggressive bending attempts. Rushing the process tends to backfire.
Noise reduction becomes another huge benefit after correcting the blade shape and balance. Fans with uneven blades often produce clicking, wobbling, or faint grinding sounds that get worse during warmer months when the fan runs constantly. Correcting the alignment helps the motor run smoother and improves airflow across the room. The difference feels surprisingly noticeable once everything spins evenly again.
Ceiling fans aren’t exactly glamorous household items, but wow, people notice immediately when one starts wobbling overhead. A balanced fan creates steady airflow, quieter operation, and less strain on the mounting system. Fixing the issue early helps avoid bigger repairs later, especially if the motor housing or bracket starts loosening from repeated vibration. That little bend can quietly create much larger problems if left alone too long.
How To Fix A Bent Ceiling Fan Blade
A shaky fan can make a quiet room feel oddly tense, especially when the blades wobble like they’re arguing with gravity. The real problem often starts with one small bend, one loose bracket, or one blade sitting lower than the rest. How to fix a bent ceiling fan blade begins with slowing down, checking the obvious stuff, and resisting the urge to bend parts back by brute force. A careful repair keeps the fan quieter, steadier, and far less stressful to live with.
Bent Blade Repair
A bent fan blade usually shows itself through wobbling, clicking, uneven airflow, or a faint scraping sound near the housing. The blade may not look dramatic from the floor, but even a small change in pitch can throw the whole fan out of rhythm. Stand back while the fan spins on low speed and watch for the blade that dips, lifts, or seems to “swim” compared with the others. That blade deserves the first inspection.
Turn the fan off at the wall switch before touching anything, because safety beats speed every single time. Once the blades stop completely, use a sturdy step ladder and check each blade from the side. A tape measure can help compare the distance between each blade tip and the ceiling. If one blade sits lower or higher than the rest, the problem may be the blade bracket, not the blade itself.
Look closely at the blade surface for warping, cracks, swollen edges, or screw holes that look stretched out. Wood and MDF blades can bend after humidity exposure, while plastic blades may twist after heat or age changes their shape. A cracked blade should not be forced back into place, since it can weaken further during use. Replacement is safer once the blade material has split or softened.
Loose screws create plenty of fake “bent blade” drama, so tighten the screws where the blade meets the bracket and where the bracket meets the motor housing. Use steady pressure instead of over-tightening, because stripped screw holes make the repair worse. If the blade straightens visually after tightening, the fix may already be halfway done. For larger room airflow problems, compare replacement options with best ceiling fans large bedrooms before buying another fan that may not fit the space well.
Check The Blade Angle
The blade angle, often called blade pitch, controls how the fan moves air. If one blade twists slightly upward or downward, the fan may wobble even if every screw feels tight. A simple ruler or tape measure helps you compare the front edge and back edge of each blade. Matching those angles is the goal, not making the blade look perfect from one random viewpoint.
Place the tape measure from the ceiling to the same point on each blade tip. Write down the measurements if needed, because eyeballing can fool you fast. A blade that sits off by even a small amount can create vibration, motor strain, and that annoying ceiling rattle nobody wants to hear at night. Keep the fan off while checking each point, and rotate the blades by hand.
If the blade itself is slightly bent but not cracked, support the blade near the bracket and apply gentle pressure in the opposite direction of the bend. Tiny adjustments work better than one big push. Check the measurement again after each adjustment instead of trying to “feel” your way through it. Rushing this step can snap the blade or loosen the mounting holes.
The bracket can also bend after someone bumps the fan with a ladder, mattress, or tall piece of furniture. Metal brackets can sometimes be nudged back into alignment, but they should never be twisted aggressively while attached to the motor. Remove the blade first if the bracket needs closer inspection. That small extra step protects the motor housing, screw threads, and blade surface.
Balance Before Replacing Parts
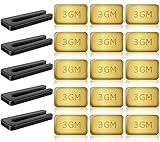
A fan can wobble even after the bent blade looks corrected, which is why balancing matters. Most ceiling fan balance kits include a small clip and adhesive weights. The clip helps identify which blade needs weight correction, while the adhesive weight creates a steadier spin. It’s not glamorous, but it’s a practical fix that often saves a decent fan from the trash.
Start the fan on low speed after checking screws and blade height. If wobble remains, attach the balancing clip to the center of one blade and run the fan again. Move from blade to blade until the wobble improves. That blade likely needs a small weight placed near the same area, and yes, this part takes patience.
Move the clip along the blade in small sections, testing each position until the fan runs smoother. The best spot is usually where shake drops noticeably without creating a new vibration. Stick the adhesive weight on the top side of the blade so it stays hidden from below. Press firmly so the weight doesn’t peel loose during regular spinning.
Balancing won’t fix a blade that is cracked, badly warped, or sagging from moisture damage. It can, however, correct the little differences caused by age, dust buildup, or minor shape changes. Clean each blade before balancing, because uneven dust adds weight in weird places. Separately, for car lighting issues that can drain attention during home projects, solve dashboard confusion with turn off door ajar light before it keeps nagging from the driveway.
Spot Damage That Needs Replacement
Some ceiling fan blades deserve repair, and some deserve retirement. A blade with deep cracks, soft swollen edges, or screw holes that no longer hold tightly should be replaced. Trying to save a weak blade can create more vibration and possibly send the blade loose during operation. That’s not a risk worth taking over one part.
Check whether the blade set is still available from the fan manufacturer. Replacing only one blade can work if the size, weight, shape, and finish match closely. Mismatched blades may look fine but still cause wobble because of weight differences. A full blade set often gives better results than mixing one new blade with several older ones.
Blade arms, also called brackets, deserve the same attention. A bent bracket can make a perfectly flat blade look crooked from below. Lay the brackets on a flat surface if you remove them, then compare their shape side by side. Any bracket that sits twisted or uneven should be replaced rather than forced back repeatedly.
Motor noise after blade repair can point to a separate issue. If the fan still hums, grinds, or rocks at the ceiling canopy, the blade may not be the only culprit. The mounting bracket, downrod, or internal motor parts may need inspection. For truck owners handling garage upgrades too, improve night visibility with best light bar dodge ram 1500 instead of guessing through poor lighting during outdoor repairs.
Fix Ceiling Fan Blade Wobble Without Replacing The Fan
Most people don’t notice how stressful a wobbling fan feels until the sound starts echoing through the room every night. The movement becomes distracting during sleep, movie time, or even simple conversations across the couch. Fix ceiling fan blade wobble without replacing the fan often starts with small adjustments instead of expensive upgrades. A steady fan creates smoother airflow, less noise, and far less strain on the ceiling mount.
Humidity Can Warp Fan Blades
Moisture quietly ruins more ceiling fan blades than people realize. Wood and MDF blades absorb humidity over time, especially in rooms with weak ventilation or changing temperatures. One blade slowly swells or droops while the others stay stable, and suddenly the entire fan starts shaking. Humidity damage tends to build gradually instead of showing up overnight.
Bathrooms, covered patios, laundry rooms, and older bedrooms often create the perfect conditions for blade warping. Fans installed near windows can also deal with seasonal moisture shifts that bend the blade shape little by little. A warped blade usually develops uneven pitch, meaning the angle changes slightly compared with the others. That tiny difference creates more wobble than most people expect.
Cleaning habits matter too. Soaking a rag with heavy cleaner and wiping the blades repeatedly can soften MDF surfaces over time. Excess moisture trapped around the edges may cause slight swelling that throws off the balance later. Dry microfiber cloths work better for regular cleaning, especially on older fan blades with aging finishes. Gentle maintenance prevents a lot of future frustration.
Rooms with tall ceilings often exaggerate wobble because longer downrods allow more movement during operation. Upgrade airflow and lighting together with best fan light 20 foot ceiling options that handle larger spaces more evenly. Bigger rooms need stronger balance control, especially once humidity begins affecting blade shape. Stable airflow feels noticeably different after the right adjustments.
Fix Loose Mounting Hardware
People often focus only on the blades while ignoring the hardware holding everything together. Loose mounting screws can create wobble that looks exactly like a bent blade problem. Grab the fan housing gently and check for side-to-side movement while the power stays off. Loose ceiling brackets create vibration that spreads through the entire fixture.
The canopy near the ceiling should sit snugly without rattling during operation. If it shifts or clicks when touched, tighten the mounting screws carefully with the proper screwdriver. Some older electrical boxes also loosen slightly over years of vibration. That movement transfers directly into the downrod and fan body, making the blades appear unstable.
Downrods deserve attention too. A loose downrod connection creates wobble even if every blade sits perfectly straight. Check the locking pin and set screws near the motor housing for movement or wear. Stable mounting points help the blades spin evenly without forcing the motor to compensate for imbalance.
Dust buildup around screws and brackets sometimes hides cracks or loose fittings. Wipe the hardware clean before tightening anything so problems become easier to spot. Small fixes often restore smooth operation without replacing expensive parts. Honestly, the simplest repairs solve more ceiling fan problems than most people think.
Blade Weight Makes A Big Difference
Ceiling fan blades need consistent weight across the entire set. One heavier blade can throw the fan off balance even if every blade looks straight from below. Paint buildup, moisture absorption, or replacement blades from another model may create subtle weight differences. Balanced blade weight matters just as much as blade shape.
Kitchen ceiling fans often collect grease and dust unevenly over time. One blade near the stove may gain more buildup than the others, especially in homes without strong ventilation. Clean every blade thoroughly using the same method and compare how each blade feels afterward. A surprisingly small weight difference can trigger noticeable vibration.
Balance kits help correct these uneven spots without replacing the blade set entirely. Adhesive weights placed carefully along the blade surface reduce wobble by redistributing weight more evenly. Move slowly during testing because too much added weight can create a whole new shake pattern. Fine adjustments usually outperform aggressive fixes.
Portable cooling setups can help while repairing ceiling fans during warmer months. Stay comfortable indoors with best rechargeable fan under 1000 options that work well during maintenance or temporary fan shutdowns. Extra airflow keeps rooms manageable while ceiling repairs take longer than expected.

Blade Alignment After Cleaning
Cleaning a ceiling fan seems harmless until someone accidentally bends a blade while wiping aggressively. Pressing downward on one blade while cleaning the dust can change its angle slightly compared with the others. The fan may look perfectly fine while turned off, yet wobble badly once spinning starts. Blade alignment shifts easier than most people expect.
Check alignment after deep cleaning sessions, especially if the fan suddenly starts shaking afterward. Measure the distance from each blade tip to the ceiling or floor using the same reference point every time. One blade sitting lower than the others usually reveals itself pretty quickly. Consistent spacing matters more than visual perfection.
Blade irons sometimes twist slightly during cleaning too. Those metal brackets connect the blade to the motor housing, and even small bends affect spin balance. Remove the blade carefully if the bracket looks uneven instead of trying to force it while attached. Gentle corrections protect both the blade and motor assembly.
Repeated over-tightening creates another common issue. Screw holes in MDF blades can weaken and compress after years of maintenance. That compression changes how the blade sits against the bracket, creating wobble despite tight screws. Washers or replacement blades may become necessary once the holes stop holding shape properly.
Motor Strain From Ignored Wobble
A wobbling fan doesn’t just create noise. Constant imbalance forces the motor to work harder during every rotation, especially at higher speeds. Over time the motor may start humming, overheating, or losing efficiency because the spinning weight never stabilizes fully. Motor strain quietly increases the longer the wobble continues.
Some fans develop a faint burning smell after months of imbalance. Others begin clicking during startup or slowing down unexpectedly between speed settings. Those symptoms often trace back to vibration stress spreading through the internal components. Early blade repairs help avoid larger electrical or mechanical problems later.
The mounting hardware also suffers from repeated shaking. Screws loosen faster, brackets wear unevenly, and ceiling boxes absorb constant movement they weren’t meant to handle long term. That’s why fixing a bent blade early saves more than just comfort. Preventive repair protects the entire fan system.
Fans that continue wobbling after balancing, alignment checks, and hardware tightening may have internal motor wear already in progress. Grinding sounds or uneven startup motion usually point toward deeper mechanical problems. At that stage, replacement may become more practical than continued repairs. Still, most wobble issues get resolved long before reaching that point.


Best Small Flush Mount Ceiling Fans 2026 Ultimate Picks

Best Smart Ceiling Fan India 2026 For Effortless Comfort

Best Smart Ceiling Fans with Lights for 2026: Top Picks

Best Smart Home Non Ceiling Fans 2026 For Ultimate Comfort

Best Outdoor Misting Ceiling Fan 2026 For Ultimate Comfort

Best Ceiling Fans With Lights For Vaulted Ceilings 2026 Top Picks

Best Outdoor Ceiling Fans For Porch 2026 With Style And Breeze

Best WiFi Enabled Ceiling Fan 2026 For Effortless Comfort





