
How to Fix a Ceiling Fan Light Pull Switch Fast
How to fix a ceiling fan light pull switch becomes a real headache once the chain suddenly stops clicking, the light flickers like crazy, or the switch feels loose in your hand. One minute everything works fine, then bam, the chain pulls out or refuses to respond. That tiny switch can turn a perfectly good ceiling fan into an everyday annoyance, especially late at night when nobody wants to stand on a chair wrestling with a broken pull chain. Small electrical issues like this tend to snowball because people either ignore them or assume the entire fan needs replacing.
A worn switch usually gives warning signs before it completely fails. The chain may snag, skip clicks, or feel oddly stiff during use. Sometimes the light only works if the chain is pulled at a weird angle, which honestly drives people nuts after a while. Fixing the problem early helps avoid damaged wiring, cracked switch housings, or unnecessary strain on the fan’s light kit.
Ceiling fan pull switch repair sounds intimidating at first, but the process is often simpler than expected. Most setups rely on a compact pull-chain switch connected by a few color-coded wires. With the power safely turned off and the right replacement switch nearby, the repair usually involves removing the fan housing, disconnecting the old component, and attaching a new one in the same configuration. Plenty of frustration comes from mixing up wire placement, so careful labeling saves a ton of time.
Old switches also fail because of constant tugging. Heavy pulls, tangled chains, or repeated yanking eventually wear down the internal spring mechanism. Dust buildup inside the fan housing can make the switch feel gritty or unreliable too. A quick cleaning while the housing is open often improves overall fan performance and helps the new switch last longer.
Electrical safety matters more than speed here. Rushing through the repair without shutting off the breaker can lead to shocks or damaged wiring connections. Stable ladders, proper lighting, and a voltage tester help reduce risky mistakes. Little details matter, especially with older ceiling fans where wire colors don’t always match modern diagrams.
Some fans hide the switch behind tight housings that barely leave room for your fingers. Yeah, that part can feel annoying. Still, patience pays off because forcing the switch out may crack the fixture or damage nearby wires. Slow, steady handling usually keeps the repair straightforward and avoids turning a small project into a costly replacement job.
Light pull switch problems also affect daily comfort more than people expect. Nobody enjoys standing in a dark room yanking a chain repeatedly just to get a dim bulb working again. Smooth operation matters because ceiling fans are used constantly in bedrooms, living rooms, patios, and workshops. A properly repaired switch restores convenience instantly without draining the wallet on a completely new fixture.
How To Fix A Ceiling Fan Light Pull Switch
A dead pull chain can make a good ceiling fan feel useless in a hurry. The light flickers, the chain hangs loose, or the switch clicks with zero response, and suddenly a tiny part becomes the whole problem. That’s why how to fix a ceiling fan light pull switch matters so much for a room that depends on quick, simple lighting. A careful repair can restore light control, avoid needless fan replacement, and keep the job from turning into a messy electrical guessing game.
Fan Pull Switch Basics
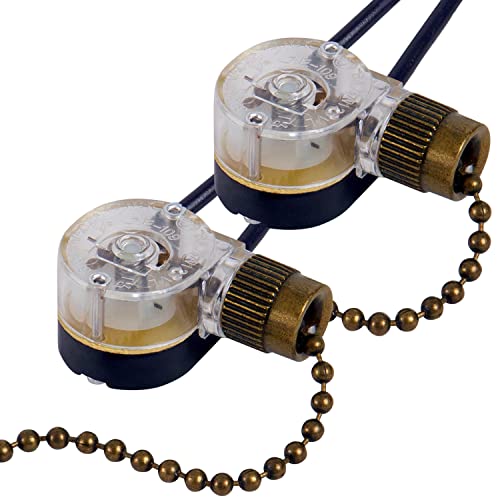
A ceiling fan light pull switch is a small part, but it handles a lot of daily abuse. Every tug moves internal contacts that open or close the light circuit. After enough use, those contacts can wear down, stick, or stop lining up cleanly. That’s usually where flickering lights, dead clicks, and a chain that feels “off” begin.
The switch usually sits inside the lower light kit housing. Most fan light switches use two wires, though some models may have a different setup depending on the fixture design. Taking a quick photo before disconnecting anything is a smart move because wire placement matters more than memory. One wrong connection can leave the light dead even after a new switch is installed.
A failed switch doesn’t always mean the fan motor has a problem. The blades may still spin normally while the light refuses to cooperate. That separation matters because fan motor issues and light switch failure need different fixes. Treating them as the same problem can waste money and send the repair in the wrong direction.
Some signs point straight at the pull switch. A chain that pulls out too far, clicks loosely, jams halfway, or turns the light on only from a certain angle usually means the internal switch is worn. A bulb that works in another lamp also helps narrow things down. Simple checks like these keep the repair grounded instead of turning it into a guessing contest.
Safety Before Opening The Fan
Power has to be off before the fan housing comes apart. Not just the wall switch, either. The safer move is turning off the correct breaker and confirming the wires are not live with a voltage tester. That one step protects against electric shock and keeps a small repair from becoming a bad day.
A stable ladder matters more than people admit. Ceiling fan repairs put both hands above shoulder level, so wobbling around on a chair is asking for trouble. Good lighting, a flat work surface for screws, and a small container for parts make the job smoother. The repair feels less annoying when small screws, wire nuts, and chain pieces aren’t rolling across the floor.
Old ceiling fans can be a little weird inside. Wire colors may not match the neat diagrams found online, and previous repairs may have left behind sloppy connections. That’s why labeling wires before removing the old switch is worth the extra minute. Careful notes protect the original wiring pattern and reduce the chance of reconnecting the new switch incorrectly.
Some electrical repairs in the home overlap with vehicle or appliance wiring ideas, but the parts are not interchangeable. For a separate automotive lighting issue, compare the correct method through bypass brake light switch before mixing up repair logic from totally different systems. A ceiling fan needs household-rated components, not shortcuts borrowed from unrelated wiring jobs. Keeping each repair in its own lane makes the work safer and cleaner.
Remove The Old Pull Switch
The light kit cover usually comes off with a few screws around the base. Support the glass shade or fixture plate while loosening those screws because it may drop slightly once released. Inside, the pull switch is often held by a small threaded collar on the outside of the housing. Removing that collar lets the old switch slide inward, making the switch body easier to access.
Before disconnecting wires, snap a clear photo from more than one angle. Phone photos save headaches, especially if the wires are tucked tightly or the colors look faded. Then mark each wire with tape if the setup seems confusing. Those little labels help preserve wire order, connection points, and the exact layout used by the original switch.
Wire nuts may twist off easily, but older ones can be stubborn. Hold the wires steady and avoid yanking because brittle copper can break or loosen deeper inside the fixture. If the connection looks burnt, melted, or unusually dark, stop and inspect more carefully. Heat damage around a pull switch points to a bigger electrical concern than normal wear.
The old switch should match the replacement in function, size, and rating. A two-wire light switch should not be replaced with a random multi-speed fan switch just because it fits the hole. Ceiling fans use different switches for lights and fan speeds, and mixing them up can cause trouble. Matching the amp rating, voltage rating, and wire count keeps the repair practical.

Install The New Switch Correctly
The new pull switch should slide into the same opening where the old one sat. The chain passes through the housing, and the threaded collar tightens from the outside. Don’t crank it down like a plumbing fitting because the housing can bend or crack. A snug fit is enough to hold the replacement switch steady during normal pulls.
Reconnect the wires exactly as the old switch was connected. Use fresh wire nuts if the old ones feel loose or damaged. The exposed copper should be fully covered, with no bare wire sticking out from the connector. Clean connections support steady light operation and lower the chance of flickering after the repair.
LED bulbs can make troubleshooting a little trickier because some flicker from incompatible dimmers or loose connections. That does not mean the pull switch is always guilty. For a separate lighting setup that uses vehicle LEDs, follow the right resistor logic through install load resistors instead of applying that fix to a ceiling fan. Home ceiling fans need proper switch wiring, not random resistor add-ons.
After the wires are secure, tuck them back into the housing without pinching anything. The switch should sit clear of sharp metal edges, moving parts, and hot bulb areas. Reinstall the cover carefully so no wire gets trapped under a screw. That final check protects wire insulation, switch stability, and the fixture’s long-term reliability.
Test The Light Without Rushing
Once the housing is back together, turn the breaker on and test the pull chain with calm, normal tugs. The light should respond cleanly with each pull. A crisp click usually means the internal mechanism is engaging the way it should. If the light still fails, the next suspect may be the bulb socket, wire connection, or wall switch.
A flicker after replacement deserves attention. Loose bulbs, weak wire nuts, and worn sockets can all mimic switch failure. Try a known working bulb and make sure it seats firmly in the socket. Small checks like that prevent replacing a switch twice for a problem that started somewhere else.
Some ceiling fans are simply at the end of their useful life. Brittle wiring, cracked housings, noisy motors, and repeated switch failures can make another repair feel less practical. In a bedroom where quiet operation matters, compare replacement ideas with hunter ceiling fan for bedroom before sinking more time into a tired fixture. A new fan may make sense when repair cost, noise, and reliability all start working against you.
Still, many pull switch problems are fixable with patience and the right part. The job rewards careful hands more than fancy tools. Take photos, match the switch, secure the wires, and test slowly. That approach keeps ceiling fan light repair simple, safe, and far less frustrating than replacing the whole fan too soon.
Fixing A Ceiling Fan Light Pull Chain That Stopped Working
Nothing kills the mood in a room faster than a ceiling fan light that suddenly refuses to turn on. The chain gets pulled again and again, the light flickers for a split second, then everything goes dark like the switch gave up completely. A lot of people start thinking the whole fixture is shot, but most of the time the real issue hides inside a tiny worn switch or a loose electrical connection. Fixing a ceiling fan pull chain the right way can restore stable lighting, reduce annoying flickers, and keep an older fan working longer without unnecessary replacement costs.
Loose Chains And Broken Internal Parts
A loose pull chain usually points toward worn internal components rather than cosmetic damage. Inside the switch housing sits a tiny spring-loaded mechanism that handles every pull. Over time, repeated tension weakens those internal contacts until they stop grabbing correctly. That’s why a chain may feel soft, skip clicks, or pull completely free from the switch body.
Cheap replacement chains can also create problems. Some chains feel heavier than the original and put extra strain on the switch over time. A longer decorative chain may look nice in a living room, but excessive weight slowly damages the internal pull mechanism. Keeping the chain light and balanced helps preserve switch durability.
Dust buildup inside the housing creates another hidden headache. Ceiling fans collect grime faster than most people realize, especially near kitchens, covered patios, and humid rooms. Fine dust particles settle around the switch contacts and interfere with smooth movement. Cleaning the inside while replacing the switch often improves chain responsiveness and reduces future sticking.
Outdoor fans tend to wear out faster because humidity and temperature swings hit electrical parts hard. Moisture can slowly corrode switch contacts even if the fan looks clean from the outside. For spaces exposed to changing weather, compare reliable airflow setups through best ceiling fan outdoor porch options that handle moisture and airflow stress more effectively. A weather-resistant fixture usually holds up better than forcing an indoor fan to survive outdoor conditions.
Why The Light Flickers After Repair
A newly installed switch can still leave the light flickering if another connection inside the fan is loose. Wire nuts hidden inside the light kit sometimes loosen gradually from vibration. Ceiling fans shake slightly during operation, and over months or years that movement affects weak electrical connections. Tightening every wire connection carefully improves electrical stability and helps eliminate inconsistent lighting.
Bulb compatibility matters too. Some older ceiling fans struggle with certain LED bulbs, especially ultra-cheap models with poor driver circuits. The switch itself may work perfectly while the bulb causes delayed startup or random flickering. Swapping in a reliable bulb helps isolate the real source of the problem.
Heat buildup inside enclosed light kits can shorten switch life faster than expected. Oversized bulbs produce more heat around the switch housing and nearby wiring. That trapped heat gradually weakens plastic parts and internal contacts. Lower-heat bulbs often reduce stress on light sockets, wiring insulation, and the replacement switch itself.
Wall switches sometimes share part of the blame. A weak wall switch connection may cause symptoms that look exactly like pull switch failure. Testing the fan with the wall switch fully engaged helps narrow things down before tearing the fan apart again. Small troubleshooting steps save time and prevent replacing perfectly good parts.
Common Mistakes During Ceiling Fan Repairs
One of the biggest mistakes happens before the repair even starts. People often assume flipping the wall switch cuts all power to the fan, then begin working on live wires accidentally. The safer move always involves shutting off the breaker and confirming with a tester. A few extra seconds spent checking power protects against electrical accidents and damaged components.
Another common problem involves forcing the light kit apart too aggressively. Ceiling fan housings can feel stubborn after years of dust and heat exposure. Twisting or prying too hard may crack fragile plastic housings or damage hidden wiring. Slow handling protects the fixture housing and keeps the repair from getting expensive.
Incorrect wire matching creates headaches later. Some replacement switches look identical while using completely different terminal layouts. Matching wire colors alone is risky if the old wiring setup was already modified years ago. Taking photos before disconnecting anything gives a clear reference for restoring the original wire arrangement.
Over-tightening screws causes more problems than people expect. Light kit covers and switch collars usually attach to thin metal or brittle plastic. Tightening them too aggressively can strip threads or crack mounting points. A secure fit matters, but brute force rarely improves repair quality.
Signs The Entire Fan Needs Replacement
Sometimes the switch isn’t the only thing wearing out. A ceiling fan with loud grinding noises, wobbling blades, overheating smells, and repeated electrical problems may be nearing the end of its lifespan. Replacing switches over and over won’t fix deeper motor issues hiding inside the fan housing. Paying attention to those warning signs helps avoid throwing money at temporary fixes.
Old fan wiring insulation can become brittle from years of heat exposure. Cracked insulation around the light kit creates safety concerns that go beyond a simple pull switch repair. If the internal wiring looks burned, stiff, or damaged, replacement often becomes the safer route. Electrical reliability matters more than squeezing extra years from a worn fixture.
Some homeowners switch away from ceiling fans entirely in smaller spaces with awkward layouts. Portable airflow setups now include quieter motors, remote control options, and smart scheduling features that fit apartments or offices better than bulky overhead fans. For alternative airflow setups with modern controls, explore smart home non ceiling fans that offer flexible cooling without ceiling installation challenges. Different room layouts sometimes benefit from a totally different approach.
Repair costs also add up quietly. Buying multiple switches, replacing bulbs repeatedly, and spending hours troubleshooting old wiring eventually stops making sense financially. A newer fixture with stronger wiring and better lighting compatibility may reduce ongoing frustration. Long-term reliability should matter just as much as the immediate repair bill.
Keeping The New Pull Switch Working Longer
Gentle handling makes a bigger difference than most people realize. Yanking the chain hard every day slowly destroys the tiny internal contacts inside the switch. Short, controlled pulls reduce strain on the mechanism and help preserve switch lifespan. That small habit alone can delay another repair for years.
Cleaning the fan regularly matters too. Dust buildup increases heat around the light kit and allows grime to work its way into the switch housing. Wiping the blades and lightly vacuuming vents helps maintain better airflow around electrical parts. Cooler operating temperatures support longer component life and steadier fan performance.
Balancing the fan blades reduces vibration stress inside the fixture. Excessive wobbling shakes wire connections and gradually loosens mounting hardware around the switch housing. Small balancing kits often solve that problem quickly. Stable movement protects internal wiring, light sockets, and the replacement switch.
Seasonal inspections help catch small problems before they turn into expensive repairs. A loose chain, delayed light response, or faint buzzing sound often appears long before total failure happens. Catching those signs early makes repairs simpler and less frustrating. Regular maintenance keeps the fan feeling reliable instead of unpredictable every time the light gets switched on.


Best Small Flush Mount Ceiling Fans 2026 Ultimate Picks

Best Smart Ceiling Fan India 2026 For Effortless Comfort

Best Smart Ceiling Fans with Lights for 2026: Top Picks

Best Smart Home Non Ceiling Fans 2026 For Ultimate Comfort

Best Outdoor Misting Ceiling Fan 2026 For Ultimate Comfort

Best Ceiling Fans With Lights For Vaulted Ceilings 2026 Top Picks

Best Outdoor Ceiling Fans For Porch 2026 With Style And Breeze

Best WiFi Enabled Ceiling Fan 2026 For Effortless Comfort





