
How To Fix A Ceiling Fan That Stopped Working Fast
How to fix a ceiling fan that stopped working usually starts with one annoying moment. You flip the switch, wait for that familiar breeze, and nothing happens. No movement. No humming sound. Sometimes the light still works, which only makes the situation feel even more confusing. Other times, the entire fixture seems completely dead, leaving the room stuffy and frustrating.
Loose wiring, worn capacitors, tripped breakers, or a failing wall switch often sit at the center of the problem. Plenty of homeowners assume the motor is fried right away, but honestly, that’s not always the case. A ceiling fan can stop spinning because of something surprisingly minor hiding behind the canopy or inside the switch housing. Small electrical issues tend to snowball after months of ignored wobbling, clicking noises, or inconsistent speeds.
Ceiling fan troubleshooting becomes much easier once the symptoms are narrowed down. A fan that hums without spinning points toward one direction, while a completely silent fan hints at another. Weird smells, overheating parts, or flickering lights can reveal deeper electrical trouble that shouldn’t be brushed aside. Nobody wants to waste money replacing a fan when a quick capacitor swap or wire reconnection could bring it back to life.
Dust buildup also creates more problems than most people realize. Thick layers of debris inside the motor housing can restrict airflow and trap heat around critical components. Over time, that extra heat stresses internal parts and shortens the fan’s lifespan. Even worse, neglected blades often throw the entire unit off balance, causing vibrations that loosen screws and strain mounting hardware.
Electrical safety matters every step of the way. Turning off the breaker before touching wiring isn’t just a suggestion; it’s the difference between a safe repair and a dangerous mistake. Some repairs feel simple on the surface, yet hidden voltage or damaged insulation can create unexpected hazards. Slow down, double-check connections, and avoid rushing through inspections with a “good enough” attitude.
Repairing a ceiling fan can save both time and money, especially when replacement costs keep climbing. Plenty of modern fans include integrated electronics that aren’t cheap to swap out. Also, matching an older fan design with existing room decor can become a headache nobody asked for. A careful diagnosis often keeps the original fixture running smoothly without tearing apart the entire room setup.
How to fix a ceiling fan that stopped working isn’t only about getting the blades moving again. It’s about restoring airflow, comfort, and peace of mind without jumping straight into expensive replacements. A few practical checks, a little patience, and some attention to warning signs can reveal what’s actually going wrong behind the scenes.
How To Fix A Ceiling Fan That Stopped Working
A dead fan can turn a comfortable room into a sticky mess fast, especially after a long day when all you want is steady airflow and a little quiet. The tricky part is that how to fix a ceiling fan that stopped working doesn’t always start with the motor, even though that’s where most people point the finger first. Loose wiring, a tired capacitor, a bad wall switch, or a tripped breaker can all make the fan act completely lifeless. Slow down, keep the power off before touching anything, and treat every symptom like a clue instead of guessing your way through the repair.
Ceiling Fan Not Working
A ceiling fan that suddenly quits usually leaves behind a few hints. Maybe the light kit still works, but the blades won’t move. Maybe the fan hums, stalls, or stays completely silent. Those small differences matter because they help separate a power problem from a motor or capacitor issue.
Start at the breaker panel before grabbing tools. A tripped breaker can cut power to the fan while other outlets nearby still seem fine, which makes the problem feel more mysterious than it is. Flip the breaker fully off, then back on, and listen for any change at the fan. If nothing responds, the issue may sit in the wall switch, wiring connection, remote receiver, or fan housing.
The wall switch deserves a close look because it takes daily abuse. A loose switch, worn internal contact, or poor wire connection can stop the fan from receiving power. If the switch feels hot, crackles, or works only when pressed a certain way, stop using it until it’s checked. That kind of symptom points toward a safety risk, not just an inconvenience.
Fans with remotes add another wrinkle. Dead remote batteries sound too obvious, but yep, they still cause plenty of false alarms. Reset the remote, check the dip switch settings if your model has them, and inspect the receiver tucked inside the canopy. A failed remote receiver can make a perfectly usable fan seem dead from the floor.
Check Power And Switches First
Power checks should stay simple and careful. Turn off the breaker before opening the canopy or switch box, then use a proper voltage tester only if you’re comfortable doing so. Electrical safety beats speed every single time. A ceiling fan is mounted overhead, wired into the home, and often connected to both fan and light circuits, so casual poking around is a bad idea.
A fan that has power but won’t spin often behaves differently from one with no power at all. You may hear a faint hum, feel warmth near the motor, or see the light working while the blades sit still. That usually narrows the problem to the capacitor, pull chain, speed switch, or motor winding. No sound, no light, and no response usually pushes the diagnosis back toward incoming power.
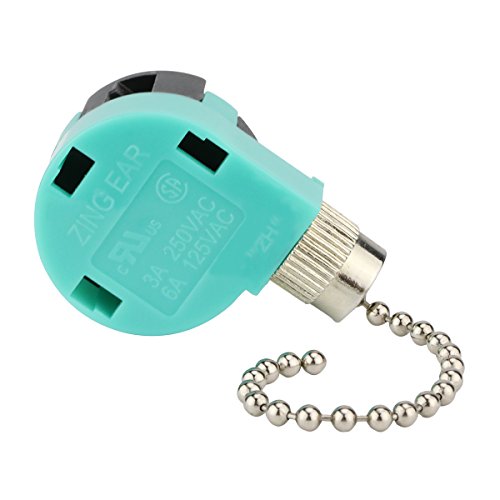
Old pull chains can fail in a sneaky way. The chain may still click, but the internal switch no longer completes the circuit. That leaves the fan stuck off, stuck on one speed, or acting randomly. Replacing a pull chain switch is often cheaper than replacing the fan, but the wiring must match the original configuration.
Separately, home projects can get oddly specific, so keep your repair notes organized before jumping between unrelated tasks. For a totally different DIY material question, compare texture and weight with light worsted yarn before buying supplies for craft repairs or decor accents. Back at the fan, labeling wires before disconnecting anything can prevent a small repair from turning into a head-scratcher.
Inspect The Capacitor Carefully
The capacitor is one of the most common reasons a ceiling fan stops spinning. It helps the motor start and maintain speed, so a weak capacitor can leave the blades motionless even while the fan hums. A bad capacitor may look swollen, cracked, or discolored. Sometimes, though, it looks perfectly normal, which is why symptoms matter so much.
A fan that needs a hand push to start is a classic red flag. The motor may have power, but it lacks the extra kick needed to move the blades from rest. That points strongly toward a failed start capacitor. Don’t keep running the fan this way because the motor can overheat while struggling.
Capacitor ratings must match the fan’s requirements. The microfarad rating and voltage rating are not random details, and guessing can damage the motor or create unsafe operation. Remove the old part only after power is off, then match the printed specifications. A proper replacement often restores fan speed control and normal startup without replacing the whole unit.
Some ceiling fans use multi-wire capacitors tied to several speed settings. That setup can look intimidating at first glance. Take a photo before disconnecting wires, label each connection, and avoid mixing colors based on memory alone. Careful documentation saves time and keeps the repair from turning into trial and error.
Listen For Humming Or Silence
Sound tells a useful story. A humming fan usually means power is reaching the unit, but the blades cannot spin properly. That could come from a bad capacitor, jammed motor, damaged bearings, or a stuck speed control. Total silence, on the other hand, often suggests no power, a bad switch, or a failed receiver.
Try spinning the blades gently by hand with the breaker off. They should move smoothly without grinding, scraping, or stopping abruptly. Resistance can mean dust-packed bearings, a bent blade bracket, or something rubbing inside the housing. A fan that physically can’t rotate won’t come back to life with electrical parts alone.
Ceiling fans mounted in bedrooms often run for long stretches, especially during warm nights. That steady use can wear down capacitors, loosen mounting hardware, and expose weak switches over time. To upgrade a tired unit rather than keep chasing repairs, compare airflow and noise needs with bedroom ceiling fans before choosing a replacement. A quiet motor and stable blade balance matter more than flashy features in a sleep space.
A burnt smell is never something to shrug off. Shut the breaker off right away if the fan smells hot, smokes, or leaves dark marks around the housing. Those signs may point to overheated wiring, a damaged motor winding, or a failing control module. At that stage, a licensed electrician is the smarter call.
Look Inside The Canopy
The canopy hides many of the connections that keep the fan alive. Over time, vibration can loosen wire nuts or strain connections, especially on older installs. A loose neutral wire can stop the fan and light from working. A loose hot wire can create flickering, intermittent operation, or complete failure.
Turn off the breaker before lowering the canopy. Check that the wire connectors are tight and that no copper is exposed outside the connector. Look for brittle insulation, scorch marks, or wires that seem pinched against the mounting bracket. Clean wiring should look secure, organized, and free from heat damage.
Remote-controlled fans often place the receiver inside this same canopy. That small box can fail from heat, age, or voltage spikes. If the wall switch sends power but the fan and light won’t respond, the receiver module may be the weak link. Bypassing or replacing it depends on the fan design, so follow the wiring diagram closely.
Not every link in a home project belongs to the same repair lane, and forcing one would sound goofy. Separately, hobby gear needs its own control setup, so compare signal feel and response through drone racing remote control if that’s on your bench after the ceiling fan is handled. For the fan itself, keep the focus on secure connections, correct wiring, and parts that match the original setup.
Check Blades, Bearings, And Dust
Dust may look harmless, but it can create real drag. Thick buildup on blade tops throws off balance and adds extra strain to the motor. Dust inside vents can trap heat around the motor housing. A fan already weakened by age may finally stop after months of running hot.
Clean the blades with a damp cloth while supporting each blade gently. Avoid bending brackets because even small changes can cause wobble later. Wipe around the motor vents, but don’t spray cleaner into the housing. Dry cleaning around electrical parts keeps moisture away from wiring and bearings.
Bearings can also wear out, especially in older fans that have run for years. Grinding, squealing, or rough blade movement points toward mechanical wear rather than a simple switch problem. Some fans allow lubrication, while many modern sealed motors do not. If the bearings are sealed and failing, replacement may be more practical than repair.
Blade imbalance can loosen screws and make the fan shake itself into trouble. Tighten blade screws, mounting screws, and light kit screws while the power is off. Use a balancing kit if the fan wobbles after cleaning. Stable rotation protects the motor, reduces noise, and keeps wiring from being stressed by constant vibration.
Know When Repair Stops Making Sense
Some ceiling fan repairs are worth it, and some are money pits. A cheap capacitor, switch, or receiver replacement can make sense if the fan is sturdy and still fits the room. A burned motor, cracked housing, or damaged mounting bracket changes the math quickly. Safety and reliability should carry more weight than squeezing a few extra months from a failing unit.
Age matters too. Older fans may lack replacement parts, especially if the brand discontinued the model. Tracking down odd switches or proprietary receiver modules can cost more time than the fan is worth. At that point, replacement may bring quieter operation, better airflow, and cleaner controls.
Still, don’t replace the fan just because it stopped once. A tripped breaker, dead remote battery, loose wire, or failed capacitor can mimic a major failure. Work through the simple checks first, then move toward deeper electrical and mechanical issues. Step-by-step troubleshooting keeps the repair practical instead of expensive.
The safest path is the one that matches the symptom. No power calls for breaker, switch, wiring, and receiver checks. Humming without movement points toward capacitor, motor drag, or stuck bearings. Flickering lights and random shutoffs raise concerns about loose connections, and those deserve careful attention before the fan gets used again.
How To Repair A Ceiling Fan That Suddenly Quit
Nothing feels more irritating than a fan dying right in the middle of warm weather, especially after it showed small warning signs for weeks. Strange noises, weak airflow, delayed startup, or wobbling blades usually point toward deeper trouble hiding inside the housing. How to repair a ceiling fan that suddenly quit becomes much easier once the problem is narrowed down step by step instead of replacing random parts. Careful troubleshooting saves money, avoids unnecessary replacements, and helps restore steady airflow without turning the repair into a frustrating guessing game.
Test The Ceiling Fan Motor
The motor sits at the heart of the fan, so it deserves close attention once simple fixes fail. A motor that overheats may feel unusually warm even after the fan has been off for a while. Burnt smells, grinding sounds, or visible discoloration near the housing often point toward motor stress or damaged windings. Those signs should never be ignored because overheating electrical parts can become dangerous.
Turn the breaker off before touching the fan blades or opening the housing. Rotate the blades slowly by hand and pay attention to resistance or rough movement. A healthy fan motor usually allows the blades to spin smoothly without scraping or sudden stops. Tight movement can signal worn bearings, internal debris, or a motor beginning to fail.
Older ceiling fans often struggle after years of dust buildup and constant use. Thick debris inside the vents traps heat around the motor and forces internal components to work harder than they should. Cleaning around the motor housing with a dry cloth or compressed air can sometimes improve cooling airflow and reduce strain. Just avoid forcing moisture into electrical parts.
Room size also affects how hard a ceiling fan works over time. Small rooms with oversized fans may create excessive vibration and unnecessary motor stress during long operation. To improve airflow balance in tighter spaces, compare layouts and blade sizes with small room ceiling fan setups before replacing your current unit. Matching the fan size to the room often improves both comfort and long-term durability.
Fix Loose Ceiling Fan Wiring
Loose wiring causes all sorts of strange behavior. A fan may work one day, stop the next, then suddenly come back to life after the switch is flipped a few times. Flickering lights, delayed startup, and random shutoffs usually point toward a weak electrical connection somewhere between the switch and motor housing.
Lower the canopy carefully after shutting off power at the breaker. Inspect wire nuts, exposed copper, and insulation around each connection. Loose wire connectors sometimes separate just enough to interrupt the circuit while still looking attached from a distance. Tug each wire gently to verify the connection feels secure.
Heat damage deserves extra attention. Melted insulation, darkened copper, or brittle wires indicate excessive resistance or overheating somewhere in the circuit. Those warning signs should be repaired before using the fan again because damaged wiring can increase the risk of electrical failure. Safe electrical connections matter more than getting the fan spinning quickly.
Some older homes contain wiring that becomes fragile with age. Brittle insulation can crack while moving wires during a repair, especially around tight junction boxes. If the wiring condition looks questionable, bringing in a licensed electrician may prevent a much bigger problem later. Ceiling fans draw continuous power during operation, so stable connections are critical.
Replace A Faulty Fan Switch
Wall switches wear out more often than many people expect. Daily use slowly weakens internal contacts, especially in homes where the fan runs constantly through hot seasons. A bad switch can interrupt power completely or cause strange symptoms like flickering lights and inconsistent fan speeds. Intermittent power loss often traces back to the switch itself.
Flip the switch several times while listening carefully. Crackling sounds, loose movement, or a warm switch plate usually signal trouble. A properly functioning switch should feel solid and consistent every time it’s used. Soft clicks or delayed responses can indicate worn internal parts.
Replacing a switch isn’t especially difficult, but the wire placement must match the original setup exactly. Labeling wires before disconnecting anything helps prevent confusion during installation. Standard single-pole switches differ from fan speed controls or dimmer switches, so the replacement needs to match the fan configuration. Correct switch compatibility keeps the fan operating safely.
Kitchen ceiling fans deal with extra grease, humidity, and heat that can shorten switch lifespan over time. Ventilation problems often make motors and controls work harder than expected. To improve airflow in compact cooking spaces, compare placement ideas through small kitchen ceiling fans before installing a replacement fan. Better airflow distribution can reduce heat buildup and improve comfort while cooking.
Repair Ceiling Fan Speed Problems
Speed issues usually start subtly. The fan may seem slower than usual, struggle to reach higher settings, or wobble harder at certain speeds. Those changes often point toward a failing capacitor, dirty bearings, or worn speed controls rather than a completely dead motor. Uneven speed control rarely fixes itself without attention.
A capacitor that weakens over time may still allow low-speed operation while failing at higher settings. That’s why some fans spin slowly but refuse to accelerate properly. Replacing the capacitor often restores normal speed performance if the motor itself remains healthy. Match the replacement specifications carefully because incorrect ratings can damage the fan.
Dirty blade brackets and unbalanced blades can also affect performance. Dust buildup changes blade weight distribution, which places additional strain on the motor during startup and operation. Tightening blade screws and cleaning the blade surfaces can noticeably reduce wobble and vibration. Balanced airflow protects both comfort and mechanical parts.
Fans installed in humid environments sometimes develop corrosion around moving components. Rust near bearings or mounting hardware can increase resistance and create rough operation at higher speeds. Inspect screws, brackets, and rotating parts for signs of corrosion while the fan is disassembled. Small maintenance steps often prevent larger mechanical failures later.
Check The Ceiling Fan Remote Receiver
Remote-controlled fans create convenience, but they also introduce extra failure points. A bad receiver inside the canopy can stop the fan completely even when the wall switch still provides power. That situation confuses plenty of people because the fan appears dead despite an active electrical circuit. Receiver failure becomes more common as electronics age.
Start with the simple checks first. Replace remote batteries, confirm the remote settings match the receiver, and reset the power at the breaker. Some remotes lose synchronization after power interruptions or voltage fluctuations. A quick reset occasionally restores operation without replacing any parts.
If the fan still refuses to respond, inspect the receiver inside the canopy. Burnt smells, discoloration, or loose wires around the receiver indicate possible failure. Some receivers can be bypassed temporarily for testing, though wiring diagrams must be followed carefully. Incorrect bypassing can damage the fan or create unsafe conditions.
Integrated smart controls add another layer of complexity. Fans connected to smart home systems may stop responding after software glitches, failed updates, or power surges. Disconnecting smart integrations temporarily can help isolate the problem. Reliable manual controls often simplify troubleshooting during repairs.
Deal With Ceiling Fan Noise Issues
Noise usually appears long before complete failure. Clicking, scraping, buzzing, or rattling sounds often signal loose hardware or stressed components hidden inside the fan. Ignoring those sounds allows vibration to worsen over time until parts begin loosening further. Persistent noise should always be treated as an early warning sign.
Loose blade screws create one of the most common rattling problems. Tighten all blade screws evenly without over-torquing them. Uneven tightening can throw the blades off balance and create fresh vibration issues. Stable blades help reduce stress on the motor and mounting bracket.
Buzzing sounds often point toward electrical problems instead of mechanical ones. Dimmer switches connected to standard ceiling fans can create humming noises because the electrical current isn’t regulated properly. Replacing the dimmer with a fan-rated speed control may eliminate the sound. Proper electrical compatibility matters more than many homeowners realize.
Scraping sounds usually indicate physical contact somewhere inside the housing. Bent blade brackets, loose light kits, or warped blade arms can shift during operation and rub against nearby components. Shut the fan off immediately if scraping becomes severe. Continued operation can damage the motor housing or internal wiring.
Prevent Future Ceiling Fan Failures
Regular maintenance keeps small issues from becoming expensive repairs later. Dust the blades monthly, tighten visible screws every few months, and pay attention to new sounds or wobbling. Those simple habits reduce strain on the motor and improve airflow consistency. Preventive maintenance often extends the lifespan of ceiling fans significantly.
Seasonal adjustments also help. Ceiling fans running nonstop during warmer months accumulate more heat and dust inside the housing. Give the fan occasional breaks during cooler weather and inspect the vents for debris buildup. Better airflow around the motor helps reduce internal temperatures.
Voltage fluctuations can damage electronics and remote receivers over time. Homes with unstable electrical systems may benefit from surge protection, especially for fans with integrated LED controls or smart modules. Repeated power spikes slowly weaken sensitive components even if the fan appears functional at first. Electrical stability protects long-term performance.
Pay attention to mounting stability as well. Ceiling fans naturally loosen slightly after years of vibration, especially in rooms where they run daily. Inspect the mounting bracket occasionally and tighten hardware before wobble becomes severe. A securely mounted fan operates quieter, lasts longer, and places less strain on the ceiling box.


Best Small Flush Mount Ceiling Fans 2026 Ultimate Picks

Best Smart Ceiling Fan India 2026 For Effortless Comfort

Best Smart Ceiling Fans with Lights for 2026: Top Picks

Best Smart Home Non Ceiling Fans 2026 For Ultimate Comfort

Best Outdoor Misting Ceiling Fan 2026 For Ultimate Comfort

Best Ceiling Fans With Lights For Vaulted Ceilings 2026 Top Picks

Best Outdoor Ceiling Fans For Porch 2026 With Style And Breeze

Best WiFi Enabled Ceiling Fan 2026 For Effortless Comfort





