
How To Fix A Humming Ceiling Fan Motor Fast
How To Fix A Humming Ceiling Fan Motor becomes a real headache once that constant buzzing starts echoing through the room every single night. A ceiling fan should fade quietly into the background, not sound like a tired appliance begging for mercy. Sometimes the noise sneaks in gradually. Other times, bam, it suddenly hums loud enough to make movie nights or sleep feel downright irritating.
Loose screws, worn capacitors, dirty motor housing, or shaky mounting brackets often trigger the issue. Plenty of people assume the motor is dying, but honestly, that’s not always the case. Small mechanical problems usually pile up over time, especially in rooms where the fan runs for hours every day. Dust buildup also plays a sneaky role because trapped grime forces the motor to work harder than it should.
Electrical buzzing tends to frustrate people the most because the sound feels unpredictable. One day the fan sounds normal. The next day it hums loudly at low speed but quiets down at high speed. That strange pattern usually points toward capacitor trouble, loose internal wiring, or worn speed controls hiding behind the wall switch. Ignoring those warning signs can slowly shorten the fan’s lifespan.
Some fans hum simply because the blades became unbalanced after months of use. A slightly warped blade can throw the entire motor off rhythm, creating vibration that travels through the housing and ceiling mount. Tiny issues often create surprisingly loud noise. That’s the annoying part. The fan may still spin perfectly while sounding like it’s about to rattle apart.
Motor lubrication also matters more than people think. Older ceiling fans sometimes dry out internally, especially models installed years ago without regular maintenance. Friction inside the bearings creates that dull humming sound that gets louder during warmer months. A little cleaning and lubrication can completely change how the fan sounds and feels during operation.
Wall dimmer switches create another overlooked problem. Standard dimmers designed for lights can interfere with fan motors and trigger humming almost instantly. Plenty of homeowners accidentally use incompatible controls without realizing the damage they create over time. Replacing the wrong switch often solves the issue faster than tearing apart the entire fan.
How To Fix A Humming Ceiling Fan Motor isn’t about guessing randomly or replacing expensive parts right away. Careful troubleshooting usually exposes the real culprit faster than expected. A few simple adjustments, basic cleaning, or replacing one worn component can quiet the noise dramatically and restore smooth airflow without draining your wallet.
How To Fix A Humming Ceiling Fan Motor
A quiet room can feel ruined by one stubborn buzz overhead, especially after the lights go down and every little sound gets louder. That low motor hum usually points to vibration, electrical mismatch, dust buildup, loose hardware, or worn internal parts, not instant fan failure. The good news is that how to fix a humming ceiling fan motor usually starts with simple checks before anyone needs to think about replacing the whole unit. A careful, step-by-step look can save money, avoid guesswork, and bring the room back to that calm, breezy feel it’s supposed to have.
Start With The Sound Pattern
A ceiling fan hum tells a story, even if it sounds like plain old annoyance at first. A steady electrical hum often points toward the capacitor, wall control, or motor winding. A rattling hum usually leans toward loose screws, canopy vibration, or blade imbalance. A deep buzzing sound that changes with speed may come from strain inside the motor assembly.
Listen to the fan on each speed setting before touching anything. Low speed may hum louder because the motor gets less electrical force and struggles to keep a smooth rhythm. High speed may quiet the sound because the motor has enough torque to push through slight resistance. That pattern matters because speed-specific noise often narrows the problem faster than random tightening.
Turn the light kit on and off if the fan has one. A hum that appears only with the light may come from a dimmer, bulb vibration, or loose light housing instead of the motor itself. Some LED bulbs also buzz inside fan fixtures, especially with incompatible dimmers. Separating fan noise from light fixture noise keeps the repair from turning into a wild goose chase.
A simple example helps here. A fan that hums only on medium speed may have a weak capacitor or bad wall speed control. A fan that hums at every speed but also shakes probably has balance or mounting trouble. A fan that hums after years of quiet use may need cleaning, lubrication, or hardware tightening before deeper electrical work makes sense.
Kill Power Before Any Inspection
Safety comes first, even for a repair that seems small. Turn the fan off at the switch, then shut power off at the breaker before opening the canopy or checking wires. A ceiling fan motor uses household current, and live wiring is nothing to play around with. That one extra minute at the breaker can prevent a nasty shock.
Use a non-contact voltage tester before handling wiring inside the canopy. Wall switches can be wired in odd ways, especially in older homes or after DIY updates. A switch in the off position doesn’t always mean every wire above the fan is dead. Treat the electrical box like it’s live until the tester says otherwise.
Look at the fan manual if it’s still around, because wire colors and control setups vary. Some fans use remote receivers tucked above the canopy, while others connect directly to wall controls. A remote receiver can hum if it’s failing or struggling with the load. That small box is easy to overlook, but it can be a major noise source.
A practical rule fits well here: “If the hum gets sharper near the canopy, check the control path before blaming the motor.” That doesn’t mean the motor is innocent every time. It means the sound may travel through metal parts and make the motor seem guilty. Careful location checking helps avoid replacing parts that weren’t the problem.
Tighten The Mounting Hardware
Loose mounting parts can turn a healthy motor into a noisy one. The fan bracket, downrod, canopy screws, blade arms, and motor housing screws all need to sit snugly. Even one loose screw can create micro-vibration that sounds like a motor hum from below. The fan may still spin normally while the metal parts buzz against each other.
Start at the blades and work upward. Tighten each blade screw where the blade connects to the blade arm, then tighten the blade arm where it meets the motor. Don’t crank too hard because stripped screws create a new headache. Firm, even pressure is the goal, not brute force.
The canopy deserves a close look because it often hides the real rattle. A canopy that lightly touches the ceiling can buzz as the motor vibrates. A small adjustment in spacing can quiet the fan without touching the motor at all. Proper clearance keeps the canopy from acting like a little metal speaker.
Downrod fans need the set screws checked, too. A loose downrod can make a low hum feel heavier, especially at higher speeds. Flush-mount fans can have similar trouble around the mounting plate. In both cases, solid support reduces motor strain and keeps vibration from traveling into the ceiling box.
Clean Dust From The Motor Housing
Dust doesn’t look dramatic, but it can make a fan sound rough. Fine debris collects around vents, blade brackets, light kits, and motor housing seams. That buildup traps heat and adds uneven weight to the rotating parts. A cleaner fan often runs cooler, quieter, and smoother.
Use a microfiber cloth for the blades and a soft brush around the motor vents. Avoid spraying cleaner directly into the motor housing because moisture can damage electrical parts. Slightly damp cloths are fine for blade surfaces, but the motor area needs a dry touch. Gentle cleaning beats aggressive scrubbing around wiring and bearings.
Blade dust can also throw off balance. One blade loaded with grime weighs a little more than the others, and that tiny difference may cause wobble. Wobble creates vibration, and vibration gets mistaken for motor hum. This is why a fan can sound better after a basic cleaning even when no part was replaced.
Pay attention to greasy dust in kitchens and humid rooms. Sticky buildup grips the blade edges and motor vents harder than dry bedroom dust. Bathroom-adjacent spaces may have moisture-heavy air that makes grime cling tighter, so improve stale-air removal by comparing a bathroom fan for basement ceiling if damp air keeps creeping into nearby rooms. Better ventilation helps reduce moisture-related dust problems around ceiling fixtures.
Check The Wall Control
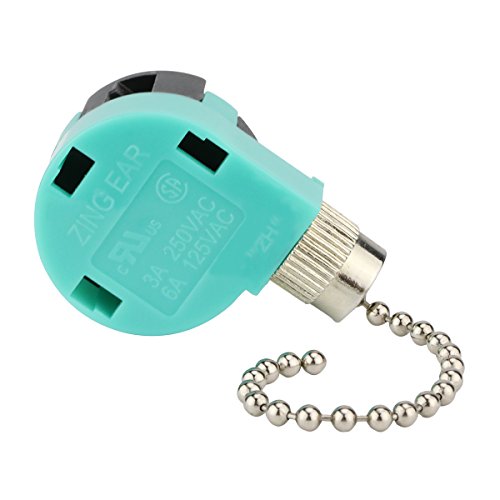
A wrong wall control can make a ceiling fan hum even if the motor itself is fine. Light dimmers are a common culprit because many are not built for fan motor loads. A dimmer chops the electrical flow in a way that can cause motor buzzing, heat, and speed instability. A fan-rated speed control is the safer match.
Look at the switch type before opening the fan. If the fan is controlled by a slider meant for lights, that’s a red flag. A proper fan control should clearly say it’s rated for ceiling fans. This small label matters because motor-rated controls handle electrical load differently than light dimmers.
Remote-controlled fans add another layer. A weak receiver or mismatched remote module may produce humming inside the canopy. Some receivers also buzz when paired with certain LED light kits. Removing the receiver for testing should only be done with power off and with clear wiring notes.
A real-life pattern shows up often: the fan hums after a wall switch upgrade, but it sounded fine before. That clue strongly suggests the new control is the problem. Replacing it with a fan-compatible wall control can stop the hum without touching the blades, capacitor, or motor bearings.
Inspect The Capacitor For Trouble
The capacitor helps the motor start and run at the right speed. A weak capacitor can make the fan hum, spin slowly, stall, or act strange on certain speed settings. The fan may need a push to start, which is a big warning sign. Slow starting and speed failure often point straight at this small component.
Capacitors usually sit inside the switch housing or canopy, depending on the fan design. Look for swelling, leaking, burnt smell, or cracked casing. Those signs mean replacement is needed, not cleaning or tightening. Use the same microfarad rating and voltage rating listed on the old part.
Don’t guess capacitor size based on looks. Two capacitors can look almost identical and behave differently inside the circuit. Installing the wrong rating can cause speed problems, extra heat, or continued humming. Matching the printed specifications keeps the repair clean and predictable.
A cautious homeowner may stop here and call an electrician, and that’s perfectly reasonable. Capacitors can hold a charge after power is off, so they deserve respect. If wiring feels confusing or cramped, the safer move is professional help. Saving money loses its charm fast if the repair creates a shock hazard.
Balance The Blades Properly
Blade imbalance can masquerade as a motor problem. A fan that wobbles even slightly sends vibration through the motor housing and mounting bracket. That vibration creates a hum, buzz, or rhythmic drone that gets worse with speed. Balanced blades reduce strain and help the motor spin with less resistance.
Measure the distance from each blade tip to the ceiling. A difference as small as about one eighth of an inch can be enough to cause visible wobble on some fans. Gently bend blade arms only if the manufacturer allows it, and never force brittle or older parts. Small corrections should be slow, careful, and even.
A blade balancing kit can help locate the heavy spot. Clip the temporary weight to one blade, run the fan, then move it until the wobble improves. Once the sweet spot is found, stick the permanent weight to the top of the blade. This basic process can quiet a fan that sounded like it had motor trouble.
Loose or warped blades create limits, though. A blade that has absorbed moisture, cracked, or twisted may never balance well again. Replacing a damaged blade set may be smarter than chasing the noise for hours. Stable blade geometry matters because the motor can only run smoothly if the rotating load stays even.
Separate Motor Hum From Bearing Noise
Motor hum and bearing noise can sound similar from across the room. A true electrical hum feels smooth and steady, while bearing noise often adds a rough, grinding, or dry tone. Bearings support the spinning shaft, and worn bearings create friction. Friction inside the motor makes the fan work harder and sound tired.
Turn the fan by hand while power is off. The blades should move smoothly without scraping, catching, or stiff spots. A fan that stops almost immediately may have tight bearings or internal resistance. A fan that spins freely but hums while powered may have an electrical issue instead.
Some older fans have oil ports, but many newer models use sealed bearings. Check the manual before adding oil anywhere. Random oiling can attract dust, drip into the light kit, or damage finishes. Manufacturer-approved lubrication is the only route that makes sense.
A dry bearing sound usually gets worse over time. It may begin as a soft hum, then turn into a scrape or growl. Once bearings are badly worn, repair may cost more than replacing the fan. That tradeoff matters, especially for budget fans with sealed motor assemblies.
Watch For Heat And Burning Smells
A humming fan that also runs hot deserves quick attention. Warm motor housing is normal to a point, but excessive heat is not. A burning smell, discoloration, or flickering light points to electrical stress. Turn the fan off and keep it off until the cause is found.
Heat often comes from overload, bad controls, failing capacitors, or internal motor wear. Dust-packed vents make the problem worse because trapped heat has nowhere to go. A fan installed too close to insulation or inside a cramped ceiling space may also struggle to cool itself. Airflow around the motor housing helps protect internal parts.
Pay attention to timing. A fan that hums only after running for twenty or thirty minutes may be reacting to heat buildup. A fan that hums immediately may have control, capacitor, or mounting issues instead. Tracking timing gives a better clue than simply saying, “It makes noise.”
Separate household strain from fan strain, too. Long DIY sessions can be rough on wrists, especially while holding tools overhead, so ease hand fatigue by reviewing red light therapy for carpal tunnel if repetitive repair work has already irritated your hands. Ceiling work looks simple from the floor, but overhead tasks can wear out your grip faster than expected.
Know When The Motor Is Failing
Some humming fans can’t be rescued with cleaning or tightening. A failing motor may hum loudly, spin weakly, smell hot, or shut off after running. Internal windings can wear down, and sealed components may not be serviceable. Persistent motor strain is the line where repair stops being simple.
Age matters, but it’s not the only factor. A fan in a humid room, dusty workshop, or daily-use bedroom may wear faster than one in a guest room. Cheap components also tend to show noise sooner. Still, even a modest fan may last well if it stays clean, balanced, and matched with the right controls.
Cost should guide the decision. Replacing a capacitor or wall control can be affordable, while motor replacement often makes less sense on low-cost fans. If the ceiling fan has sentimental value or a hard-to-match design, repair may still be worth it. For most standard fans, total repair cost should stay reasonable compared with replacement.
One more practical habit helps during overhead repairs. Keep small tools and accessories easy to see, and secure any headlamp before climbing a ladder, especially after comparing how to lock black diamond headlamp for safer hands-free lighting. Better visibility reduces dropped screws, awkward reaches, and those “where did that part go?” moments that turn a simple fan fix into a messy afternoon.
How To Quiet A Humming Ceiling Fan Motor Safely
A fan that keeps humming after basic tightening, cleaning, and blade balancing usually needs a closer look at electrical load, motor stress, and long-term wear. The sound may seem small during the day, then somehow turns huge once the room gets quiet. That’s the maddening part. A smart repair path keeps the fix simple, but it also knows when how to fix a humming ceiling fan motor needs caution instead of another random screwdriver turn.
Test One Change At A Time
Fixing a humming fan gets messy fast if too many parts are changed at once. Tighten one area, test the fan, then move to the next check. This keeps the repair honest because one clear change shows what actually helped. Guesswork usually wastes time and can hide the real cause.
Start with the easiest items before touching wiring. Clean the blades, snug the screws, check the canopy gap, and run the fan again. A simple notebook note helps more than people expect, especially if the hum changes by speed. Tracking the sound turns a frustrating repair into a cleaner process.
Use the same room conditions during each test. Keep the same light setting, same fan speed, and same wall switch position. A fan may sound different with the light kit on, the door closed, or the air conditioner running nearby. Consistent testing prevents false clues.
Small repairs can feel boring, but they’re often the ones that work. A quarter turn on a canopy screw or a cleaned blade edge may reduce the noise more than a new part. That’s why the slow path wins here. Simple checks protect the budget and lower the chance of creating a new problem.
Look Closely At The Fan Box
The ceiling box above the fan matters more than most people think. A ceiling fan needs a box rated to hold movement and weight, not just a basic light fixture box. If the box flexes, the motor vibration travels into the ceiling framing and creates a deeper hum. Fan-rated support keeps the whole fixture steadier.
Stand back and watch the canopy while the fan runs. A tiny shake near the ceiling usually means the movement starts above the motor, not inside it. That can make the fan sound worse than it really is. Mounting vibration often tricks the ear because the ceiling acts like a sounding board.
Older homes can have loose electrical boxes, tired screws, or mounting braces that no longer hold tight. A fan that was quiet for years may begin humming after seasonal wood movement or repeated vibration. Drywall dust around the canopy can be another clue that something has shifted. Structural looseness should be fixed before deeper motor repairs.
Don’t ignore a fan that visibly drops, sways oddly, or feels loose at the ceiling. Turn it off and inspect the mount before using it again. A humming motor is annoying, but a weak support box is a safety issue. Secure mounting protects the fan, the ceiling, and everyone sitting below it.
Reduce Nighttime Noise Triggers
Nighttime makes every fan sound louder because the house gets quieter. The refrigerator hum, outdoor traffic, and daytime chatter fade out, then the ceiling fan becomes the star of the show. A low buzz that seemed tolerable at dinner can feel sharp at midnight. Sleep disruption is often the real reason this repair feels urgent.
Try running the fan before bedtime and listening from the bed, not from directly below the motor. Sound changes across the room because walls, furniture, and ceiling height affect echo. A fan may hum more near a corner or above a hard floor. Room acoustics can make a normal motor sound more irritating.
Soft materials help reduce reflected sound. Curtains, rugs, fabric headboards, and upholstered chairs can absorb some vibration noise floating through the room. They won’t fix a bad capacitor or loose mount, but they can make a mild hum less noticeable. Sound control works best after the mechanical issues are handled.
Bedside habits matter too. Harsh lamps and late-night repairs make the room feel tense, so settle the space with a night time reading light if bright overhead lighting keeps sleep feeling out of reach. A quieter fan and softer light can make the room feel calmer without turning bedtime into another project.
Replace Noisy Controls Carefully
A humming fan that started after a switch change deserves a hard look at the control. Fan motors need controls built for inductive loads, not plain light dimmers. The wrong switch can cause buzzing, uneven speed, heat buildup, and shortened motor life. Replacing the control may be the cleanest fix.
Check the rating printed on the switch or packaging if it’s still available. A fan-rated control should clearly say it supports ceiling fans. If the switch only mentions incandescent or LED lights, it probably doesn’t belong on the fan motor. Control compatibility is not a small detail here.
Remote kits can also create noise, especially cheap receiver modules hidden in the canopy. A failing receiver may buzz even while the fan still responds to commands. That little electronic box can vibrate or send rough power to the motor. Receiver failure often gets blamed on the motor because it sits so close to it.
Match the control style to the fan design. Some fans are made for pull-chain speed settings, some for remote modules, and some for wall controls. Mixing parts can create weird behavior that feels impossible to trace. Correct pairing keeps speed changes smooth and helps the motor run cooler.

Decide Between Repair And Replacement
Repair makes sense when the problem is easy to isolate. A loose bracket, dirty blade set, weak capacitor, or incompatible wall control can usually be handled without replacing the whole fan. Those fixes target specific causes and often restore quiet operation. Throwing out the fan too early can waste money.
Replacement starts making more sense when the motor runs hot, smells burnt, or keeps humming after every basic repair. Sealed motors can be hard to service, and labor costs may climb quickly. A budget fan with a failing motor often isn’t worth a major repair bill. Repair value depends on the fan’s age, quality, and parts availability.
Style can matter, but function has to lead. A fan that looks great but hums every night is still a daily annoyance. Some newer designs reduce visual clutter and may suit rooms where traditional blades feel heavy, so compare a retractable blade ceiling fan if the old unit feels noisy, bulky, or awkward for the space. A replacement should solve a real comfort problem, not just look different.
Set a repair limit before buying parts. If the capacitor, control, receiver, and labor start approaching the cost of a reliable new fan, step back. That doesn’t mean every hum needs a replacement. It means spending wisely beats chasing one more part because the first three didn’t work.
Use A Practical Troubleshooting Order
A clear order keeps the repair from feeling like a guessing game. Start with power safety, then check visible hardware, blades, canopy, wall control, capacitor, and motor behavior. This path moves from low-cost checks to higher-risk electrical work. It also keeps the easiest wins near the front.
Run the fan at each speed after each adjustment. Low speed hum may signal weak starting support or control trouble. High speed vibration may point to balance, blade pitch, or mounting problems. Speed-based clues are some of the most useful signs a fan gives.
Pay attention to smell, heat, and startup behavior. A fan that hums but won’t spin has a different problem than a fan that spins fine but buzzes near the ceiling. Slow starts, uneven speeds, and warm housings all deserve caution. Motor stress can become unsafe if ignored.
Keep screws, wire nuts, and small covers organized as you work. A shallow bowl or magnetic tray prevents those tiny parts from rolling under furniture. Good lighting also matters because ceiling work already puts your neck and shoulders in a bad mood. Organized repair habits make the job smoother and reduce mistakes.
Call A Pro At The Right Moment
Some fan fixes are fair DIY territory, but not all of them. Call an electrician if wiring colors don’t match the manual, the ceiling box feels loose, or the fan shares a confusing switch setup. Electrical work can look simple until one mystery wire changes the whole picture. Professional help is cheaper than repairing a mistake inside the ceiling.
A pro also makes sense if the fan hums after a capacitor and control replacement. That may point to motor windings, internal connections, or a deeper load issue. Those problems are harder to confirm without proper tools. Advanced diagnosis can prevent wasted parts and repeat repairs.
Landlords and renters should be extra careful. Many leases don’t allow electrical fixture repairs without approval. Report the hum, describe the symptoms, and avoid opening wiring if it violates the agreement. Clear communication protects both safety and deposit money.
Homeowners should trust their instincts, too. If the fan smells hot, sparks, trips a breaker, or makes a sharp electrical buzz, stop using it. No quiet-room goal is worth pushing a risky fixture. Safety-first repair keeps a humming motor from turning into a bigger household problem.
Keep The Fan Quiet After The Fix
Once the hum is gone, maintenance keeps it from sneaking back. Dust the blades every few weeks in heavy-use rooms and inspect screws a few times a year. Fans slowly loosen as they spin, especially during long warm seasons. Routine tightening helps the motor stay smooth.
Keep blades dry and avoid harsh cleaners that can warp wood or damage finishes. Warped blades create imbalance, and imbalance brings vibration right back. A mild cleaner on a cloth is usually enough for blade surfaces. Gentle care protects both appearance and balance.
Use the fan at reasonable speeds for the room. Running an old fan on high all day in a dusty space can speed up wear. Give the motor a break sometimes, especially if it already needed repair. Lower strain often means quieter operation over time.
Check the sound every so often instead of waiting until it becomes unbearable. A faint new buzz can reveal a loose screw, dirty vent, or weakening part before the fan becomes truly annoying. Small fixes stay small when caught early. Early attention is the quietest repair strategy.


Best Small Flush Mount Ceiling Fans 2026 Ultimate Picks

Best Smart Ceiling Fan India 2026 For Effortless Comfort

Best Smart Ceiling Fans with Lights for 2026: Top Picks

Best Smart Home Non Ceiling Fans 2026 For Ultimate Comfort

Best Outdoor Misting Ceiling Fan 2026 For Ultimate Comfort

Best Ceiling Fans With Lights For Vaulted Ceilings 2026 Top Picks

Best Outdoor Ceiling Fans For Porch 2026 With Style And Breeze

Best WiFi Enabled Ceiling Fan 2026 For Effortless Comfort





