
How to Fix a Hunter Ceiling Fan Light Without Stress
How to fix a hunter ceiling fan light usually starts with one frustrating moment. The light flickers out of nowhere, refuses to turn on, or suddenly starts buzzing like an angry little bee above your head. A lot of people assume the whole fixture is toast, but honestly, many of these problems come from loose wiring, worn bulbs, faulty pull chains, or small connection issues hiding inside the housing. That sinking feeling after flipping the switch three times in a row? Yeah, that’s more common than most homeowners admit.
Ceiling fan lights tend to act up after years of vibration and daily use. Tiny components loosen gradually, especially in rooms where the fan runs constantly through hot afternoons or sticky summer nights. Loose wire connections, burned sockets, damaged light kits, and failing capacitors often create symptoms that seem much worse than they really are. A dim light can look like a dying fixture, while a stubborn flicker may simply point to a weak bulb connection that needs tightening.
Some repairs sound intimidating at first, but they’re surprisingly manageable with patience and a basic screwdriver. That’s the part many people don’t realize. A quick inspection around the light kit can reveal cracked sockets, scorched wires, or dusty connectors slowing everything down. Once those trouble spots are cleaned up or replaced, the fan light usually snaps back to normal without turning the project into an all-day headache.
Electrical safety matters here, though. Rushing into repairs without shutting off power creates unnecessary risk, especially with older ceiling fans that may have brittle internal wiring. Careful troubleshooting helps narrow down the issue before buying random replacement parts that may never solve the actual problem. Nobody wants to waste money swapping bulbs over and over while the real culprit hides behind the switch housing.
Some Hunter fan models also include remote receivers or integrated LED systems, which can complicate things a little. A remote that suddenly stops responding may trick people into thinking the light failed completely. In reality, dead batteries, receiver interference, or pairing issues often trigger the problem instead. Remote-controlled ceiling fan lights behave differently than traditional pull-chain systems, so identifying the fan style early saves time and frustration.
Then there’s the cosmetic side nobody talks about enough. A blinking or half-working fan light changes the entire mood of a room. Dim corners, uneven brightness, and annoying flickers can make bedrooms feel uncomfortable and living spaces feel neglected. Restoring a steady, reliable light doesn’t just improve visibility. It helps the room feel functional and comfortable again without replacing the entire fan assembly.
How To Fix A Hunter Ceiling Fan Light
A ceiling fan light that flickers, hums, or quits right before dinner can make the whole room feel off. The fan still spins, the switch still clicks, and yet the light acts like it has a mind of its own. That’s where how to fix a hunter ceiling fan light becomes less about guessing and more about checking the usual trouble spots in the right order. A calm, step-by-step approach helps protect the fan, the wiring, and, yep, your patience.
Hunter Fan Light Basics
Hunter ceiling fan lights usually fail for simple reasons before anything major goes bad. A loose bulb, tired socket tab, weak wall switch, faulty pull chain, or remote receiver issue can all make the light stop working. The tricky part is that several problems can look exactly the same from the outside. That’s why basic troubleshooting beats swapping random parts and hoping for the best.
Start with the boring stuff because boring fixes save money. Check whether the fan motor still runs, whether the light responds to the pull chain, and whether the wall switch feels loose or spongy. A fan that spins normally but has no light points toward the light kit, bulb socket, switch, wiring connection, or remote module. A fan and light that both fail may point toward the breaker, wall switch, or power feed instead.
Power should always be shut off at the breaker before removing covers or touching wiring. That’s not being dramatic. Ceiling fan housings can hide multiple wire connections, and a switch being “off” doesn’t always mean every wire in the box is dead. A non-contact voltage tester is cheap peace of mind, especially in older homes where wiring has been changed over the years.
Hunter fans often use removable light kits, which makes repairs less scary than they look. The lower switch housing usually holds the pull chain switch, wire connectors, and light kit connections. Once the glass shade and bulbs are removed, the small screws around the housing reveal most of the parts involved. Keep the screws in a dish because those little guys love rolling under furniture.
Check Power First
No light at all can come from a tripped breaker, a bad wall switch, or a loose connection in the fan canopy. Flip the breaker fully off and back on, then test the wall switch again. A half-tripped breaker can look normal at first glance, which catches plenty of people off guard. If the fan motor also refuses to run, the issue may sit before the fan rather than inside the light kit.
Wall switches wear out, especially in rooms where the fan light gets clicked on and off every day. A switch that crackles, feels warm, or moves loosely should not be ignored. Those symptoms can point to poor contact inside the switch, and that can cause flickering or total light failure. Replacing a basic wall switch is usually inexpensive, but power must be confirmed off before any work begins.
Remote-controlled Hunter fans add another layer to the puzzle. A dead remote battery, lost pairing, or faulty receiver can stop the light even while the fan motor still works. Try the pull chain if your model has one, then test the remote after replacing the battery. For homes with multiple ceiling fans, remote frequency interference can also make one fan behave oddly after another remote is used nearby.
A simple example helps here. The light fails, but the fan speeds still change from the remote. That usually means the receiver has power, but the light circuit, bulb, socket, or light output side needs closer inspection. If neither fan nor light responds to the remote, then the battery, pairing, receiver, or incoming power deserves attention first.
Inspect Bulbs And Sockets
Bulbs are the easy suspect, but they’re not always innocent. LED bulbs can fail in strange ways, including flickering, glowing faintly, or turning on only after a delay. Try a known working bulb with the correct wattage and base size before opening the fan housing. A quick swap can save a whole afternoon of unnecessary tinkering.
Hunter fan light sockets can develop poor contact after years of heat and vibration. With power off, look inside each socket for a flattened center tab, dark marks, corrosion, or loose metal parts. A tab that sits too low may not touch the bulb base firmly enough. Gently lifting that tab with a small insulated tool can restore solid bulb contact, but only after confirming power is off.
Burn marks tell a bigger story. A scorched socket, melted plastic, or brittle wire insulation means the socket may need replacement rather than cleaning. Heat damage can happen when bulbs exceed the fan’s rated wattage or when connections stay loose for too long. Staying within the listed wattage protects the light kit wiring and prevents repeat failures.
LED compatibility can trip people up too. Some older fan controls and dimmer modules don’t play nicely with certain LED bulbs. Flicker may appear only at low brightness or only after the fan has been running for a while. In that case, use dimmable LED bulbs rated for enclosed or fan fixtures if the light kit design requires it.
Trace Pull Chain Problems
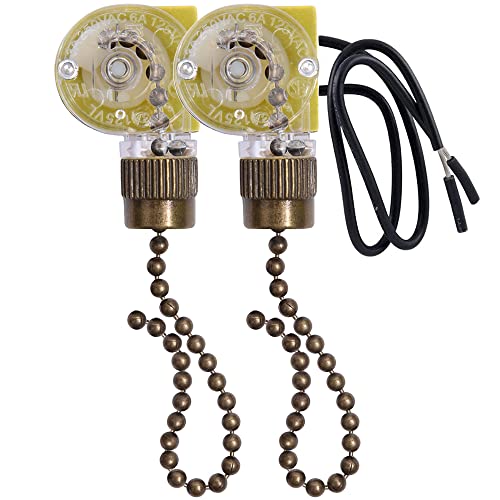
A broken pull chain can make a good light kit look dead. The chain may snap outside the housing, jam inside the switch, or stop clicking cleanly between positions. If the chain feels loose with no resistance, the internal switch may have failed. That tiny part controls the light on-off function and is one of the most common repair points on older fan lights.
Before replacing the pull chain switch, take a photo of the wire layout. Seriously, don’t trust memory while standing on a ladder. Most pull chain light switches use two wires, but some fan assemblies vary by model and control setup. Matching the original switch rating and wire configuration helps avoid headaches during reassembly.
The repair usually involves removing the lower switch housing, unscrewing the chain nut, disconnecting the old switch, and installing the new one in the same position. Wire connectors should be tight, clean, and properly sized. A loose connector can create flicker even after the new switch is installed. Tug gently on each connected wire to confirm the connection is snug.
Do not leave stripped copper exposed outside a wire connector. That small mistake can cause shorts inside the metal housing. After reassembly, restore power and test the chain through each click position. A firm click and steady light usually mean the pull chain repair did its job.
Open The Light Kit Safely
Light kit access starts with removing glass shades, bulbs, and the decorative cover carefully. Glass shades can be heavier than they look, especially if dust and heat have made the thumbscrews sticky. Support each shade with one hand while loosening screws with the other. Nobody wants a repair job turning into broken glass on the floor.
Once the housing is open, check wire nuts, plug connectors, and any quick-connect fittings between the fan and light kit. Hunter fans often use color-coded wires, commonly blue for light power and white for neutral, though model designs can vary. Loose blue or white connections can kill the light while leaving the fan motor untouched. That makes wire connection inspection one of the highest-value checks.
Look for dust, insect debris, pinched wires, or insulation that looks cracked. Ceiling fan vibration can rub wiring against metal edges over time. Any damaged wire should be repaired with proper connectors and safe insulation, not taped casually and shoved back inside. A clean housing supports safer airflow, better connections, and fewer repeat issues.
Separately, if the fan mounting setup feels loose while you’re working near the ceiling, compare the fixture support with a proper ceiling fan mounting box for safer long-term stability. A standard light box is not built to handle the movement and weight of many ceiling fans. A wobbling fan can loosen light kit connections again and again. Stable mounting protects the fan body, wiring joints, and ceiling surface.
Remote Receiver Issues
Remote receiver failure can be sneaky because the light itself may be perfectly fine. The receiver sits inside the canopy on many remote-controlled Hunter fans and sends power to the fan motor and light. If the fan works but the light button does nothing, the receiver’s light output may be failing. If everything stops responding, the receiver may have lost power or communication.
Fresh batteries should be the first move, not the last. Remote buttons can also wear down or stick, especially the light button used every night. Check whether the indicator light on the remote turns on, then try re-pairing according to the fan’s manual. A simple reset can restore remote control response without opening the fan at all.
Some homes have mixed remote systems, smart plugs, dimmers, and wall controls all trying to manage the same fan. That can create strange behavior. Hunter ceiling fans usually prefer compatible controls rather than random dimmers or universal switches. For a separate media setup issue, compare remote replacement options like remote control for chromecast instead of confusing entertainment remotes with fan controls.
A faulty receiver often shows patterns. The light may blink once, work only at certain times, or fail after the fan has been running. Heat inside the canopy can expose weak electronics. Replacing the receiver requires matching the model, wiring layout, and control type so the fan speeds and light function both operate correctly after installation.
Handle Flickering Lights
Flickering can come from loose bulbs, incompatible LEDs, weak socket contact, faulty dimming controls, or loose wiring. Start with the simplest checks before assuming the fan has a serious electrical fault. Tighten the bulbs gently, swap in a compatible bulb, and test the light without using a dimmer if possible. A steady light after that points toward a bulb or control compatibility issue.
Vibration is a major reason fan lights flicker. Even a balanced fan produces small movements that can loosen bulbs and connectors over time. If the fan wobbles, fix that too, because the light issue may return after a few days. A balanced fan protects the socket contacts, wire nuts, glass shades, and pull chain switch.
Flicker that appears only at low brightness often points to a dimmer mismatch. Many ceiling fan light kits need dimmable bulbs and compatible fan-rated controls. Regular wall dimmers can cause buzzing, flickering, or shortened bulb life. The safest route is using controls approved for ceiling fan light operation, not generic lighting controls.
Heat can also make flicker worse. Enclosed glass shades trap warmth around bulbs and sockets, especially with higher-wattage lamps. LED bulbs reduce heat, but they still need proper ventilation and compatibility. Keeping the fan within its listed bulb rating supports longer socket life and more stable lighting.
Replace A Faulty Light Kit
A light kit replacement makes sense when sockets are scorched, wiring is brittle, or the fixture has multiple failed parts. Repairing one socket may not be worth it if the whole assembly shows age and heat damage. Hunter-compatible light kits are often easier to install than rebuilding every small part. The key is matching the fan model, connector style, finish, and light kit type.
Before buying anything, check the fan’s model number. It may be printed on top of the motor housing, inside the canopy, or on a label near the switch housing. That number helps avoid buying a light kit that almost fits but doesn’t line up with the screw holes. Close enough is not your friend with ceiling fan parts.
Installation usually means disconnecting the old light kit, attaching the new kit to the switch housing, connecting matching wires, and securing the assembly. Wire colors should match the fan’s instructions, not guesswork. If the wiring looks different from expected, stop and verify the model diagram. A correct match protects the light circuit and fan controls.
Some integrated LED Hunter fan lights use boards or modules instead of standard bulbs. Those repairs may require a specific replacement LED assembly rather than a regular bulb socket. Integrated LEDs can look sleek, but they’re less flexible when parts fail. That tradeoff matters because module availability can decide whether repair or replacement makes better sense.
How To Fix A Hunter Ceiling Fan Light That Keeps Failing
A repaired light should not start acting up again a week later. That repeat failure usually means the first fix handled the symptom, not the real electrical or mechanical cause. With how to fix a hunter ceiling fan light, the deeper work is checking heat, vibration, controls, wiring strain, and fixture support so the same headache doesn’t boomerang back. A steady light depends on more than a new bulb.
Test The Wall Control
Wall controls can quietly cause flicker, buzzing, weak brightness, or random shutoffs. A basic on-off switch usually behaves differently from a dimmer or fan-speed wall control. If the light acts strange only from the wall but works from the pull chain or remote, the control deserves a closer look. That small clue can save you from tearing apart a perfectly fine light kit.
Standard light dimmers often create problems with ceiling fan lights, especially with LED bulbs. Fan light circuits need compatible controls, not whatever switch happens to fit in the wall box. Buzzing, pulsing, or delayed startup may point to a mismatch between the bulb and the control. Swapping to the right fan-rated control often makes the light feel boring again, which is exactly what you want.
Loose wires inside the wall box can also mimic a bad fan light. A wire that barely grips the terminal may work one day and flicker the next. That on-again, off-again behavior gets worse as the fan vibrates and the switch gets used daily. Shut off power first, then check for tight terminal screws, clean wire ends, and secure wire connectors.
Odd searches can confuse the repair trail too. The phrase light period may sound electrical at a glance, but it points to a completely different topic, so keep the fan repair focused on power flow, bulb contact, and control compatibility. Clear wording matters during troubleshooting. The more specific the symptom, the faster the repair path becomes.
Watch For Heat Damage
Heat damage is one of those problems that hides until the light kit is opened. Darkened socket edges, brittle insulation, warped plastic, or a faint burnt smell all deserve attention. A new bulb won’t fix a socket that has already been cooked by years of high-wattage lamps. That’s a replacement situation, not a “tighten it and hope” moment.
Glass shades can trap heat around bulbs, especially in compact light kits. LEDs run cooler than incandescent bulbs, but they still need the right rating for the fixture. Some bulbs dislike enclosed spaces and fail early when heat builds up around the electronics. Using fan-safe, fixture-appropriate bulbs helps reduce flicker and premature burnout.
Socket heat often starts with poor contact. A loose bulb base creates tiny arcs, and those arcs leave marks over time. The light may flicker first, then stop working completely once the contact weakens further. Clean, firm contact supports stable brightness and safer operation.
Do not ignore melted wire nuts or stiff wiring inside the switch housing. Those signs suggest the connection has been overheating. Replace damaged connectors and trim back compromised wire ends only if there is enough safe wire length to work with. If wiring looks badly aged or crowded, a licensed electrician is the safer move.
Check Fan Movement
A wobbling fan can undo a good light repair. Every shake travels through the housing, socket tabs, pull chain switch, and wire connectors. Even small movement can loosen electrical contacts after enough daily use. Fixing the light without calming the wobble is like mopping while the faucet is still dripping.
Start with the blade screws, blade arms, and mounting hardware. Tighten each screw evenly, then check whether the fan hangs level. Dust buildup on one blade can also throw off balance more than people expect. Clean blades support smoother rotation and reduce stress on the light assembly.
A loose ceiling connection deserves extra caution. People often ask can ceiling fans fall after noticing wobble, and the honest answer is that poor mounting can become dangerous if ignored. A fan should be attached to a fan-rated box or proper support, not a basic light fixture box. Strong mounting protects the fan body, ceiling, wiring, and anyone underneath.
Balancing kits can help when the fan is mounted correctly but still wobbles at certain speeds. Small weights shift blade balance and reduce vibration. That smoother motion helps the light kit stay tight longer. It also cuts down on annoying shade rattles that make the room feel cheap and unfinished.

Know When Parts Need Replacing
Replacement parts make sense after the same issue returns despite careful troubleshooting. A pull chain switch that jams again, a socket that keeps losing contact, or a receiver that randomly drops the light signal may be worn out. Repeated failure usually means the part has reached its limit. At that point, repair time starts costing more than the part itself.
Hunter fan parts should match the fan model as closely as possible. Light kits, receivers, switches, and LED modules can look similar while using different connectors or ratings. A wrong part may fit physically but fail electrically. Model matching protects control function, brightness stability, and wiring safety.
Integrated LED modules need special attention. Unlike screw-in bulbs, these systems may require a specific board or light engine. That can feel annoying, but guessing with universal parts can create more trouble. Check the model label and part diagram before ordering anything.
Older fans also deserve a practical cost check. If the fan has a failing receiver, brittle wiring, worn sockets, and noisy bearings, replacing one light part may not buy much time. A newer fan may solve several small headaches at once. Still, a solid Hunter fan with one bad switch or socket is often worth repairing.
Reassemble And Test Carefully
Reassembly matters more than it seems. Pinched wires, loose screws, or crooked shade holders can create new problems right after a repair. Place wires back into the housing gently instead of forcing the cover closed. A clean fit helps protect wire insulation and connector stability.
Glass shades should sit snugly, but not under heavy pressure. Overtightened thumbscrews can crack glass or make future removal miserable. Tighten each one just enough to stop rattling. Then give the shade a gentle touch test before turning the fan back on.
Restore power and test one function at a time. Try the wall switch, pull chain, remote, dimming function, and fan speeds separately if your model includes them. This slow testing helps identify which control path still causes trouble. A steady response across each control means the light circuit is behaving properly.
Let the light run for a while after repair. Some faults only show up once heat builds inside the housing. Watch for flicker, buzzing, odor, or sudden dimming. Quiet, steady operation is the sign you’re after.
Prevent The Same Light Trouble
Preventive care keeps small ceiling fan light issues from turning into weekend projects. Clean dust from shades, bulbs, and blade tops every so often. Dust traps heat and adds blade imbalance, which both stress the light kit. A quick wipe can do more than people think.
Use bulbs that match the fixture rating, especially with enclosed shades or dimmable controls. Cheap mismatched LEDs may flicker even when the fan wiring is fine. That creates a false problem and sends you chasing the wrong fix. Good compatibility supports steady brightness, lower heat, and longer bulb life.
Listen for new sounds after the light is repaired. Buzzing, clicking, or shade rattling can point to a loose part before the light fails again. Catching that early keeps the repair simple. Small noises are often the fan’s way of waving a little red flag.
Seasonal checks help in busy rooms where the fan runs daily. Tighten visible screws, test the pull chain, check remote response, and watch for wobble. These small habits protect the light kit, mounting hardware, and wiring connections. A ceiling fan light stays more reliable when the whole fan is treated as one connected system.


Best Small Flush Mount Ceiling Fans 2026 Ultimate Picks

Best Smart Ceiling Fan India 2026 For Effortless Comfort

Best Smart Ceiling Fans with Lights for 2026: Top Picks

Best Smart Home Non Ceiling Fans 2026 For Ultimate Comfort

Best Outdoor Misting Ceiling Fan 2026 For Ultimate Comfort

Best Ceiling Fans With Lights For Vaulted Ceilings 2026 Top Picks

Best Outdoor Ceiling Fans For Porch 2026 With Style And Breeze

Best WiFi Enabled Ceiling Fan 2026 For Effortless Comfort





