
How to Fix a Hunter Ceiling Fan Pull Chain Fast
How to fix a hunter ceiling fan pull chain usually becomes urgent right after that tiny chain suddenly snaps, jams, or refuses to switch speeds. One second the fan works fine, then boom, the chain spins loosely or disappears into the housing like it’s hiding from responsibility. That frustration hits harder during hot nights, especially when the fan stays stuck on the wrong speed or won’t turn off at all. Small mechanical problems like this tend to snowball if ignored, and honestly, nobody wants to replace an entire ceiling fan over a cheap internal switch.
Most pull chain problems come from worn internal contacts, tangled chain links, or excessive force during daily use. Older fans often develop stiff switching, uneven clicking, or delayed responses that make operation feel rough and unreliable. Dust buildup inside the switch housing can also interfere with movement, causing the chain to snag halfway through rotation. A careful repair approach helps restore smooth control while avoiding damage to fragile wiring or decorative fan components.
Hunter ceiling fans are known for dependable airflow, but even durable models eventually deal with pull chain wear. Some chains break externally and leave enough metal exposed for a quick fix, while others snap inside the switch assembly and require partial disassembly. That’s where patience matters. Rushing through repairs can crack the switch casing, strip screws, or disconnect internal wires that were perfectly fine before the repair even started.
Plenty of people assume a faulty pull chain means the entire fan motor is failing, but that’s rarely the case. More often, the issue stays isolated to the pull switch mechanism itself. Replacing the chain switch typically costs far less than installing a new fixture, and the repair usually requires only basic household tools. A screwdriver, voltage tester, needle-nose pliers, and a replacement switch handle most situations without unnecessary hassle.
Noise, inconsistent fan speeds, and chains that feel gritty during operation usually point toward internal wear. Some switches produce clicking sounds without changing settings, while others lock completely after years of repeated pulling. Those symptoms may seem minor at first, yet they often signal deteriorating contacts inside the switch assembly. Addressing the issue early helps preserve smooth fan performance and prevents more irritating electrical problems later on.
Repairing a pull chain also improves everyday convenience. Nobody wants to stand under a ceiling fan yanking repeatedly at a stubborn chain while hoping the blades finally slow down. A properly functioning switch restores predictable speed control, cleaner operation, and less stress on the fan’s internal components. Small repairs like this may not look dramatic, but they make daily comfort feel normal again, which honestly counts for a lot.
How To Fix A Hunter Ceiling Fan Pull Chain
A snapped chain can turn a normal room into a tiny household standoff, especially when the fan is stuck on high and the light won’t cooperate. The good news is that how to fix a hunter ceiling fan pull chain usually comes down to a worn switch, a broken chain segment, or a loose connection inside the switch housing. This repair rewards patience more than muscle, so slow hands beat hard pulling every single time. Start with safety, keep track of wires, and treat the fan housing like a small puzzle instead of a wrestling match.
Hunter Pull Chain Repair Basics
A Hunter fan pull chain works through a small internal switch that clicks through fan speeds, light control, or both, depending on the model. The chain itself is only the handle, while the real work happens inside the switch assembly. Once that inner mechanism wears out, pulling harder won’t save it. Hard yanks usually make things worse by snapping the chain inside the housing.
The first clue is the feel of the chain. A healthy pull chain gives a clear click, resets cleanly, and changes the fan or light response right away. A failing one may feel gritty, loose, stuck, or strangely soft, like nothing is catching inside. That soft no-click feeling often points to a failed pull switch rather than a problem with the motor.
Some repairs are quick because the chain breaks outside the fan body and leaves enough metal to attach an extension. Other repairs need the lower switch housing opened so the broken chain or switch can be replaced. That sounds intimidating, but the job is usually manageable with a voltage tester, screwdriver, needle-nose pliers, and the correct replacement switch. The trick is labeling wires before removing anything.
Replacement switches are not all identical, so matching the wire count, switch rating, and function matters. A light pull switch may use two wires, while a fan speed switch often uses more. Installing the wrong switch can leave the fan stuck on one speed or unable to start. That’s why the old switch becomes your map before it comes out.
Safety Comes Before The First Screw
Power needs to be off before the fan canopy or switch housing is touched. Turning off the wall switch is not enough because wiring can still be live in certain setups. Shut off the correct breaker and confirm with a non-contact voltage tester before reaching inside the fan. That one step prevents the kind of surprise nobody wants from a ceiling fixture.
Ceiling fans combine moving parts, electrical wiring, and overhead work, so a stable ladder matters more than people think. Set the ladder where your shoulders can stay relaxed instead of leaning sideways. A wobbly stance turns a small pull chain repair into a dropped screw circus. Keep a small bowl or magnetic tray nearby for screws, chain nuts, and tiny caps.
The light kit, if attached, may need to come off before the switch housing opens fully. Support it with one hand while loosening screws, because hanging weight can tug on light kit wires. Some Hunter models use plug connectors, while others use wire nuts inside the housing. Take a quick phone photo before separating anything, since that picture can save a lot of head scratching later.
Old fans may have brittle plastic parts, especially around the switch nut and decorative cap. Don’t crank on the nut like it owes you money. Use gentle pressure and let the tool do the work. Preserving the switch housing keeps the repair cleaner and avoids hunting for discontinued trim pieces.
Finding The Real Pull Chain Problem
A chain broken outside the housing is the easiest version of this headache. If a short piece still sticks out, attach a chain connector and extension, then test the pull once power is restored. That fix only works when the internal switch still clicks and responds properly. A chain that pulls without changing anything means the issue sits deeper.
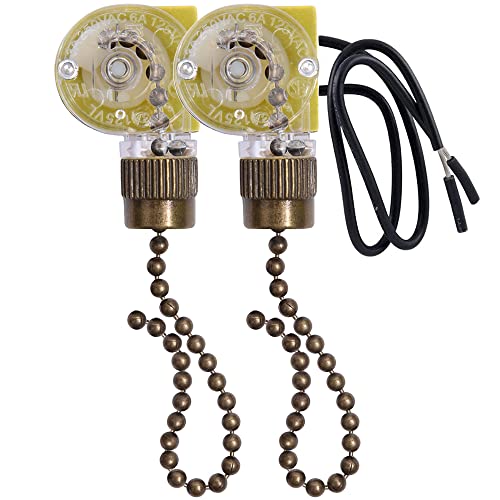
A chain snapped inside the housing usually requires removing the switch. The broken bead chain may be trapped inside the old mechanism, and most pull switches are not worth rebuilding. Replacing the full pull chain switch saves time and avoids a repeat failure two weeks later. Cheap fixes feel nice until the chain breaks again during a hot afternoon.
A jammed chain can happen when the switch spring fails or the chain binds at the bushing. Sometimes the chain enters the housing at a bad angle after years of being pulled from the side. That side pressure wears the opening and strains the internal switch spring. Pulling straight down after repair helps the new switch last longer.
Fan speed problems can mimic pull chain failure too. If the chain clicks but the fan only hums, runs slowly, or refuses to start, the issue may involve the capacitor, motor, or wiring rather than just the switch. Still, a damaged speed switch should be ruled out first because it’s cheaper and simpler. For cooling in a small workspace while the fan is down, upgrade airflow with a rechargeable clip on fan that can sit on a shelf, desk, or headboard without needing permanent wiring.

Opening The Switch Housing Without Making A Mess
Most Hunter ceiling fans place the pull chain switch in the lower switch housing, often below the blades. Remove the glass shade or light kit parts first if they block access. Keep each screw grouped by location because fan housing screws can look similar while being slightly different lengths. Mixing them up can leave the housing loose or crooked.
Once the housing is open, look for the switch connected to the pull chain nut on the outside. The switch body may be plastic with two, three, or four wires depending on its job. Before removing wires, take a clear photo and mark each wire with tape if colors repeat. That simple habit protects the wire order, which is the heart of this repair.
Some switches use push-in wire terminals, and others use pre-attached wires joined with wire nuts. Push-in terminals can be stubborn, so avoid ripping wires out blindly. A tiny release slot may let the wire slide free with controlled pressure. Damaged copper ends should be trimmed and stripped clean before reconnecting to the new switch.
The outside chain nut usually holds the switch to the housing. Remove the pull chain extension, loosen the nut, and slide the old switch inward. Feed the chain from the new switch through the same opening, then tighten the nut until snug. Over-tightening can crack plastic threads, so firm and steady beats brute force.
Matching The Replacement Switch Correctly
A Hunter fan light switch and a fan speed switch are not interchangeable just because both use chains. The light switch often controls a simple on-off circuit, while the fan speed switch routes power through different speed connections. Match the old switch layout before buying or installing the replacement. The wrong part can create confusing symptoms that feel worse than the original problem.
Check the old switch for stamped markings, wire labels, or model numbers. Labels such as L, 1, 2, and 3 often appear on fan speed switches. Those markings tell you where each wire belongs on the new part. Guessing wire placement is a bad bargain because incorrect wiring can cause poor speed control or prevent the fan from running.
Wire color alone does not always tell the full story. Fan manufacturers and replacement switch brands may use different color patterns. The safest move is copying the old terminal positions one by one. If the old switch fell apart before you recorded the layout, the fan manual or Hunter support information may be needed before continuing.
Lighted fans add one more layer because the pull chain may control either the light, the fan motor, or separate functions. A broken chain near the center of the light kit often belongs to the light switch, while the chain closer to the side may control fan speed. Still, model designs vary. Good lighting helps here, so brighten a dark utility closet or tool corner with a wireless closet light before sorting small screws and wire labels.
Replacing The Pull Chain Switch Step By Step
With power off and wires documented, remove the old switch from the housing. Disconnect one wire at a time and move it to the matching terminal on the replacement switch if the layout allows. This one-by-one method reduces mistakes and keeps the switch wiring organized. It feels slow, but it saves time compared with troubleshooting a scrambled connection later.
If the replacement switch has attached leads, connect each lead to the correct fan wire using properly sized wire nuts. Tug gently on each connection after twisting the nut in place. A loose connection can cause flickering lights, dead speeds, or intermittent operation. Clean, tight connections are the quiet heroes of ceiling fan repair.
Route the new pull chain through the housing opening before closing everything up. Make sure the chain hangs freely and does not rub sharply against metal edges. A chain that drags sideways will wear faster and may jam again. The chain should drop straight down with a smooth path through the decorative bushing.
Before reinstalling glass shades or decorative pieces, tuck wires back into the housing without pinching them. Pinched wires can create future shorts or make the housing sit unevenly. Secure the housing screws evenly, then restore power and test each pull setting. Listen for clean clicks and watch for proper fan speed changes or light control.
Why The Fan May Still Act Strange
A new switch should create a clear response, but other worn parts can still cause trouble. A fan that hums after switch replacement may have a weak capacitor, especially if the blades need a hand push to start. A fan that runs on only one speed may have mismatched wiring or a faulty replacement switch. Those symptoms deserve a second look before assuming the motor is dead.
Loose mounting can also make a repaired fan feel worse than expected. If the fan wobbles after the switch repair, the issue may come from blade balance, loose screws, or a weak ceiling support. Secure support matters because a ceiling fan creates constant movement while running. For safer fixture stability, reinforce the setup with a ceiling fan mounting bracket suited for fan-rated installations.
Light kits can complicate diagnosis too. A light that flickers after a pull chain repair may have a loose bulb, weak socket contact, or poor wire nut connection inside the housing. Start with the simple checks before reopening the entire assembly. Small contact issues often look like bigger electrical problems until they’re inspected closely.
Remote-controlled Hunter fans may use receivers that change how pull chains behave. Some models rely on the pull chain being set to a certain fan speed while the remote handles daily control. Changing switch wiring without considering the receiver can create odd behavior. In those setups, the remote receiver, wall control, and pull switch need to work as a team.
How To Replace A Hunter Ceiling Fan Pull Switch
Nothing tests patience faster than a ceiling fan that suddenly ignores every pull while the room keeps getting warmer. After checking the chain, wiring, and housing in the earlier steps, the next move often involves replacing the actual switch assembly itself. A worn Hunter pull switch can create random speed changes, delayed response, or a chain that spins loosely without resistance. Most people expect the repair to be complicated, but the process becomes manageable once the housing is open and the wiring layout is clear.
Signs The Pull Switch Needs Replacement
A failing switch usually sends warnings before it completely quits. The chain may feel rough during operation, or the fan may skip speeds randomly while clicking inconsistently. Those little warning signs matter because the internal contacts wear down gradually over years of daily use. Ignoring them often leads to a fully jammed pull chain right when airflow matters most.
Another common symptom shows up when the fan refuses to cycle through speeds properly. Pull once, nothing changes. Pull again, the fan suddenly jumps from low to high without stopping at medium. That uneven behavior usually points toward a worn internal contact plate inside the switch assembly rather than a motor failure.
Some switches fail silently. The chain still moves, but there’s no click at all behind it. That soft, dead feeling usually means the spring mechanism inside the switch has broken apart. Replacing the fan speed switch becomes more reliable than trying to repair tiny internal pieces that were never built for rebuilding.
Lighting issues can also trace back to a separate pull switch. A light kit that flickers or stays stuck on despite repeated pulls may have a damaged switch contact or loose wiring. A careful inspection saves money because replacing a small switch costs far less than swapping the entire fan assembly.
How Different Hunter Fan Switches Work
Hunter fans use different switch layouts depending on age, remote capability, and whether the unit controls a light kit separately. Some use a basic two-wire switch for lights, while fan speed controls often rely on four-wire configurations. Matching the original setup matters because the wrong switch can scramble speed order or stop the motor from starting correctly.
Inside the fan, the switch cycles electricity through different capacitor paths to create speed changes. That tiny mechanical action controls the difference between low, medium, and high airflow. A damaged switch interrupts that flow and creates uneven operation. Replacing the correct switch type restores proper fan response without touching the motor.
Fans with remote systems add another layer to troubleshooting. Some remote receivers expect the pull chain to remain locked at a certain speed while the remote handles daily adjustments. Before replacing anything, check whether the fan depends on remote pairing settings. For smoother remote troubleshooting, review how to pair hunter ceiling fan remote setups that affect speed control behavior.
Older Hunter fans may use pull chains more heavily because they lack smart controls or wall-mounted systems. That extra use wears down the chain and switch faster over time. Frequent pulling at awkward angles also strains the entry bushing, creating drag that shortens the lifespan of the switch assembly.
Cleaning The Switch Housing Before Reassembly
Dust buildup inside a ceiling fan housing gets nasty after years near kitchens, bathrooms, or busy living rooms. Grease particles, lint, and humidity settle around the switch and wiring, especially in fans running daily. Cleaning the housing before installing the new switch helps prevent future sticking or chain drag. A soft cloth and dry brush usually handle most buildup safely.
Avoid spraying liquid cleaners directly onto electrical components. Moisture trapped around wire connections can create corrosion later, especially inside enclosed fan housings. Instead, wipe carefully around the switch cavity and remove loose debris manually. Small maintenance steps like this help the replacement switch operate more smoothly.
Check the chain opening where the pull chain exits the housing. Rough metal edges or cracked plastic around the opening can scrape the chain repeatedly during use. That constant friction wears chain links faster and may eventually jam the switch again. Filing sharp edges lightly or replacing damaged trim parts protects the new pull chain from unnecessary strain.
Good visibility matters during reassembly because small wire positions can become hard to track inside cramped housings. Some people use handheld lights or headlamps, but stable lighting often feels easier during detailed work. For sharper close-up visibility while handling wiring or screws, explore a best remote control for dslr setup that helps capture zoomed reference photos without shaky hands near the ladder.
Common Mistakes During Pull Chain Repairs
One of the biggest mistakes happens before the repair even begins. People often buy a random replacement switch without checking wire layout or speed configuration. That shortcut creates confusion fast because not all fan switches behave the same way internally. Matching the original switch pattern avoids hours of unnecessary troubleshooting.
Another problem shows up during wire removal. Pulling wires aggressively from push terminals can weaken copper strands or loosen insulation. Damaged wire ends may still connect temporarily but create unreliable fan performance later. Clean wire handling protects both the electrical connection and long-term reliability.
Over-tightening the switch nut causes headaches too. Plastic housings crack easily if squeezed too hard against metal threads. A cracked mounting area may leave the switch loose or crooked inside the fan body. Tight enough to stay secure is plenty for most Hunter fan switch housings.
Skipping a test before full reassembly wastes time. Restoring power briefly after wiring the switch but before reinstalling every decorative piece helps confirm proper operation. Nobody enjoys removing glass shades twice because a wire slipped loose during assembly.
What To Do If The Fan Still Won’t Respond
A new pull switch does not magically fix every fan problem. If the fan still refuses to spin, the issue may involve the capacitor, motor winding, wall switch, or remote receiver. A dead fan combined with humming noise often points toward a weak capacitor rather than another switch issue. Capacitors wear gradually and affect startup torque over time.
Check wire connections again before assuming the motor failed. One loose neutral wire inside the housing can stop both fan and light functions completely. Wire nuts should feel snug without exposed copper hanging outside the connection. Stable wiring keeps the electrical circuit consistent during speed changes.
Wall controls can also create misleading symptoms. Some Hunter fans connect to variable wall controls that affect how the pull chain behaves. Incompatible dimmers or worn switches sometimes interfere with fan speed circuits. Turning off the breaker and inspecting the wall switch setup may reveal hidden issues outside the ceiling fan itself.
Remote receivers deserve attention too, especially in newer fan models. A receiver failure may leave the fan unresponsive even after replacing the pull chain switch. Resetting the remote system or re-pairing the control can restore communication between components.
Keeping The New Pull Chain Working Longer
Daily habits affect how long the replacement switch survives. Pulling the chain straight down instead of sideways reduces wear on the internal spring and housing opening. Fast aggressive yanks may feel harmless, but they strain delicate moving parts repeatedly over time. Controlled pulls help preserve the internal switch mechanism.
Dust also shortens switch lifespan more than people expect. Fans near kitchens or humid bathrooms collect sticky residue inside the housing faster than bedroom fans. Cleaning the exterior housing and chain occasionally reduces buildup that interferes with movement. Small maintenance routines protect the smooth clicking action that makes the fan feel reliable.
Loose ceiling fan mounting can increase internal vibration and wear down switches faster. A wobbling fan shakes wiring, housing screws, and chain openings during operation. Tightening blade screws and checking support brackets every few months helps reduce unnecessary stress inside the fan body.
Temperature changes matter too. Hot attic conditions above ceiling installations can age plastic switch parts faster over time. Older switches become brittle and prone to cracking after years of heat exposure. Replacing worn chains early and addressing rough clicks quickly helps avoid bigger electrical repairs later.
Repair Costs Compared With Full Replacement
Most pull chain repairs stay surprisingly affordable compared with replacing the entire fan. A replacement switch often costs far less than a new ceiling fixture, especially for decorative Hunter models with matching finishes and integrated lighting. Swapping a small switch assembly usually takes less time than removing blades, brackets, and wiring for a full installation.
Labor costs rise quickly if the repair gets delayed until additional parts fail. A worn switch left unattended may overheat connections or create electrical arcing inside the housing. Catching the issue early protects nearby components and keeps the repair focused on the pull chain assembly rather than larger electrical damage.
Older fans with sentimental value or matching room décor often justify repair instead of replacement. Some discontinued Hunter finishes become difficult to match later, especially in homes with multiple coordinated fixtures. Restoring the existing fan preserves the room’s appearance without forcing a full redesign.
Replacement only starts making more sense when the motor, capacitor, mounting hardware, and switch all show serious wear together. A single broken pull chain rarely means the fan itself is finished. Most of the time, the repair simply restores the smooth operation people forgot they missed until the chain stopped working.


Best Small Flush Mount Ceiling Fans 2026 Ultimate Picks

Best Smart Ceiling Fan India 2026 For Effortless Comfort

Best Smart Ceiling Fans with Lights for 2026: Top Picks

Best Smart Home Non Ceiling Fans 2026 For Ultimate Comfort

Best Outdoor Misting Ceiling Fan 2026 For Ultimate Comfort

Best Ceiling Fans With Lights For Vaulted Ceilings 2026 Top Picks

Best Outdoor Ceiling Fans For Porch 2026 With Style And Breeze

Best WiFi Enabled Ceiling Fan 2026 For Effortless Comfort





