
How to Fix a Remote Control Ceiling Fan Fast
How to fix a remote control ceiling fan becomes a whole lot easier once the usual trouble spots stop feeling mysterious. A fan that suddenly ignores commands, changes speed randomly, or refuses to turn the light on can drive anyone up the wall. One minute everything works fine, then boom, the remote starts acting like it has a mind of its own. Small electrical hiccups, weak batteries, loose receiver connections, or signal interference often sit right at the center of the problem.
Plenty of ceiling fan issues look worse than they really are. A blinking light kit or delayed fan response can sometimes come from something as simple as mismatched frequency settings inside the remote. Other times, dust buildup near the receiver creates inconsistent communication that leaves people repeatedly pressing buttons out of frustration. Nobody wants to stand under a spinning fan clicking the same button ten times while wondering if the whole unit needs replacing. That’s where practical troubleshooting matters more than fancy tools.
Remote control ceiling fan troubleshooting also helps prevent expensive mistakes. Swapping out an entire fan because of a faulty capacitor or damaged receiver wastes both money and time. Careful step-by-step inspection usually reveals whether the issue involves power supply interruptions, worn wiring, remote syncing problems, or overheating components hidden inside the canopy. Even better, many fixes require only a screwdriver, fresh batteries, and a little patience instead of a full electrical overhaul.
Odd noises, flickering lights, or fan speeds that suddenly slow down can point toward deeper electrical wear. Still, not every symptom signals disaster. Some remote systems lose synchronization after power outages or voltage fluctuations, especially during storm season or after breaker resets. Others struggle because nearby electronics interfere with the signal path. Little details like router placement, smart home devices, or overloaded circuits can quietly create ongoing fan headaches.
Ceiling fan remote repair becomes much less stressful once the common patterns start making sense. Smooth airflow, stable light control, and responsive buttons usually return after narrowing down the real cause instead of guessing blindly. Tightening loose wire nuts, replacing damaged receivers, or resetting dip switches often restores full performance surprisingly quickly. Bit by bit, the entire setup starts behaving normally again, and honestly, that alone feels like a breath of fresh air.
How To Fix A Remote Control Ceiling Fan
A fan that ignores the remote can turn a comfortable room into a sticky little mess fast. The light flickers, the blades sit still, and suddenly how to fix a remote control ceiling fan feels less like a small chore and more like a guessing game. Most problems start with power flow, remote signal, or a receiver issue tucked inside the canopy. Start simple, stay safe, and don’t rip the whole fan down before the easy checks have had their say.
Remote Fan Fixes
Fresh batteries sound too obvious, yet they solve a surprising number of remote problems. Weak batteries may still light up the remote indicator, but they don’t always send a strong enough signal to the receiver. Replace both batteries at the same time, then check the battery contacts for rust, dust, or bent metal tabs. A tiny layer of corrosion can break the connection just enough to make the remote act moody.
Resetting the remote can also clear up strange behavior after a power outage. Turn the wall switch off, wait a bit, then turn it back on and press the remote’s pairing button if the model has one. Many ceiling fan remotes need a short sync window, so don’t wander off halfway through the process. A calm reset often brings back fan speed control, light dimming, and basic on-off response.
Dip switches deserve a quick look too. Older remote-controlled fans often use tiny switches inside the remote and receiver to match frequencies. If those settings don’t line up, the fan won’t listen, plain and simple. Keep the switch pattern identical on both sides, and take a quick phone photo before changing anything so you’re not stuck playing electrical bingo.
Signal interference can sneak into the picture, especially in rooms packed with smart plugs, routers, LED strips, or other wireless gadgets. Move nearby electronics away from the fan area and test the remote again from different spots in the room. A remote that only works from one weird angle usually points to weak signal strength or a receiver that’s starting to struggle. That clue matters before any parts get replaced.
Power Checks Before Parts
Power supply issues often hide behind remote symptoms. Check the wall switch first because many remote ceiling fans still need that switch turned on to feed the receiver. A switched-off wall control can make the remote seem dead even though nothing is actually broken. It’s a silly mistake, sure, but it happens all the time.
The breaker should be checked next, especially if the fan stopped working after a storm, a surge, or another appliance tripped the circuit. Reset the breaker fully by moving it off, then back on, instead of just nudging it. If the breaker trips again, stop testing and call a licensed electrician because repeated tripping can point to a wiring fault. Electrical problems don’t reward stubbornness.
Lighting issues can confuse the diagnosis too. A ceiling fan light that fails with the remote may have a bad bulb, loose socket tab, or worn light kit instead of a bad receiver. For homes with older fixtures, compare the symptoms with other lighting tasks around the house, and use practical safety habits before touching bulbs or sockets. For a separate lighting job, make removal safer with this guide on remove fluorescent light bulb before working around fragile tubes or stubborn covers.
Safety deserves more than a quick nod here. NFPA fire research has tied many home electrical fires to electrical distribution, lighting, and wiring equipment, which is exactly why loose connections shouldn’t be brushed off as harmless. A ceiling fan receiver sits in a cramped canopy where heat, vibration, and old wire nuts can create trouble over time. Turn power off at the breaker before opening the canopy, not just at the wall switch.
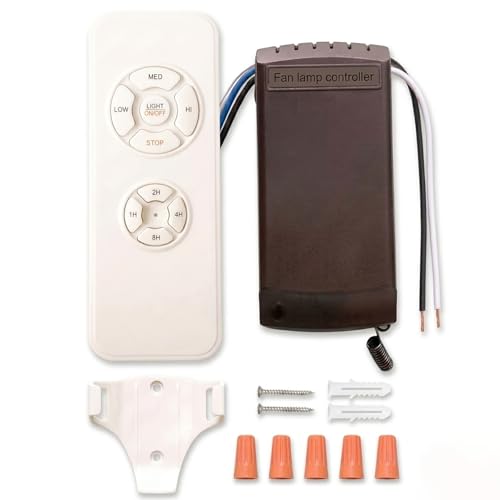
Receiver Problems Inside The Canopy
The receiver is the little box that translates remote commands into fan action. If the remote works, the batteries are fresh, and the fan still refuses to respond, the ceiling fan receiver becomes a prime suspect. Many receivers sit above the mounting bracket inside the canopy, where heat builds up after years of use. A burnt smell, melted plastic, or discolored wiring means the repair should stop right there until a pro checks it.
Loose wire nuts can mimic a failed receiver. Vibration from daily fan use slowly works connections loose, especially on older installations or fans that wobble. After power is off, gently inspect the wiring connections for loose caps, frayed insulation, or wires that slip out too easily. A secure connection should feel firm without exposed copper hanging around where it doesn’t belong.
Receiver replacement is usually more affordable than replacing the entire fan, but matching matters. The replacement receiver must match the fan’s voltage, motor type, light function, and remote setup. Some fans use AC motors, while newer models may use DC motors with more specific control boards. Buying the wrong receiver can lead to weak fan speeds, nonworking lights, or a remote that pairs once and then quits again.
Noise can also point toward receiver strain. A faint hum after pressing the remote may mean the receiver is sending partial power but not enough for clean motor operation. For bedrooms, noise feels even more annoying because every buzz seems louder at night. To compare quieter airflow setups for another room, explore portable fan for noise as a separate comfort backup while the ceiling fan gets sorted.
Remote Pairing And Frequency Fixes
Remote pairing is easy to overlook because every brand handles it a little differently. Some remotes pair automatically after power returns, while others need a hidden button pressed within a short window. Check the battery compartment, the back of the remote, or the fan manual for a learn button. Pressing random buttons for ten minutes usually does less than one proper reset.
Frequency conflicts can make one remote control another fan in the house, or worse, make the fan respond randomly. That’s not haunted wiring, even if it feels that way at midnight. Change the dip switch pattern on the remote and receiver so the fan uses a more private code. Keep the new pattern simple enough to remember, but not identical to another fan nearby.
Smart ceiling fan controls add another layer. App-based fans may need Wi-Fi, Bluetooth, or a hub connection to behave properly. If the physical remote works but the app doesn’t, the problem likely sits with network pairing rather than the fan motor. If neither one works, go back to power, receiver, and wiring checks before blaming the app.
Wall controls can clash with remote systems too. Some fan remotes don’t play nicely with old dimmer switches or variable-speed wall controls. A fan connected to the wrong wall control may flicker, buzz, or run at odd speeds. Use a standard on-off wall switch unless the fan manual specifically allows a compatible wall speed controller.
Light And Speed Symptoms
A fan that runs but won’t change speed usually points toward the receiver, capacitor, or motor control board. Speed problems often show up gradually, with high speed working one week and only low speed working the next. That slow decline matters because it suggests component wear instead of a simple remote sync issue. Don’t ignore a motor that smells hot or struggles to start.
Flickering lights can come from loose bulbs, incompatible LED bulbs, or a remote dimmer that doesn’t support certain bulb types. Some ceiling fan remotes use dimming modules that dislike non-dimmable LEDs. Swap in a compatible bulb before tearing into the canopy. Simple bulb mismatch can look exactly like an electrical failure from the floor.
Bedroom fans add extra pressure because comfort and quiet both matter. A remote problem at bedtime feels twice as irritating, especially if the light turns on but the fan won’t spin. For a separate upgrade path in a sleep space, compare white ceiling fan with light options that fit quieter rooms and brighter overhead lighting needs. Still, repair first if the existing fan is safe, sturdy, and worth keeping.
Motor hum deserves careful attention. A soft hum with no blade movement can mean the capacitor is failing, while a harsh buzz can point toward bad control electronics or poor voltage delivery. Turn the fan off if the motor heats up without spinning because heat buildup can damage internal parts. A fan should move air smoothly, not sit there grumbling like an old refrigerator.
How To Repair Ceiling Fan Remote And Receiver Issues
Some ceiling fan problems don’t show up all at once. The light starts flickering every few days, the fan speed feels slower than usual, or the remote suddenly works only from one side of the room. Little annoyances like that often point toward deeper receiver wear, motor strain, or unstable wiring hidden above the canopy. Fixing those issues early can save the fan from bigger electrical trouble later.
Capacitor Problems And Slow Fan Speeds
A ceiling fan capacitor controls how the motor starts and changes speed. Once the capacitor weakens, the fan may spin slowly even on high speed or refuse to start without a push. That sluggish movement usually feels gradual at first, which makes many people assume the blades just need cleaning. A worn capacitor creates uneven airflow, motor stress, and inconsistent speed control long before total failure happens.
Buzzing sounds often show up alongside capacitor problems. The fan hums, the blades twitch a little, then nothing happens. That sound means the motor is trying to work while the capacitor struggles to deliver the right electrical boost. Ignoring the noise for months can overheat the motor and shorten the life of the fan.
Replacing a capacitor isn’t usually difficult for someone comfortable with basic electrical repairs, but matching the exact ratings matters. Microfarad values and voltage ratings must align with the original part or the fan may run unpredictably afterward. Taking a clear photo before disconnecting wires helps prevent mistakes during reinstallation. Tiny wiring errors can create hours of frustration later.
Heat buildup around the canopy can also speed up capacitor wear. Bedrooms with poor ventilation or vaulted ceilings often trap warm air near the motor housing. In larger rooms, airflow design matters just as much as motor power, especially with high ceilings that need better circulation coverage. Compare larger room setups through ceiling fans with lights for vaulted ceilings if airflow problems continue even after repairs.
Loose Blades And Wobbling Problems
A wobbling ceiling fan can make remote issues seem worse than they really are. Constant vibration shakes internal wiring, loosens wire nuts, and puts extra strain on the receiver tucked above the mounting bracket. Small wobbles may not look serious, but repeated movement over time affects electrical stability and motor balance. A fan should rotate smoothly without rattling the ceiling box.
Blade screws should be checked carefully with the power disconnected. Even one loose blade arm can throw the balance off enough to create shaking at medium or high speed. Tighten screws evenly instead of cranking one side fully first. Uneven pressure can slightly twist the blade brackets and make the wobble worse.
Dust buildup creates another overlooked balance issue. Heavy dirt collecting on one blade changes weight distribution more than most people expect. Cleaning the blades with a damp cloth often reduces shaking immediately, especially in kitchens or rooms with poor ventilation. Sticky dust mixed with humidity creates stubborn buildup that slowly drags the fan out of alignment.
Ceiling box stability matters too. A fan mounted to a weak or loose electrical box can wobble no matter how balanced the blades are. If the entire fan shifts when touched gently, the mounting hardware deserves inspection before anything else. Stable mounting protects the receiver, motor, and wiring from long-term vibration damage.

Wall Switch Mistakes That Cause Remote Failure
Older homes sometimes hide outdated wall switches behind modern ceiling fans. Standard light dimmers and fan remotes rarely cooperate well together. The remote receiver expects steady power, while some dimmers reduce voltage in ways that confuse the electronics. That mismatch can trigger flickering lights, partial fan speeds, or random shutoffs.
Pull chains can create confusion too. Many remote-controlled ceiling fans still rely on the pull chain being set to high speed before the remote takes over. If the chain accidentally clicks into a lower speed or off position, the remote may stop responding properly. People often assume the remote died when the issue sits right there hanging from the fan.
Shared circuits can also interfere with consistent fan operation. Large appliances, portable heaters, or overloaded outlets on the same breaker may create voltage fluctuations that affect the receiver. Lights dimming briefly when another appliance turns on can hint at circuit strain. A stable electrical supply matters more than many homeowners realize.
Small room setups sometimes use extra portable cooling instead of relying only on ceiling airflow. For study corners or compact sleeping spaces, compare quieter task lighting and airflow combinations through led desk lamp for dorm setups that work well in tighter rooms where overhead lighting alone feels harsh.
Signs The Receiver Needs Replacement
Some receiver problems become impossible to ignore. The remote works one minute, then stops completely for hours before suddenly reconnecting again. That inconsistent behavior often points toward failing internal relays or heat-damaged circuitry inside the receiver box. Electronics tend to fail gradually before quitting altogether.
Burn marks or sharp electrical smells near the canopy should never be ignored. A receiver running excessively hot can melt insulation or damage nearby wires over time. Shut off power immediately if the canopy feels unusually warm or if crackling sounds appear during operation. Electrical smells are warnings, not suggestions.
Replacing the receiver usually restores remote control quickly if the motor itself remains healthy. Universal receiver kits work with many fan brands, though features like dimming or reverse controls may vary afterward. Read the wiring diagram carefully before connecting anything. A rushed installation creates more problems than it solves.
Some newer fans use integrated control boards instead of separate receiver boxes. Those systems can cost more to repair because the electronics are built directly into the motor assembly. In those cases, comparing repair cost against fan age helps determine whether replacement makes more sense. Older fans with worn bearings, noisy motors, and outdated lighting may not justify expensive electronic repairs.
Smart Habits That Prevent Future Fan Problems
Routine cleaning keeps remote-controlled ceiling fans healthier than most people expect. Dust buildup traps heat inside the motor housing and blocks airflow around sensitive electronics. Wiping blades regularly and vacuuming around vents reduces strain on the motor and receiver. Cooler operation helps extend the life of electrical components and moving parts.
Power surges quietly damage ceiling fan electronics over time. Storm activity, unstable wiring, or overloaded circuits can weaken receivers long before total failure appears. Surge protection for entertainment systems and bedroom electronics also helps protect fan controls connected to the same circuit. Tiny spikes in voltage create cumulative wear inside electronic receivers.
Remote storage matters more than people think. Tossing remotes onto couches, beds, or cluttered counters increases the chance of cracked battery contacts or damaged buttons. Sticky residue from drinks or humidity can slowly interfere with button responsiveness too. A remote treated gently usually lasts much longer than one constantly dropped or squeezed between couch cushions.
Regular listening helps catch problems early. Fans often warn about trouble through subtle clicking, humming, or vibration changes before complete failure arrives. Paying attention to those shifts makes troubleshooting simpler and cheaper later. Quiet, stable operation usually signals that the motor, receiver, and remote system are all working together the way they should.


Best Small Flush Mount Ceiling Fans 2026 Ultimate Picks

Best Smart Ceiling Fan India 2026 For Effortless Comfort

Best Smart Ceiling Fans with Lights for 2026: Top Picks

Best Smart Home Non Ceiling Fans 2026 For Ultimate Comfort

Best Outdoor Misting Ceiling Fan 2026 For Ultimate Comfort

Best Ceiling Fans With Lights For Vaulted Ceilings 2026 Top Picks

Best Outdoor Ceiling Fans For Porch 2026 With Style And Breeze

Best WiFi Enabled Ceiling Fan 2026 For Effortless Comfort





