
How To Fix A Wobbly Ceiling Fan With Lights Fast
How to fix a wobbly ceiling fan with lights becomes a frustrating search the second those blades start swaying like they’ve got a mind of their own. One minute the room feels calm and comfortable. Then suddenly, there’s that annoying ticking noise, a shaky light kit, or a fan that looks ready to detach from the ceiling. Small balance issues don’t stay small for long, either. Loose screws, uneven blades, and worn mounting brackets can slowly turn a relaxing evening into a nonstop distraction.
Most people assume replacing the entire fan is the only way out. Honestly, that’s rarely true. A wobbling fan usually points to a handful of fixable issues hiding in plain sight. Bent blade arms, dust buildup, warped wooden blades, or an unbalanced light fixture often create the problem without any obvious warning signs. Tightening the wrong component won’t solve it, though. A steady fan depends on several parts working together smoothly, so skipping steps can leave the shaking just as bad as before.
Ceiling fan balance also affects more than comfort. Excessive wobbling places stress on the motor housing, ceiling box, and electrical connections over time. That constant movement can shorten the fan’s lifespan and create louder operation every week it’s ignored. Nobody wants to sit under a noisy spinning fixture wondering whether it’s safe to keep running. Fixing the movement early helps reduce long-term wear while keeping airflow consistent and quieter.
Blade alignment tends to trip people up the most. Even a tiny difference in blade height can throw off the entire spin cycle. Dust can make things worse too, oddly enough. Heavy buildup on one blade changes weight distribution and creates uneven rotation during higher speeds. A proper inspection usually reveals several small issues stacking together instead of one dramatic failure.
Fan mounting stability matters just as much as blade condition. Loose electrical boxes or worn mounting brackets allow extra movement that balancing kits can’t fix alone. Sometimes the fan itself is perfectly balanced, yet the ceiling connection shifts with every rotation. That’s why careful inspection beats rushing into random adjustments. A stable base creates smoother performance from the start.
Lighting components add another layer of trouble. Loose glass shades, crooked light kits, or poorly secured bulbs can exaggerate vibration and create rattling noises that mimic motor damage. Separately, if airflow still feels uneven after repairs, exploring compatible replacement fan blades or balancing accessories may help improve long-term stability. Small adjustments often create the biggest difference once every part works together properly.
How To Fix A Wobbly Ceiling Fan With Lights
A shaky fan can make a quiet room feel tense fast, especially once the light kit starts rattling above your head. The good news is that how to fix a wobbly ceiling fan with lights usually comes down to a careful check of the blades, screws, mounting box, and light assembly. Small problems stack up, then the whole fan starts swaying like it’s had too much coffee. A steady fix starts with safety, patience, and the right order of inspection.
Stop The Shake First
Turn off the fan and lights before touching anything, even if the wobble looks minor. Let the blades stop completely, then use a sturdy step ladder so you’re not stretching or twisting overhead. A wobbly ceiling fan with lights can hide loose glass shades, warm bulbs, and shaky blade arms, so rushing the job is asking for trouble. Keep one hand free for balance, and avoid pulling on the fan body like it’s a grab handle.
Power control matters more than people think during ceiling fan repairs. Flip the wall switch off, and use the remote only after the inspection is done. If you need to open the canopy or touch wiring, shut off the breaker because light kits add another layer of electrical risk. That extra step feels annoying, sure, but electrical safety beats guesswork every single time.
Start with a simple visual check from below. Watch the fan at low speed, then medium speed, and notice whether the whole motor housing moves or only the blade tips appear uneven. That difference points you toward either mounting instability or blade balance trouble. If the ceiling canopy shifts with the fan, stop running it until the mount is checked.
Loose parts often make the first clue easy to hear. A clicking sound may come from blade screws, while a glassy buzz usually points to the light kit or shades. A deep knocking sound near the ceiling can mean the fan box or downrod connection has movement. Those sounds matter because they help separate a harmless balance issue from a mounting problem that needs attention right away.
Check The Mounting Hardware
Ceiling fan mounting hardware carries the weight of the fan, light kit, spinning blades, and everyday vibration. A fan-rated electrical box is built for that movement, while a basic light fixture box may not be. If the fan was installed where a regular ceiling light used to sit, that’s a red flag worth taking seriously. A wobbly fan can sometimes be a symptom of the wrong support above the ceiling.
Remove the canopy only after power is safely off at the breaker. Look for loose bracket screws, a shifting downrod ball, or a mounting bracket that doesn’t sit tight against the ceiling box. The fan should not wiggle at the ceiling connection when gently moved by hand. If it does, tightening the blades won’t solve the real issue.
Downrod fans need a close look at the pin, set screws, and hanging ball. Those small pieces keep the fan centered as it spins, and even a slight gap can create visible wobble. Tighten set screws firmly, but don’t strip them by forcing the tool. The goal is stable contact without damaging the hardware.
Flush-mount fans have their own quirks. The housing can sit unevenly against textured ceilings, old paint ridges, or warped mounting plates. A small tilt at the base becomes much more obvious once the blades start turning. That’s why a level mounting surface matters before using a balance kit or blaming the motor.
Tighten Blades And Light Parts
Blade screws are the usual suspects because vibration slowly loosens them over time. Tighten each screw where the blade connects to the blade arm, then check where the blade arm attaches to the motor. Work around the fan in a pattern instead of jumping randomly from one side to another. That keeps the inspection cleaner and helps you avoid missing one loose connection.
Blade arms can bend slightly during cleaning, moving furniture, or a clumsy bulb change. Measure the distance from each blade tip to the ceiling, then compare the results. A blade sitting lower or higher than the others can create uneven rotation that looks worse at higher speeds. Gently adjusting a bent arm may help, but cracked or badly bent arms should be replaced.
The light kit deserves just as much attention as the blades. Tighten the screws holding the light fixture to the fan body, then check each shade, bulb, finial, and retaining ring. A loose glass shade can make the fan sound more dangerous than it really is, but it still adds extra vibration and annoying noise. Use bulbs with the correct size and weight for the fixture so the light kit stays balanced.
Dust creates more wobble than it gets credit for. A thick layer on one blade changes the weight just enough to throw off the spin. Clean each blade with a damp cloth, supporting the blade from underneath so you don’t bend the arm. That simple step improves blade balance, airflow, and quiet operation before any parts are replaced.
Lighting comfort matters too, especially in rooms used for video calls or desk work. To reduce glare while the fan light is being checked, compare your setup with best light for zoom meetings for softer, steadier room lighting. A ceiling fan light can brighten the whole space, but it may cast harsh shadows when the fixture shakes or sits too close overhead. Keeping the fan stable helps the room feel calmer and makes everyday lighting more consistent.
Balance The Fan Blades
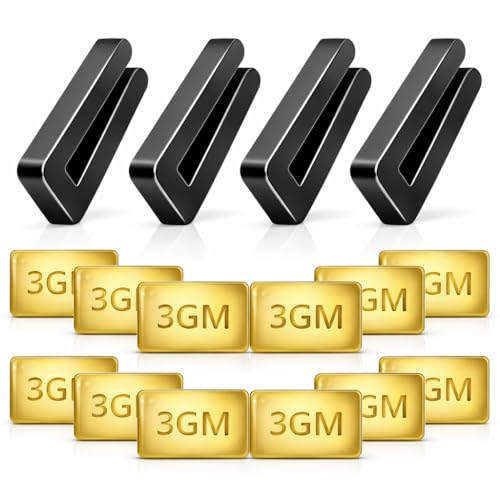
Fan blade balance is the next step after the mount, screws, and light kit are secure. A balancing kit usually includes a plastic clip and small adhesive weights. Place the clip on one blade at a time, run the fan at medium speed, and watch whether the wobble improves. Slow and boring? Yep, but methodical testing beats random guessing.
Start the clip near the middle of the blade, then move it closer to the tip if the wobble changes. Repeat the same test on each blade until one position clearly reduces the shake. Once you find the sweet spot, stick the adhesive weight on top of the blade where it won’t show from below. That hidden weight helps correct uneven blade weight distribution.
Some wobble remains if the blades are warped. Lay each blade on a flat surface if removal is easy, or sight along the edge while it’s still attached. Wood and composite blades can twist from humidity, age, or heat near the ceiling. A balance kit can help a little, but warped blades usually need replacement for a truly smooth spin.
Speed settings can expose different problems. A fan that wobbles only on high speed may have a mild balance issue, while a fan that shakes badly on low speed may have a mounting or blade-arm problem. Test one speed at a time and give the fan a few seconds to settle before judging the result. Careful testing keeps you from chasing false fixes.
Airflow direction also affects how the room feels after repairs. A stable fan still needs the correct seasonal rotation to support cooling and comfort, so explore best direction for ceiling fans before assuming the fan speed is the only issue. During air conditioning season, proper rotation helps move cool air without making the room feel drafty. That combo gives you smoother airflow and better comfort without cranking the thermostat.
Test Controls And Remote Signals
Remote controls can complicate wobble troubleshooting because speed changes may feel inconsistent. A weak battery, delayed receiver, or mismatched setting can make the fan surge slightly before settling into rhythm. That surge does not always mean the motor is bad. It may simply point to control issues affecting speed stability.
Run the fan from the wall switch, pull chain, or remote depending on the model. Test each control method separately so you can tell whether the wobble changes with the control source. If the fan behaves better with one method than another, the receiver or remote setup deserves a closer look. Small control problems can create jerky starts and uneven speed changes.
Smart devices and media remotes can create clutter in rooms where one remote already controls too much. To simplify nearby entertainment setups, explore universal remote for nvidia shield so fan troubleshooting doesn’t get mixed up with TV controls. Keeping controls organized prevents accidental speed changes while you’re testing the wobble. A calm setup makes fan repair less confusing.
After every adjustment, run the fan for a few minutes with the lights on and off. Light kits add weight, so testing both modes helps reveal whether the shake comes from the fan body or the fixture below it. Listen for rattles, watch the canopy, and check whether the blades track evenly. The best result is steady rotation, quiet lighting, and no visible sway at the ceiling.
How To Stop Ceiling Fan Light Wobble And Noise
Nothing ruins a quiet evening faster than a ceiling fan that starts wobbling every time the speed goes up. The shaking becomes even more irritating once the light kit joins in with rattling glass shades and buzzing sounds. After the basic screws and blade balancing are handled, deeper issues sometimes stay hidden behind the motor housing or ceiling bracket. That’s where careful troubleshooting makes the difference between a temporary fix and long-term fan stability.
Watch For Motor Wear
Ceiling fan motors usually last for years, but constant wobbling speeds up wear on internal bearings and moving parts. A fan that hums loudly, slows down randomly, or feels rough during startup may already have motor strain building up inside. The shaking itself often causes the damage, which turns into a frustrating cycle over time. Small balance issues today can become motor problems and noisy operation later.
Place one hand lightly on the motor housing while the fan runs at low speed. Excessive vibration traveling through the center housing often signals internal wear instead of a blade issue. Fans with older motors may also develop a grinding sound that gets louder during higher speeds. That roughness points toward bearing wear or uneven motor rotation.
Heat becomes another clue. A warm fan motor after several hours is normal, but excessive heat paired with wobbling deserves attention. Dust buildup inside the motor vents can trap heat and force the fan to work harder than necessary. Cleaning those vents carefully helps improve air circulation and motor efficiency without replacing the unit.
Older fans sometimes reach a point where replacement parts become harder to justify. If repairs keep piling up, comparing the fan’s age against how long ceiling fans last can help decide whether continued repairs still make sense. Some fans hold up for well over a decade with regular maintenance, while cheaper models often show wear much sooner. A stable fan should feel smooth, quiet, and predictable instead of shaky every few months.
Fix Uneven Blade Tracking
Blade tracking refers to how evenly the blades move around the same circular path. Even after balancing, one blade sitting slightly higher than the others can keep the wobble alive. The difference may look tiny from below, yet the spinning motion exaggerates it immediately. A ruler or measuring tape helps reveal small alignment inconsistencies that are easy to miss by eye.
Measure from the ceiling to each blade tip while the fan is turned off. Keep the tape position consistent for every blade so the comparison stays accurate. A blade sitting lower often points to a bent blade arm rather than a damaged blade itself. Slight adjustments may correct the issue, but forcing the metal too aggressively can crack the arm or weaken the connection.
Humidity can slowly twist wooden blades over time, especially in rooms with poor airflow or seasonal moisture changes. Bathrooms, laundry rooms, and covered patios tend to show this problem earlier than dry indoor spaces. Warped blades usually create persistent wobble and inconsistent airflow even after balancing kits are installed. Replacing the damaged blade often solves more than endless tweaking ever will.
Ceiling height also affects how noticeable wobbling becomes. A fan installed lower over a dining table or bed makes movement feel much more dramatic. Tight tracking and even blade spacing create a calmer look while improving steady airflow across the room. Those details matter because ceiling fans stay in your line of sight almost constantly.
Reduce Noise From The Light Kit
Light kit rattling tricks many people into blaming the fan motor first. Glass shades vibrate surprisingly easily once the fan reaches medium or high speed. Even one loose retaining ring can create a sharp ticking sound that echoes through the entire room. Tightening every visible light component helps narrow down the actual source of the noise.
Bulb type plays a role too. Heavier decorative bulbs sometimes exaggerate wobbling on lighter fan models, especially if the light kit hangs lower beneath the motor housing. Switching to lighter LED bulbs often reduces strain while keeping the room bright enough for everyday use. That small change can improve balance, brightness, and energy efficiency all at once.
Glass shades need careful tightening because overtightening creates another problem. Too much pressure can crack the glass or make the shade sit unevenly against the fixture. Tighten only until the shade feels secure and stops rattling during operation. A stable fit keeps the fan quieter without stressing the fixture hardware.
Room layout affects sound more than people expect. Bare walls and hard flooring bounce fan noise around the space, making small rattles feel louder. Rugs, curtains, and upholstered furniture help soften those echoes naturally. Reducing room echo improves the feeling of quiet airflow and smoother fan performance without touching the motor itself.

Improve Airflow Without Extra Vibration
Fan speed settings should improve comfort, not create anxiety every time the blades spin faster. Some people crank the fan to maximum speed because the room still feels stuffy, but airflow problems don’t always mean the motor is weak. Furniture placement, blocked vents, or poor circulation can make the room uncomfortable even with the fan running hard. Solving those issues helps reduce the temptation to push a wobbling fan beyond its comfort zone.
Blade pitch matters too. Fans with steeper blade angles move more air, but they also place extra strain on the motor during high speeds. Cheap replacement blades with mismatched pitch angles often create air imbalance and stronger vibration. Matching replacement parts carefully keeps airflow more consistent and reduces unnecessary stress on the housing.
Large rooms sometimes need support from additional cooling equipment instead of forcing one ceiling fan to do everything alone. For flexible airflow in corners, garages, or temporary workspaces, compare portable circulation setups with best pedestal fan with remote options that allow easier speed adjustments from across the room. Spreading airflow more evenly helps reduce strain on the ceiling fan during hotter days. That setup also creates better room circulation and quieter cooling.
Seasonal fan direction changes can improve comfort without relying on maximum speed all year long. Counterclockwise rotation usually pushes cooler air downward during warmer months, while clockwise rotation helps circulate warm air during colder weather. Correct direction settings improve room comfort while reducing unnecessary fan strain. A properly adjusted fan should feel smooth, balanced, and steady at moderate speeds.
Know When Replacement Makes Sense
Persistent wobbling after repeated repairs can point toward structural wear that’s no longer worth chasing. Cracked blade arms, worn bearings, or damaged mounting systems often return even after temporary fixes. Spending money on constant repairs adds up fast, especially once electrical parts or motor components enter the picture. Sometimes replacing the fan becomes the more practical path instead of fighting the same issues repeatedly.
Older fans may also struggle with outdated wiring setups or inefficient motors that run hotter than modern designs. Newer fans tend to use quieter motors and lighter light kits that reduce strain during operation. That difference becomes obvious in bedrooms, offices, or living rooms where constant fan noise gets irritating fast. Better balance and quieter performance create a much calmer environment overall.
Installation quality still matters with brand-new fans. A poorly mounted replacement can wobble just as badly as the old unit within days. Taking extra time to verify the ceiling box, bracket alignment, and blade spacing prevents frustration later. Stable installation supports long-term reliability and quieter operation from the very beginning.
Daily comfort depends on more than airflow alone. A ceiling fan should fade into the background instead of pulling your attention every few seconds with shaking or rattling. Smooth rotation, balanced blades, secure lighting, and steady airflow all work together to create a quieter and more comfortable room. Once those pieces line up properly, the entire space feels easier to relax in.


Best Small Flush Mount Ceiling Fans 2026 Ultimate Picks

Best Smart Ceiling Fan India 2026 For Effortless Comfort

Best Smart Ceiling Fans with Lights for 2026: Top Picks

Best Smart Home Non Ceiling Fans 2026 For Ultimate Comfort

Best Outdoor Misting Ceiling Fan 2026 For Ultimate Comfort

Best Ceiling Fans With Lights For Vaulted Ceilings 2026 Top Picks

Best Outdoor Ceiling Fans For Porch 2026 With Style And Breeze

Best WiFi Enabled Ceiling Fan 2026 For Effortless Comfort





