
How To Fix Hampton Bay Ceiling Fan Pull Chain Fast
How to fix Hampton Bay ceiling fan pull chain problems can feel downright irritating once the fan stops responding at the worst possible moment. One minute the fan works fine, then suddenly the chain snaps, jams, or spins endlessly without changing the speed. That tiny switch hidden inside the fan housing tends to wear out after years of daily use, especially in warm rooms where the fan barely gets a break. The good news is that many pull chain issues don't automatically mean replacing the entire ceiling fan.
Loose chains, broken connectors, and stuck speed switches usually come from worn internal components rather than electrical failure. A rattling pull chain often signals that the switch mechanism has loosened or cracked inside the housing. Sometimes the chain still moves, yet the fan won't react at all. Other times, the chain pulls out completely, leaving people staring at the ceiling thinking, “Well, that's just great.”
Fixing ceiling fan pull chain issues becomes much easier once the real cause is identified. Some repairs only require replacing the external chain extension, while others involve swapping the internal pull chain switch. Small details matter here. Matching the correct wire configuration and fan speed settings prevents bigger headaches later. A rushed repair can leave the fan stuck on one speed or completely unresponsive.
Dust buildup inside older ceiling fans also creates sneaky problems. Dirt can interfere with the pull switch mechanism, causing rough clicks or delayed speed changes. Humidity doesn't help either. Over time, moisture weakens internal plastic parts and increases wear around the switch housing. That's why ceiling fans in bedrooms, kitchens, or covered patios tend to develop pull chain problems more frequently.
Hampton Bay ceiling fan repair work often sounds intimidating at first, but most repairs stay surprisingly manageable with basic tools and patience. A screwdriver, voltage tester, replacement switch, and a little attention to wiring order usually handle the job. Also, checking the fan model beforehand saves time because switch compatibility varies across Hampton Bay designs. Some switches use three wires, while others use four, and mixing them up can create frustrating speed control issues.
Replacing the pull chain switch instead of the entire fan helps preserve a working fixture without unnecessary expense. Plenty of people assume a nonworking chain means the motor is failing, though that's rarely the case. In reality, the pull chain assembly acts like a wear-and-tear component that naturally degrades over time. Once repaired properly, the fan often runs smoothly again without strange noises or inconsistent speed changes.
How To Fix Hampton Bay Ceiling Fan Pull Chain
A fan that ignores the pull chain can turn a normal room into a sticky, annoying little problem fast. The chain may still click, dangle loose, or disappear into the switch housing, yet the blades sit there like they’ve clocked out early. That’s where how to fix Hampton Bay ceiling fan pull chain issues becomes practical, because most failures come from a worn pull switch, a broken chain connector, or a loose internal mechanism, not a ruined fan motor.
Hampton Bay Pull Chain Basics
Hampton Bay ceiling fan pull chain problems usually start small. A chain feels rough, the click sounds weaker, or the fan skips a speed. Those little signs matter because the internal switch uses small contacts that wear down from repeated pulling. Ignore them long enough, and the fan may stop responding completely.
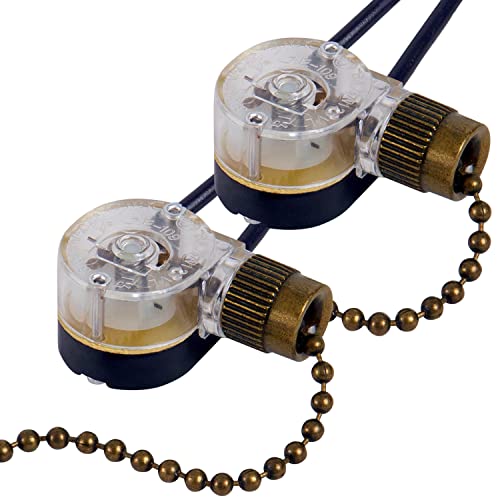
The pull chain does more than hang from the fan for convenience. It connects to a fan speed switch inside the switch housing, and that switch controls how power moves through the fan’s speed circuit. A light pull chain works differently from a fan speed chain, so mixing them up can cause more confusion. Labeling which chain controls what saves a lot of head scratching later.
Many Hampton Bay fans use a three-speed pull chain switch, though some models vary. The switch may have three or four wires depending on the fan design. That small detail matters more than the shape of the chain itself. A replacement switch with the wrong wire setup can leave the fan stuck on one speed or unable to run at all.
Safety comes first, even for a repair that looks simple. Turn off power at the wall switch and breaker before opening the fan housing. A non-contact voltage tester helps confirm the wires are not live before touching anything. That extra check is boring, sure, but it keeps the repair from turning ugly.
Common Pull Chain Problems
A snapped chain is the easiest issue to spot. Sometimes the visible chain breaks outside the housing, leaving enough metal bead links to attach a new extension. Other times, the break happens inside the switch, which means the pull chain switch assembly likely needs replacement. The outside chain is cheap, but the inside switch does the real work.
A stuck chain usually points to a jammed switch mechanism. Pulling harder feels tempting, but that often cracks the plastic switch body or yanks the wiring loose. A rough or frozen chain needs a careful look inside the housing. The smart move is to open the fan, inspect the switch, and avoid forcing parts that already feel weak.
A chain that pulls with no click often means the internal spring or contact plate has failed. The fan may stay off, stay on, or refuse to change speed. That symptom is common in older fans used every day through hot months. Switch wear is normal, and replacing that small part can bring the fan back without replacing the whole fixture.
Fan owners also run into the classic mixed-chain problem. One chain controls the light kit, while the other controls fan speed. If the light works but the fan does nothing, the issue may be isolated to the fan pull chain circuit. For outdoor hobbies that need a separate beam in low light, compare uv light for rockhounding for better visibility away from ceiling fan repairs.
Tools And Safety Checks
A basic repair setup keeps the job cleaner and less stressful. You’ll usually need a screwdriver, wire stripper, voltage tester, replacement pull chain switch, and a phone camera. The camera earns its keep because a quick photo of the original wiring gives you a clear reference before any wires come loose. That one habit prevents a lot of “Wait, where did this wire go?” moments.
Match the replacement switch before installing anything. Look at the number of wires, terminal markings, and switch rating printed on the old part. Many fan speed switches use labels like L, 1, 2, and 3. Those markings are not decoration, because they guide the correct wire placement for proper speed control.
The fan housing should open without forcing the metal cover. Remove the screws slowly and support the light kit if your fan has one attached. Wires may be tucked tightly inside, especially on older installations. A calm pace helps protect wire connectors, light kit wiring, and the fragile switch body.
Power checks deserve real attention. Wall switches can be mislabeled, and older homes sometimes have wiring that doesn’t behave the way you expect. Use the tester near the wires before touching them. Dead power confirmation is the line between a simple repair and a dangerous mistake.

Replacing The Pull Chain Switch
Start by removing the fan’s switch housing cover. Keep the screws in a cup or on a piece of tape so they don’t roll off the ladder. Once the switch is visible, take a clear picture of every wire connection. That photo becomes your wiring map, especially if the wire colors look faded or oddly matched.
Unscrew the small nut holding the pull chain switch to the housing. Let the old switch hang gently while you compare it with the new one. The terminal layout should match closely, and the wire count should be the same. If anything looks different, stop and verify the model before continuing.
Move one wire at a time from the old switch to the matching terminal on the new switch. This slow transfer reduces the risk of mixing up speed wires. Some switches use push-in terminals, while others use screw connections. Either style needs a secure wire hold, because loose wires can cause flickering, buzzing, or speed failure.
After the wires are connected, mount the new switch back into the housing. Thread the chain through the hole, tighten the retaining nut, and tuck the wires back neatly. Avoid pinching wires against the metal cover. For rooms with taller rooflines and harder fan access, compare ceiling fans for cathedral ceilings before dealing with another awkward ladder repair.
Testing Speeds And Chain Feel
Restore power only after the housing is fully closed. Stand clear of the blades and pull the chain once at a time. A working switch should move through high, medium, low, and off in a steady sequence. The chain should click cleanly without grinding, sticking, or feeling mushy.
Speed order may feel different depending on the fan model and switch type. Some fans start on high after the first pull, while others follow a different pattern. The key is consistency. If the fan skips a speed or hums without spinning, the wiring order or switch compatibility needs another look.
A short test run helps reveal hidden problems. Let the fan run for a few minutes at each speed while listening for buzzing, clicking, or wobbling. A pull chain repair should not create new noises. If the motor hums but the blades hesitate, the issue may involve a capacitor, not just the chain switch.
Chain length also affects daily use. A chain that hangs too short invites hard yanking, while one that hangs too low gets bumped or tangled. Add a modest extension if needed, but avoid heavy ornaments that stress the switch. For stroller naps, playrooms, or warm corners where airflow needs to stay gentle, compare portable fan for kids as a separate cooling backup.
Mistakes That Make Repairs Harder
The biggest mistake is guessing the wire order. Fan switches may look nearly identical while working differently inside. A random swap can leave the fan stuck, noisy, or dead. A before photo and careful terminal matching beat memory every single time.
Another common problem is buying a light switch instead of a fan speed switch. Light pull switches usually control simple on and off power, while fan switches control multiple speeds. The wrong part may fit the housing but fail the job. Correct switch type matters more than chain color, chain length, or package claims.
Forcing the chain after installation can ruin a new switch fast. The pull should feel firm but not stiff. If it binds, the switch may be twisted in the housing or the chain may be rubbing against the opening. Fixing that alignment protects the new pull chain mechanism from early wear.
Overtightening the retaining nut causes trouble too. A snug nut holds the switch in place, but too much pressure can crack the plastic threads. Ceiling fan parts are practical, not indestructible. A gentle hand keeps the switch body, chain slot, and housing cover from taking damage during a repair that should stay simple.
Repair Limits And Warning Signs
Some symptoms point beyond the pull chain. A fan that smells hot, trips the breaker, or sparks inside the housing needs professional attention. Those signs may involve damaged wiring or motor trouble. Electrical warning signs are not worth gambling with, even if the chain also feels broken.
A fan that wobbles heavily after the repair may have a separate mounting or blade balance issue. The pull chain switch doesn’t control blade alignment. Still, opening the housing can shift parts if screws are left loose. Check the canopy, blade arms, and housing screws before assuming the new switch caused the wobble.
Older fans can hide brittle wiring insulation inside the switch cup. If wires crack, crumble, or look burned, replacing only the pull switch may not be enough. Fresh wire connectors can help with minor wear, but damaged internal wiring deserves caution. Safe repair boundaries matter more than saving a few dollars.
A replacement fan may make more sense if the motor is noisy, the light kit is failing, and the pull chain switch has broken more than once. Repairing one part after another gets old fast. Still, if the motor runs quietly and the housing is solid, a new pull chain switch is often the practical fix that keeps the fan useful.
Fix Hampton Bay Fan Chain Without Replacing Fan
A ceiling fan that finally spins again after a pull chain repair feels satisfying for about five seconds, then new questions pop up. The chain works, but the speed feels odd. The fan hums louder than before. Maybe the chain feels stiff, or the light flickers every few pulls. Those small details matter because Hampton Bay fan pull chain repairs work best when the surrounding parts stay in good condition too.
Signs The Capacitor May Be Failing
A pull chain switch doesn’t control everything inside the fan. The fan capacitor helps regulate speed levels and motor startup, so a weak capacitor can mimic a bad pull chain. Fans with capacitor trouble often hum softly while the blades struggle to start. Some fans only run at one speed even after installing a brand-new switch.
Speed inconsistency usually gives the capacitor away. High speed may feel weak, while medium and low blur together without much difference. That uneven airflow becomes obvious during warmer nights when the room still feels stale. A healthy fan should deliver clear speed changes, not vague shifts that barely move air.
Burn marks or leaking oil near the capacitor housing signal deeper trouble. Capacitors wear out gradually from heat buildup inside the motor housing. Ceiling fans used daily through long summers experience more strain over time. A damaged capacitor can also produce a faint electrical smell that shouldn’t be ignored.
Replacing a capacitor takes more attention than swapping a pull chain switch. Wire placement matters, and capacitors store electrical charge even after the fan is off. If the repair feels outside your comfort zone, stopping there is perfectly reasonable. A working pull chain won’t help much if the motor control system continues failing behind the scenes.
Why Pull Chains Break So Often
Most people don’t think about the pull chain until it snaps in their hand. Daily use slowly wears the tiny internal gears and springs inside the switch body. Aggressive pulling speeds up that wear, especially when the chain sticks slightly. A gentle pull actually extends the life of the ceiling fan chain switch more than people realize.
Heavy decorative chain extensions can also create extra strain. Long metal ornaments look nice at first, but they add weight to the switch every single day. Over time, that tension weakens the chain connection inside the housing. A lighter extension usually keeps the switch mechanism healthier for longer.
Humidity causes problems too. Bathrooms, covered patios, and poorly ventilated bedrooms expose ceiling fans to moisture that slowly affects plastic components and metal contacts. That moisture can lead to corrosion around the chain opening or inside the switch itself. Fans exposed to sticky air often develop rough chain movement before total failure.
Dust buildup quietly contributes to wear as well. Fine dust collects inside the switch housing and interferes with the moving contacts. The chain starts feeling gritty or inconsistent after months of buildup. Fans that stay cleaner inside tend to keep their pull chain performance much longer.
Simple Maintenance That Prevents Repeat Repairs
A repaired fan lasts longer with small maintenance habits that barely take extra time. Dusting the blades regularly helps reduce strain on the motor and balance system. Excessive blade dust makes the fan wobble more, which increases vibration through the housing. Less vibration protects the pull chain switch from repeated internal shock.
Checking loose screws every few months helps more than people expect. Blade screws, switch housing screws, and mounting hardware naturally loosen from constant spinning. Tiny rattles often start before visible wobble appears. Tight hardware keeps the fan structure stable and reduces stress on electrical components.
Chain handling matters too. Quick yanks damage the switch faster than smooth, controlled pulls. Kids especially tend to swing or tug chains sideways, which twists the internal mechanism. For rooms where airflow distractions keep little ones staring upward, explore why babies love ceiling fans to understand why fans grab attention so easily.
Light bulbs also affect fan performance more than expected. Some bulbs generate extra heat inside enclosed light kits, which increases stress on surrounding wiring and switch components. Lower-heat LED bulbs reduce that pressure while improving efficiency. Compare different types of light bulbs before replacing older bulbs that may overheat enclosed fan fixtures.
Dealing With Loud Clicking Sounds
A repaired pull chain should click cleanly without sounding harsh or metallic. Loud clicking often means the switch isn’t mounted tightly inside the housing. The chain may also rub against the metal opening during pulls. That rubbing creates extra friction that eventually damages the new chain assembly.
Loose switch nuts create another common noise issue. Even a slight wobble allows the switch body to shift while pulling the chain. The result feels clunky instead of smooth. Tightening the retaining nut gently usually restores a clean pull motion without overcompressing the plastic threads.
Blade wobble sometimes gets mistaken for switch noise. Fans with uneven blades produce rhythmic clicking or tapping sounds that seem connected to the chain repair. Watching the blades carefully while the fan spins can reveal slight height differences. A balancing kit or blade adjustment may solve the noise problem faster than reopening the switch housing.
Motor noise sounds different from switch noise. A failing motor usually hums steadily or produces a grinding sound that continues while the fan spins. Pull chain noises happen mainly during speed changes or chain movement. Separating those sounds helps narrow down the real source of trouble instead of replacing parts blindly.
Fan Models That Need Extra Care
Older Hampton Bay fans sometimes use compact switch housings with very little wire space. Pulling wires too hard during repair can loosen internal connections deeper inside the fan. Working slowly prevents accidental strain on the motor wiring harness. Tight spaces demand patience more than force.
Fans installed on angled ceilings create another challenge. The housing may tilt slightly, making switch access awkward from a ladder. Stable ladder placement becomes critical during repairs. Rushing while leaning sideways often leads to dropped screws or pinched wires instead of a smooth switch replacement.
Outdoor-rated fans deal with harsher conditions year-round. Moisture, temperature swings, and airborne debris all shorten the lifespan of pull chain components. Even weather-resistant fans eventually develop wear around moving parts. Periodic inspections help catch corrosion, wire damage, and switch stiffness before total failure hits.
Fans with integrated remote systems sometimes confuse troubleshooting. The remote may still power the fan even though the pull chain switch has failed. Testing both control methods separately helps isolate the issue. A bad pull chain and a working remote often point directly toward a damaged speed switch rather than motor failure.
Cheap Replacement Parts Versus Reliable Ones
Low-cost replacement switches look tempting because they usually cost only a few dollars. Some hold up fine, while others develop loose clicks after only a few months. Thin plastic housings and weak internal springs tend to wear faster. Paying slightly more for a sturdier replacement switch often avoids repeating the repair too soon.
Chain extensions vary wildly in quality too. Lightweight metal chains resist strain better than oversized decorative pulls that swing heavily. Decorative pieces made from thick ceramic or glass can gradually damage the switch body over time. A balanced chain setup protects the internal pull mechanism far better.
Packaging claims don’t always mean compatibility. Some universal switches technically fit Hampton Bay fans but create odd speed sequences or weak clicks. Matching the original switch specifications remains the safest route. The wire terminal pattern matters more than flashy wording on the package.
Reliable parts also feel different during installation. Better switches usually provide firmer terminal grip and smoother chain movement right out of the package. That smoother feel matters because tiny inconsistencies grow worse after months of use. A solid chain response during installation usually signals a better long-term repair.
Knowing When Repair Stops Making Sense
A fan that constantly develops new electrical issues eventually becomes more frustrating than useful. Replacing pull switches repeatedly while ignoring motor problems rarely saves money long term. Older fans with dimming lights, noisy bearings, and overheating housings often signal broader wear. At that point, the pull chain issue may only be one piece of a larger fan reliability problem.
Frequent breaker trips deserve serious attention. A failing pull chain switch alone usually won’t overload the breaker unless damaged wiring is involved. Burned wire insulation or melted connectors indicate heat buildup that needs immediate attention. Those symptoms move beyond a simple DIY fan repair situation.
Replacement also becomes practical when parts stop matching correctly. Older Hampton Bay models sometimes use discontinued switch layouts or unusual wiring patterns. Hunting for rare replacement parts turns a small repair into an exhausting project. Installing a newer fan can restore consistent airflow, quieter operation, and easier future maintenance.
Still, many ceiling fans keep running for years after a proper pull chain repair. A stable motor, balanced blades, and correctly installed switch usually restore reliable operation without much drama. Small repairs done carefully tend to last longer than rushed fixes done twice.


Best Small Flush Mount Ceiling Fans 2026 Ultimate Picks

Best Smart Ceiling Fan India 2026 For Effortless Comfort

Best Smart Ceiling Fans with Lights for 2026: Top Picks

Best Smart Home Non Ceiling Fans 2026 For Ultimate Comfort

Best Outdoor Misting Ceiling Fan 2026 For Ultimate Comfort

Best Ceiling Fans With Lights For Vaulted Ceilings 2026 Top Picks

Best Outdoor Ceiling Fans For Porch 2026 With Style And Breeze

Best WiFi Enabled Ceiling Fan 2026 For Effortless Comfort





