
How to Fix Light Switch on Ceiling Fan Fast
How to fix light switch on ceiling fan becomes a frustrating search the second that tiny switch stops cooperating. One minute the light works fine, then suddenly it flickers, refuses to turn on, or starts acting like it has a mind of its own. A loose pull chain, worn switch contacts, or hidden wiring trouble can turn a simple evening into a headache pretty quickly. Nobody wants to sit under a fan light that blinks like a haunted attic scene.
Small switch problems often grow slowly. At first, the light only works after tugging the chain twice. Then the clicking feels rough, awkward, or oddly stiff. Before long, the entire switch mechanism gives out. Loose wiring, overheated connections, and aging switch parts are common trouble spots that sneak up quietly, especially in older ceiling fan models that run daily.
Fixing the issue usually feels more intimidating than it really is. Plenty of ceiling fan light switch problems come down to a worn pull chain switch, disconnected wires, or a faulty wall control that no longer sends stable power. Also, ceiling fans collect dust over time, and that buildup can affect internal components more than most people expect. Strange buzzing noises, delayed lighting, or random shutoffs often point toward deeper switch wear hiding inside the fan housing.
Electrical safety matters here, no question about it. Cutting power before touching any wiring isn't optional. Still, many repairs stay surprisingly manageable with a screwdriver, patience, and a close look at the switch assembly. Replacing a damaged pull switch usually costs far less than replacing the entire ceiling fan, which honestly saves a lot of unnecessary hassle.
Some ceiling fan switches fail because of constant tugging or cheap internal parts. Others wear down after years of heat exposure inside enclosed fan fixtures. That's why identifying the exact symptom matters so much. A chain that won't click feels different from a wall switch that sparks or a light kit that flickers randomly after running for an hour.
How to fix light switch on ceiling fan also depends on the fan style itself. Modern remote-controlled fans behave differently than older pull-chain designs. Some fans hide wiring behind tight mounting brackets, while others make switch access surprisingly easy. A quick repair on one model may require extra disassembly on another, so rushing through the process usually backfires.
Good repairs focus on the root problem instead of temporary tricks. Tightening loose wires, replacing worn switch housings, and checking for burned connectors often restore stable lighting without major expense. A steady ceiling fan light feels like one less thing to worry about, and honestly, that's worth the effort after dealing with constant flickering or stubborn switches night after night.
How To Fix Light Switch On Ceiling Fan
A ceiling fan light that flickers, clicks weirdly, or refuses to turn on can make a normal room feel half-broken. The fan may still spin, which makes the problem even more annoying because the issue feels small but nags at you every single day. That is where how to fix light switch on ceiling fan becomes less about fancy repair talk and more about getting dependable light back without replacing the whole fixture. A careful check of the switch, wiring, breaker, and pull chain usually tells you where the trouble starts.
Ceiling Fan Switch Basics
The light switch on a ceiling fan usually works through a wall switch, a pull chain switch, a remote receiver, or a mix of those parts. That setup can confuse people because the fan motor may run fine while the light kit acts dead. A working fan does not always mean the light circuit is healthy. The light side has its own path, and a weak connection in that path can cause flickering, delay, buzzing, or total failure.
A pull chain switch takes plenty of abuse over the years. Every tug moves tiny internal contacts, and those contacts eventually wear down or stop lining up cleanly. A chain that feels loose, gritty, stuck, or oddly soft often points to a worn pull switch rather than a bad bulb. That tiny plastic part can be the whole headache, which is good news because it is usually cheaper than a full fan replacement.
The wall switch can also be the weak link. A switch that crackles, feels warm, or only works after being pressed a certain way needs attention right away. Heat, loose terminal screws, and worn switch contacts are not things to shrug off. Electrical Safety Foundation International notes that electrical failures and malfunctions are a leading cause of home electrical fires, so a suspicious switch deserves a careful look instead of another week of “maybe it’ll be fine.”
Remote-controlled ceiling fans add one more layer. The remote may send a signal, but the receiver inside the canopy still has to pass power to the light kit. A dead battery is the easy fix, sure, but a failed receiver, loose neutral wire, or mismatched light setting can mimic a bad switch. Start with the simple checks, then move inward only after cutting power at the breaker.
Safety Checks Before Touching Wires
Cutting power at the breaker is the first real step, not a polite suggestion. The wall switch alone may not remove power from every wire inside the ceiling fan housing. Use a non-contact voltage tester before touching anything, then test again after opening the switch cover or fan canopy. It sounds fussy, but that habit keeps a basic repair from turning into a dangerous surprise.
Bulbs deserve a quick check before the fan comes apart. A loose bulb, wrong wattage, or damaged socket tab can make the light act like the switch failed. LED bulbs can also flicker if they do not play nicely with older dimmer switches or remote modules. Swapping in a known-good bulb helps separate a simple lamp issue from a real switch problem.
The breaker panel can tell a story too. A breaker that trips repeatedly after the fan light turns on suggests a deeper issue, not a random nuisance. Short circuits, pinched wires, and overloaded light kits need more caution than a worn pull chain. In that situation, calling a licensed electrician is not overkill, especially if you smell burning plastic or see dark marks near the switch.
Loose mounting parts also matter because vibration travels through the whole fan. A fan that wobbles every night can loosen wire nuts inside the light kit or canopy over time. Tighten visible screws after power is off, then inspect wire connectors for any sign of melting, discoloration, or exposed copper. A steady fan puts less stress on the light switch assembly and helps the repair last longer.

Diagnosing Pull Chain Problems
A broken pull chain switch usually gives itself away. The chain may pull with no click, jam halfway, or keep spinning through settings without turning the light on. Some chains break outside the housing, while others snap inside the switch body where you cannot grab the leftover piece. The main clue is a change in feel, because healthy pull switches click firmly and return cleanly.
Opening the light kit exposes the switch, but patience matters here. Take a photo of the wiring before removing anything, because ceiling fan wire colors can vary by brand and age. Most light pull switches use two or three wires, and mixing them up can stop the light from working even with a brand-new part. A photo gives you a simple map back to the original wire placement.
Replacement pull switches are not all identical. Some are single-circuit on-off switches, while others control multiple light settings. Bring the old switch to the hardware store or match the printed rating and terminal layout before buying a new one. A wrong switch may fit the hole but still fail the job, which is the kind of small mistake that makes a repair feel cursed.
The actual swap is usually straightforward after power is off. Remove the retaining nut, disconnect the old switch wires one at a time, and connect the new switch in the same pattern. Tight wire nuts and clean copper contact are the difference between a steady light and another flicker next week. After reassembling the housing, restore power and test the ceiling fan light switch without yanking the chain like a lawn mower cord.
Wall Switch And Wiring Clues
A wall switch that controls the fan light can fail quietly. The paddle or toggle may still move, but the internal contacts may no longer close with a clean connection. Flickering at the exact moment you touch the switch points strongly toward a worn wall switch. A light that flickers while the fan vibrates may point more toward wiring inside the fan housing.
Removing the wall plate after turning off the breaker lets you inspect the switch box. Loose screws, backstabbed wires, cracked plastic, or heat marks all deserve attention. Many electricians prefer side-screw terminals because they hold wires more securely than push-in connections. That small difference can matter in rooms where the fan light gets used every day.
Switch compatibility gets overlooked, especially with LED bulbs. Older dimmers and some fan controls do not always handle modern LED loads smoothly. Buzzing, strobing, or random low-glow after shutoff can happen when the control and bulb do not match. A standard on-off switch or LED-rated control often fixes the flickering light issue without touching the fan itself.
Design choices matter after the repair too. A bedroom fan with a poor light layout can keep causing frustration even after the switch works, so compare airflow, blade size, and lighting placement before replacing an older unit. For a better room setup, explore best ceiling fan design bedroom options that balance quiet operation, usable light, and comfortable nighttime control. A switch repair solves the immediate problem, but a smarter fan layout can prevent daily annoyance from coming right back.
Remote Receiver And Light Kit Issues
Remote ceiling fans can make diagnosis feel like a guessing game. The handheld remote, receiver, wall switch, light kit, and bulb all sit in the same chain of blame. Start with the remote battery and dip switch settings if the fan uses them. Then check whether the fan motor responds while the light does not, because that split behavior often points to the receiver light output.
The receiver usually sits inside the canopy near the ceiling. After power is off, the canopy can be lowered enough to inspect connectors without pulling the whole fan down. Loose wire nuts, crowded wires, and pinched insulation are common in tight canopies. A clean connection from the receiver to the blue light wire and neutral wire is essential for steady light operation.
Some remote modules fail from heat buildup over time. The fan may beep, click, or respond inconsistently before the light quits fully. Replacement receivers need to match the fan type, remote frequency, and light load, so random parts can create new problems. This is where the repair becomes less “swap a switch” and more careful matching of fan control components.
Smart home devices add another wrinkle around indicator lights and controls. A glowing ring or status light nearby can make people think the ceiling fan light is still leaking power, especially in dim rooms. To reduce confusion around device indicators, compare how to turn off alexa light ring steps with your fan troubleshooting so each light source gets checked separately. Clear separation saves time because not every glow in the room comes from the fan circuit.
Common Mistakes That Make Repairs Worse
Guessing at wires is the mistake that causes the most regret. Ceiling fan wiring can include separate leads for the motor, light kit, neutral, ground, and remote receiver. Swapping wires without photos or labels can turn one bad switch into multiple dead functions. A simple piece of tape and a quick phone photo protect the original wiring layout.
Buying the cheapest switch without checking ratings can also backfire. A ceiling fan light switch should match the electrical rating of the old part and the type of light kit attached. Some compact switches look identical but handle different loads. The right part keeps the repair safe and helps prevent overheating inside the housing.
Forcing stuck chains rarely ends well. A jammed chain may be caught inside the switch, and yanking harder can crack the light kit housing or snap the chain flush with the switch body. Open the housing instead of fighting it from the outside. Gentle disassembly gives you a better shot at saving the fixture trim, chain guide, and wiring.
Unrelated home projects can wait until the electrical problem is stable. Still, households that manage multiple comfort routines often juggle pet care, lighting, and room setup in the same spaces. Separately, to support calm recovery routines for pets away from electrical repair areas, review best red light therapy dogs home options before bringing animals back into a room with tools, ladders, or exposed fixtures. Keeping pets clear of the workspace protects both the repair and the animals wandering underfoot.
How To Repair Ceiling Fan Light Switch Problems
Light switch trouble rarely stays small for long. A tiny flicker turns into random shutoffs, then suddenly the light refuses to work right before guests arrive or late at night when nobody wants to drag out tools. That ongoing irritation pushes many people toward replacing the entire fan even though how to repair ceiling fan light switch problems usually comes down to a few fixable parts. Careful troubleshooting saves money, cuts frustration, and keeps a perfectly usable fan from ending up in the trash.
Burned Sockets And Hidden Damage
A damaged bulb socket can imitate a bad switch so convincingly that people replace the wrong part first. The bulb may flicker, dim randomly, or stop working unless twisted into a very specific position. Inside the socket, the small metal tab at the bottom can flatten over time or develop burn marks from heat exposure. That weak contact interrupts power flow and creates the same symptoms people blame on the ceiling fan light switch.
Turn off the breaker before checking the socket closely. A flashlight helps spot black marks, melted plastic, or corrosion around the metal contact points. Some older ceiling fan light kits trap heat badly, especially with enclosed glass shades and oversized bulbs. Excessive heat slowly damages the socket and eventually affects nearby wiring too.
Bulb wattage matters more than people realize. Ceiling fan light kits often carry lower wattage limits than table lamps or floor fixtures. Installing oversized incandescent bulbs can overheat the housing and weaken internal parts year after year. LED bulbs usually run cooler, which helps protect the socket wiring and light switch components.
Outdoor ceiling fans face extra stress from humidity and temperature swings. Moisture can corrode socket contacts slowly until the light starts behaving unpredictably. For patios or covered decks that need stronger airflow and better weather resistance, compare best powerful outdoor ceiling fan setups that handle moisture more reliably while keeping lighting stable through seasonal weather changes.
Loose Neutral Wires And Flickering Lights
Flickering lights often get blamed on the bulb itself, but a loose neutral wire creates some of the most frustrating lighting problems inside ceiling fans. The light may dim slightly when the fan speed changes or blink randomly while the motor keeps running normally. That inconsistency usually points toward a weak electrical connection rather than a failed bulb. A loose neutral interrupts the return path of electricity, which creates unstable lighting behavior.
The neutral wire connection typically sits inside the canopy or light kit housing. Wire nuts can loosen slowly over time because ceiling fans vibrate every single day. Even minor movement eventually affects weak connections. Tightening loose wire nuts after shutting off power can sometimes restore stable lighting immediately.
Heat buildup around loose wires deserves attention fast. A poor connection creates resistance, and resistance generates heat. Warm wire nuts, brittle insulation, or discoloration around copper wires are warning signs that should not get ignored. Electrical heat damage tends to spread quietly before it becomes obvious.
Some flickering happens only during certain times of day because of fluctuating household electrical loads. Air conditioners, microwaves, or heavy appliances can expose weak fan wiring that otherwise seems fine. Stable connections matter because ceiling fan lights operate best with consistent voltage and properly secured neutral wire connections.
Fixing Light Kits That Stop Working
Sometimes the switch works perfectly but the light kit itself fails. Pull the chain and you hear the click, yet the bulbs stay dark no matter what. Many ceiling fan light kits contain internal connectors that loosen or overheat over time. Those tiny plastic quick-connect plugs often become the hidden weak spot.
Removing the glass shade and lower housing usually reveals the connector setup. A burned connector may show melted plastic, dark spots, or brittle insulation around the wires. Replacing damaged connectors restores power flow and prevents future flickering. Ignoring a burned connector can eventually damage the light kit wiring beyond a simple repair.
Integrated LED light kits create a slightly different headache. Traditional bulbs can be swapped easily, but built-in LED panels sometimes require replacing the entire module. That sounds expensive at first, though replacement kits are often cheaper than installing a brand-new fan. Matching the correct size and voltage keeps the light output steady without overloading the circuit.
Some ceiling fan models make light kit access unnecessarily awkward. Tight screw placement, cramped housings, and short wires can turn a quick repair into an hour of careful balancing on a ladder. Slow, organized work prevents stripped screws and accidental wire damage. A magnetic tray for screws honestly saves a lot of aggravation during repairs.
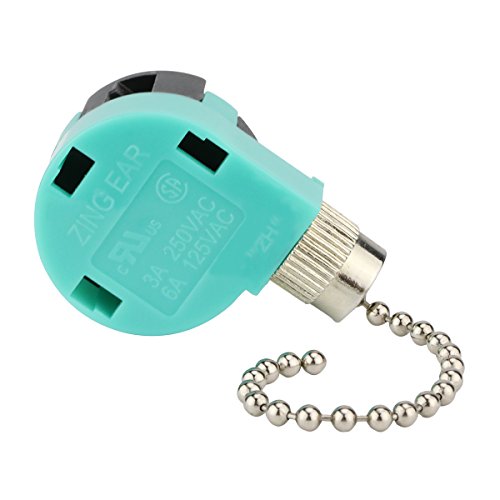
Signs The Entire Switch Needs Replacement
A light switch that sparks, crackles, or feels hot needs replacement rather than another round of hopeful troubleshooting. Those symptoms usually point toward worn internal contacts that no longer create a clean electrical connection. Heat inside the switch body can spread to nearby wiring if ignored too long. Replacing the switch early helps prevent more serious electrical damage.
Some switches fail mechanically before electrical symptoms appear. The toggle may feel loose, sloppy, or uneven during operation. Pull chain switches can stop clicking entirely or feel mushy inside the housing. That soft feeling usually means the internal spring mechanism has worn out after years of repeated use.
Replacement switches are inexpensive, but matching the specifications matters. Voltage rating, amperage, and switch style should align with the original part whenever possible. Installing an underrated switch can shorten its lifespan dramatically, especially on ceiling fans with multi-bulb light kits. Proper compatibility protects the switch contacts from unnecessary strain.
Bedrooms especially benefit from reliable lighting controls because small interruptions become more noticeable late at night. Fans designed for quieter operation and balanced lighting often create fewer long-term annoyances overall. For more stable bedroom airflow and lighting layouts, explore best type ceiling fan bedroom ideas that reduce vibration and help electrical components last longer.
Ceiling Fan Capacitor Problems
The capacitor usually gets blamed for fan speed problems, but it can affect the light system indirectly too. A failing capacitor may cause unstable motor operation, which increases vibration throughout the fixture. That constant shaking can loosen light kit wiring and strain internal connectors over time. Flickering lights paired with unusual fan speed changes sometimes point toward a weak capacitor.
Capacitors store electrical energy and help regulate motor performance. Inside older fans, heat gradually breaks down the capacitor material until the fan behaves unpredictably. Humming noises, slow startup, or speed settings that stop responding properly are common warning signs. The light may flicker during those motor fluctuations because the entire fan assembly vibrates harder than normal.
Replacing a capacitor requires attention to ratings and wire layout. Capacitors come in different microfarad values, and using the wrong one can damage the motor or reduce performance badly. Taking photos before disconnecting wires helps prevent confusion during reassembly. Organized repairs reduce the risk of accidental wiring mistakes inside the fan motor housing.
Capacitors can also hold residual electrical charge briefly after power is disconnected. Waiting several minutes after shutting off the breaker adds an extra layer of safety before touching internal components. A cautious approach matters because ceiling fan repairs combine electrical parts, moving components, and elevated ladder work all in one tight space.
Maintenance Habits That Prevent Repeat Problems
Dust buildup creates more trouble than most people expect. Thick dust layers trap heat around light kits, clog vents, and work their way into switch housings over time. A fan that runs hot places more stress on wiring and electrical contacts. Cleaning the fan blades, switch housing, and glass shades regularly helps preserve electrical stability and airflow performance.
Loose screws deserve occasional checks too. Ceiling fans vibrate constantly, and even balanced models experience slight movement during daily use. Mounting screws, blade brackets, and light kit hardware slowly loosen over the years. Tightening those parts reduces vibration that can damage delicate electrical connections.
Bulb compatibility matters long after the repair is finished. Cheap LED bulbs sometimes flicker with older fan controls or dimmer systems. Stable, dimmer-compatible LEDs reduce strain on switches and create smoother light performance. Paying attention to bulb quality often prevents repeat troubleshooting later.
Ladder safety gets overlooked during quick maintenance jobs. Rushing to tighten a screw or replace a bulb while leaning awkwardly usually ends badly. Stable footing, proper lighting, and organized tools make repairs easier and safer. Ceiling fan work feels simple until somebody drops a screw into the light kit or loses balance reaching overhead.
Knowing When To Call An Electrician
Some repairs move beyond normal DIY territory pretty quickly. Repeated breaker trips, burned wiring smells, or visible melting around the switch box should raise concern immediately. Those signs suggest a deeper electrical issue rather than a simple worn switch. Professional diagnosis helps prevent hidden wiring problems from getting worse behind walls or ceilings.
Older homes sometimes contain outdated wiring that struggles with newer electrical loads. Aluminum wiring, overloaded circuits, or aging breaker panels can affect ceiling fan lighting in unpredictable ways. Replacing the switch alone may not solve the root problem if the circuit itself has weaknesses. A licensed electrician can test the full circuit safely and identify voltage inconsistencies.
Complex smart fan systems also create situations where professional help makes sense. Integrated remotes, app controls, dimming modules, and smart home wiring can become frustrating fast without proper diagrams. Guesswork around those systems risks damaging expensive control boards or creating new electrical faults.
A stubborn ceiling fan light problem can wear people down because it interrupts routines constantly. Reliable lighting changes the feel of a room immediately, especially in bedrooms, living rooms, and workspaces where the fan gets daily use. A steady switch, quiet fan operation, and stable wiring remove that constant low-level annoyance that builds every time the light flickers unexpectedly.


Best Small Flush Mount Ceiling Fans 2026 Ultimate Picks

Best Smart Ceiling Fan India 2026 For Effortless Comfort

Best Smart Ceiling Fans with Lights for 2026: Top Picks

Best Smart Home Non Ceiling Fans 2026 For Ultimate Comfort

Best Outdoor Misting Ceiling Fan 2026 For Ultimate Comfort

Best Ceiling Fans With Lights For Vaulted Ceilings 2026 Top Picks

Best Outdoor Ceiling Fans For Porch 2026 With Style And Breeze

Best WiFi Enabled Ceiling Fan 2026 For Effortless Comfort





