
How To Fix Wobbly Noisy Ceiling Fan Fast
How To Fix Wobbly Noisy Ceiling Fan problems usually start with tiny issues that snowball into nonstop rattling, shaky blades, and that irritating clicking sound echoing through the room at night. A loose screw here, an uneven blade there, and suddenly the whole fan feels like it’s about to lift off the ceiling. Plenty of people ignore the warning signs at first, hoping the sound will fade away on its own. It rarely does. The vibration often gets worse, especially after long daily use during warmer months.
Ceiling fans take more abuse than most people realize. Dust builds up unevenly across blades, mounting brackets loosen over time, and worn-out balancing clips quietly throw everything off. That constant wobble can also strain the motor, which leads to buzzing noises that become impossible to tune out. Fixing those issues early helps prevent bigger repair headaches later. Small maintenance steps often restore smooth airflow without replacing the entire fixture.
Blade balancing plays a bigger role than many expect. Even a slight weight difference between blades can create noticeable shaking at higher speeds. Fans installed years ago may also develop warped blades from humidity or seasonal temperature swings. A quick inspection usually reveals whether the fan needs balancing weights, tightened hardware, or a fresh blade replacement. That’s the sweet spot where careful adjustments save both time and frustration.
Noise problems don’t always come from the blades themselves. Loose light kits, worn rubber gaskets, or rattling pull chains can create distracting sounds that mimic serious motor trouble. Some fans even develop ticking noises because of bent blade arms rubbing slightly during rotation. Pinpointing the exact source matters because random fixes rarely solve the problem completely. A methodical approach keeps the repair process straightforward instead of turning it into a guessing game.
How To Fix Wobbly Noisy Ceiling Fan setups also depends on checking the mounting box hidden above the canopy. An unstable electrical box creates dangerous movement that tightening blade screws alone won’t solve. That’s why experienced homeowners usually inspect both the visible fan parts and the ceiling connection itself. Stability starts at the top. Once the mounting system is secure, the remaining adjustments become much easier and more effective.
Dust buildup deserves more attention than it gets. Heavy grime sitting unevenly across blade surfaces changes weight distribution little by little. Funny enough, a dirty fan often wobbles more after months of neglect than after years of actual use. Cleaning the blades thoroughly can improve balance immediately. It’s one of those surprisingly simple fixes people tend to overlook until the noise becomes unbearable.
Some ceiling fans simply age poorly, especially cheaper models with lightweight hardware and thinner blade arms. Bearings wear down, motors hum louder, and internal components loosen after constant operation. Still, not every noisy fan needs replacement. Careful tightening, balancing, lubrication, and part replacement can often extend the fan’s lifespan significantly. A quieter room and steadier airflow make the effort worthwhile.
How To Fix Wobbly Noisy Ceiling Fan Issues
A fan that shakes above your head doesn’t feel like a tiny household nuisance for long. The sound creeps into dinner, sleep, work calls, and quiet evenings until the whole room feels off. The real fix starts with how to fix wobbly noisy ceiling fan problems by treating wobble, rattle, and hum as connected clues instead of random annoyances. A steady fan should move air smoothly, stay centered, and avoid making the ceiling box sound like a drum.
Fix Fan Wobble First
Fan wobble usually starts small, then grows louder because every spin repeats the same imbalance again and again. A slightly loose blade screw can make one blade sit lower than the others, which pulls the fan off rhythm. That uneven motion creates vibration, and vibration is what turns a quiet fan into a ceiling-mounted noisemaker. Start with the obvious hardware before blaming the motor, because loose parts are far more common than a failed fan.
Turn off the fan and let the blades stop completely before touching anything. Then check every visible screw on the blade brackets, blade arms, canopy, downrod, and light kit. Use a screwdriver that fits snugly so you don’t strip the screw heads, because rounded screws become a whole different headache. Tighten gently but firmly, since over-tightening can crack older blade material or bend a thin bracket.
A good inspection also means looking from the side, not just from below. One blade may droop slightly lower, and that tiny difference can cause a big shake once the fan reaches medium or high speed. Measure from the ceiling to the tip of each blade with the blade pulled to the same position each time. A difference around one-eighth inch can be enough to trigger wobbling, especially on longer blades.
Don’t skip the mounting area. The canopy may hide a loose downrod pin, weak hanger ball seating, or screws that backed out after years of spinning. A fan can look fine from below while the mounting connection above the canopy is quietly shifting. If the ceiling box moves with the fan, stop running it until the support is checked, because a standard light fixture box may not be rated for a ceiling fan.
Track Down The Noise Source
Noisy ceiling fan repairs get easier once the sound has a name. Clicking usually points to loose blade hardware, a rattling pull chain, or a light kit part tapping during rotation. Buzzing often comes from a dimmer switch, worn capacitor, or motor vibration. Scraping can mean a bent blade arm, tilted canopy, or a wire nut brushing inside the housing.
Run the fan on low, medium, and high, then listen carefully from different spots in the room. A sound that appears only on high speed often points to balance problems rather than serious motor trouble. A hum that stays the same at every speed may involve electrical controls or internal motor wear. This little listening test keeps you from chasing the wrong fix for an hour.
Pull chains deserve a quick look because they love to cause mystery rattles. A chain tapping against the glass shade can sound like a mechanical failure, especially in a quiet bedroom. Shorten the chain slightly or add a small connector so it hangs away from the shade. That tiny change can silence a surprising amount of metallic clicking.
Light kits can be sneaky too. Loose glass shades, decorative finials, and bulb collars may vibrate just enough to buzz against each other. Tighten them by hand, not with pliers, because glass hardware cracks faster than people expect. For a useful side read on the parts doing the work overhead, compare the moving pieces in how a ceiling fan works so the next repair feels less like guesswork.
Clean The Blades Before Balancing
Dust buildup sounds harmless until it collects unevenly across the blades. One blade might carry a thick strip of grime near the leading edge while another stays cleaner, and that uneven weight changes the fan’s rhythm. Wipe every blade from top to bottom before adding balancing weights. Cleaning first prevents you from balancing dirt instead of the fan itself.
Use a damp microfiber cloth and support each blade with your free hand. Pressing too hard on a blade can bend the bracket slightly, which creates a new wobble while fixing the old one. Sticky kitchen dust may need a mild soap solution, especially near open-plan cooking areas. Dry the blades afterward because moisture left on wood composite blades can encourage warping.
Blade condition matters just as much as blade cleanliness. Look for cracks, swollen edges, peeling laminate, or a blade that twists more than the others. Humidity can warp cheaper blades over time, particularly in rooms that stay damp. A warped blade won’t balance properly for long, even if a weight kit makes it behave for a day or two.
Cleaning also gives you a chance to spot loose bracket screws hidden under grime. A screw that looks tight from below may be sitting in an enlarged hole or cracked blade end. Replace damaged screws with matching hardware rather than grabbing a random screw from a drawer. The right fit keeps the blade connection solid without chewing up the mounting hole.

Use A Balancing Kit Properly
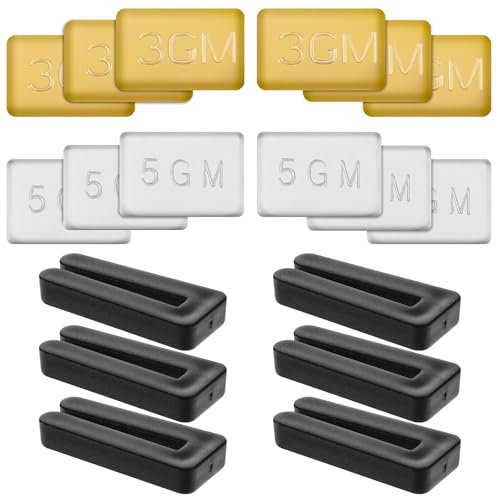
Blade balancing works best after tightening, cleaning, and checking blade height. Most balancing kits include a plastic clip and small adhesive weights. The clip helps you test where extra weight should go before sticking anything permanently. This step takes patience, but it beats slapping weights everywhere and hoping for the best.
Pick one blade and place the clip near the middle of its trailing edge. Run the fan on the speed where wobble is worst, then stop the fan and move the clip to the next blade. Repeat the process until one blade clearly reduces the shake. That blade is likely where the weight correction belongs.
After finding the right blade, slide the clip closer to the blade tip, then closer to the motor, testing each position. Small moves matter because weight near the tip affects balance differently than weight near the center. Once the smoothest position is found, place the adhesive weight on top of the blade near that spot. Press it firmly so it doesn’t fly off during regular use.
Balancing won’t fix a loose ceiling box, a bent bracket, or a failing motor bearing. That’s the tradeoff people miss. A kit can calm a healthy fan with minor imbalance, but it can’t rescue hardware that’s physically damaged or poorly installed. Treat balancing as a fine-tuning step, not a magic patch for every shake.
Check The Ceiling Mount
Ceiling fan support has to be stronger than support for a regular light fixture. Fans twist, pull, and vibrate while running, so the box above the canopy must be fan-rated and firmly attached to framing or a proper brace. If the whole canopy shifts while the fan spins, that’s not normal wobble. That’s a support issue begging for attention.
Turn off power at the breaker before removing the canopy. A wall switch alone isn’t enough because someone can flip it by accident while you’re working. Once the canopy is lowered, inspect the hanger ball, downrod pin, cotter pin, mounting screws, and wire connections. A missing pin or loose hanger bracket creates serious movement that blade balancing will never solve.
Older homes sometimes have fans installed on boxes meant only for light fixtures. That setup may hold for a while, then loosen as vibration works against the screws and ceiling material. A fan-rated brace can spread the load properly between joists. That upgrade matters most for larger fans, heavier light kits, and rooms where the fan runs for long stretches.
A wobbly fan also affects comfort because shaky airflow feels uneven. Fixing the mount helps the fan run smoother, and setting the rotation correctly helps the room feel cooler without overworking the motor. For seasonal airflow habits, use best ceiling fan direction for summer as a quick guide before assuming speed alone will solve stuffy air.
Separate Electrical Hum From Mechanical Noise
Electrical hum has a different personality than rattling or clicking. It often sounds steady, low, and slightly buzzy, even when the fan looks balanced. A common cause is using a ceiling fan with an incompatible dimmer switch. Fans need proper speed controls, not light dimmers that chop power in a way the motor doesn’t like.
Switch the fan to different speeds and listen for changes. If the hum grows louder on certain speeds, the capacitor or speed control may be part of the issue. If the hum started after installing a wall control, that control deserves suspicion. Replacing it with a fan-rated switch can reduce buzzing and protect the motor from rough operation.
Bulbs can create their own weird sounds too. Some LED bulbs buzz inside fan light kits, especially with dimming controls or older remotes. Remove the bulbs briefly and run only the fan to see whether the noise remains. That simple test separates light kit noise from motor noise without taking the whole fan apart.
Motor bearings are trickier. A dry, grinding, or persistent humming sound from inside the motor housing may mean wear that basic tightening won’t fix. Some older fans can be oiled if the design includes oil ports, but many modern sealed motors are not built for routine lubrication. If the fan smells hot, sparks, or trips a breaker, stop using it and bring in a qualified electrician.
Know Which Fixes Are Worth Doing
Repair value depends on the fan’s age, parts availability, and how much movement remains after basic maintenance. A newer fan with loose screws, dusty blades, or a rattling light kit is usually worth fixing. An older fan with warped blades, buzzing controls, and worn bearings may keep asking for attention. At some point, replacement costs less than repeated frustration.
Blade arms are often replaceable, but they need to match the fan model. Random arms may look close while sitting at a slightly different pitch, and that pitch difference can wreck balance. Replacement blades also need matching length, weight, and hole placement. Mixing parts without checking specs invites more wobble problems.
Some noises are harmless but annoying, while others signal risk. A rattling glass shade can wait until the weekend, but a moving ceiling box needs faster action. A slight balance issue may be safe to test carefully, while a fan that rocks hard at every speed should stay off. That judgment call protects both the fixture and the ceiling above it.
Oddly enough, repair work on one room can reveal habits from another. Moisture, dust, and poor ventilation affect hardware in surprising ways, from bathroom fans to ceiling fixtures. Separately, for a completely different home-care concern, compare practical device use in how to use blue light for toenail fungus if that specific issue is already on your checklist.
Build A Simple Maintenance Routine
Regular fan maintenance keeps wobble from sneaking back after the repair. Clean the blade tops every few weeks during heavy-use seasons, especially in kitchens, bedrooms, and rooms with open windows. Dust rarely lands evenly, so letting it pile up creates balance changes over time. A clean blade also moves air better because grime roughens the surface.
Check screws a few times a year rather than waiting for noise. The blade brackets, canopy screws, and light kit hardware take constant vibration, so they naturally loosen. A quick tightening session can prevent the annoying click that starts at midnight and ruins the whole mood. Keep the tool pressure moderate because over-tightened screws can damage soft blade material.
Watch how the fan behaves after storms, ceiling work, or bulb changes. A bumped blade arm can shift just enough to create a new wobble. A glass shade tightened unevenly can add rattling where none existed before. Small changes around the fan often explain sudden noise better than motor failure.
A steady fan feels almost boring, and that’s exactly the goal. Smooth rotation, quiet airflow, and a solid mount mean the fan is doing its job without demanding attention. How to fix wobbly noisy ceiling fan issues is mostly about slowing down, checking the basics, and refusing to guess. The payoff is a room that feels cooler, calmer, and a whole lot less irritating.
How To Fix A Ceiling Fan That Wobbles And Makes Noise
A fan that still shakes after basic tightening usually needs a deeper look at the parts most people ignore. The first round of repairs handles the obvious troublemakers, but stubborn movement often hides in the downrod, canopy, blade pitch, switch control, or mounting box. That’s where how to fix wobbly noisy ceiling fan problems becomes less about guessing and more about checking each weak point in the right order. A calm, steady fan starts with solid support before any fine-tuning can really stick.
Inspect The Downrod And Canopy
The downrod carries a lot of responsibility, especially on fans installed in rooms with tall or sloped ceilings. A loose set screw near the motor housing can let the fan sway even if the blades are perfectly balanced. That tiny gap creates a rocking motion that gets worse at higher speeds. Tightening the downrod hardware often removes the kind of wobble that blade weights can’t touch.
Check the canopy after the fan is off and completely still. A canopy that rubs the ceiling can create scraping, tapping, or dull vibration that sounds like motor trouble. Slide it slightly lower if it’s touching the ceiling unevenly, then tighten the canopy screws so it stays centered. A small clearance gap can make the whole fan sound cleaner.
Downrod sizing can also affect stability. A rod that’s too long for a low ceiling may exaggerate swing, while a poor-fit rod can create movement at the coupler. To avoid mismatched parts during repairs, compare fit and compatibility with ceiling fan downrods before swapping hardware. The right rod should feel snug, straight, and matched to the fan’s weight and design.
Don’t assume every wobble comes from the visible blades. The fan may be moving from the stem upward, especially if the hanger ball isn’t seated properly in the mounting bracket. A seated hanger ball usually has a groove that lines up with the bracket tab. That small detail helps stop twisting and side-to-side movement while the motor runs.
Check Blade Pitch And Arm Alignment
Blade pitch controls how each blade cuts through the air. If one blade sits at a slightly different angle, the fan starts fighting itself with every rotation. That uneven pull creates shaking, airflow noise, and motor strain. A blade can look normal from below while sitting just crooked enough to cause trouble.
Look across the blade edges from a side angle instead of staring straight up. A bent blade arm may show one blade sitting higher or lower than the rest. Gently compare each arm without forcing anything, because rough bending can crack the metal or weaken the bracket. Small alignment issues need careful correction, not brute strength.
Blade arms sometimes bend during cleaning, moving, or bulb replacement. Someone grabs the blade for balance, the arm flexes, and the fan never spins quite the same again. That’s why supporting the blade while cleaning matters so much. Protecting the blade arm angle helps prevent wobble before it starts.
Replacement arms should match the original model whenever possible. A near-match can still change the blade pitch and throw the fan off balance. If one arm is bent badly, replacing the whole set may create a more even result than replacing only one. Consistent hardware keeps airflow and rotation predictable.
Quiet The Light Kit And Pull Chain
A loose light kit can make a fan sound worse than it really is. Glass shades, bulb collars, decorative caps, and small screws can buzz together as the motor vibrates. The sound often travels through the fixture, making it hard to pinpoint from the floor. Tightening each piece by hand can calm the noise without touching the motor.
Remove the glass shades and run the fan briefly without them if the design allows it safely. If the sound disappears, the light kit is the culprit. Add the pieces back one at a time, listening after each step. This simple process isolates rattling hardware without tearing apart the whole fan.
Pull chains cause plenty of false alarms. A chain tapping the glass shade can sound like a bad bearing, especially at night when the house is quiet. Shorten the chain slightly or attach a small weight that keeps it hanging away from the shade. That tiny fix can remove a sharp clicking sound instantly.
Bulbs deserve attention too. Some loose bulbs vibrate inside the socket, while certain LED bulbs buzz with older controls. Make sure bulbs are snug, then test the fan with the lights off and on. Separating fan noise from light noise keeps the repair practical and saves you from blaming the wrong part.
Fix Speed Control And Remote Problems
Speed control issues can make a ceiling fan hum even after the wobble is gone. A fan connected to a standard dimmer switch may buzz because the motor isn’t getting power in the right way. That sound can feel like vibration, but it’s really an electrical control mismatch. A fan-rated wall control is usually the cleaner route.
Remote receivers can also create strange behavior. A weak receiver may cause delayed starts, uneven speed changes, or low humming from the housing. If the noise started after adding a remote kit, the receiver and control setup deserve a closer look. Matching the remote system to the fan’s motor type protects smooth operation.
Capacitor problems can show up as slow starts, weak airflow, or a fan that only runs on certain speeds. A bad capacitor doesn’t always make a dramatic failure scene. Sometimes it just leaves the fan acting tired and noisy. Replacing it requires the correct part rating, so guessing is a bad bet.
Electrical work should stay inside your comfort zone. Turning off the breaker, confirming power is off, and following the fan manual are non-negotiable steps. If wires look burned, melted, or loose inside the canopy, stop and call a qualified electrician. Safety matters more than saving a few minutes.
Decide Between Repair And Replacement
Repairing a ceiling fan makes sense when the wobble comes from loose screws, dirty blades, poor balancing, or a rattling light kit. Those issues are usually affordable and straightforward. A fan with a solid motor and stable mounting can often run quietly again after basic service. That’s the sweet spot for a simple fix.
Replacement starts making more sense when several problems stack up. Warped blades, worn bearings, buzzing controls, and a questionable mounting setup can turn a small repair into a money pit. Older fans may also lack available matching parts. At that point, chasing every sound can feel like plugging leaks in a tired old boat.
Room size matters too. A fan that’s too small may run on high constantly, which adds noise and strain. A fan that’s too large for a small room can feel drafty and may exaggerate mounting issues. Proper sizing helps reduce motor stress, wobble, and airflow complaints.
Think about where the fan works hardest. Bedrooms need quiet operation at low speed, while living rooms may need stronger airflow with less noticeable hum. Covered patios face moisture, dust, and temperature swings that wear parts faster. Matching the fan to the room gives repairs a better chance of lasting.
Prevent Wobble From Coming Back
Prevention beats chasing the same rattle every few months. Dust the blade tops regularly, especially during heavy cooling seasons. Uneven dust adds weight in strange places and slowly throws the fan off balance. A clean fan also moves air with less drag and less noise.
Check screws during seasonal home maintenance. Blade brackets, light kit screws, canopy screws, and downrod set screws all loosen from normal vibration. A quick inspection before summer can save you from dealing with noisy airflow during hot evenings. This habit keeps minor looseness from becoming a full wobble.
Airflow habits also play a role in comfort. Running a fan at the right speed and direction helps the room feel better without forcing the motor to work harder than needed. Separately, outdoor routines have their own maintenance rhythm, and gardeners who automate watering can compare smart water hose timer options to keep patio plants from drying out while indoor comfort stays handled. Different tools, same idea: fewer annoying chores piling up at once.
A fan should never feel like something you have to monitor every time it turns on. After tightening, cleaning, balancing, and checking controls, the motion should look centered and the sound should fade into the background. Keep an eye on sudden changes after bulb swaps, deep cleaning, or ceiling work. Fresh noise usually points to a recent disturbance, not a mysterious failure.
Handle Stubborn Noise Without Guesswork
Stubborn fan noise needs a step-by-step approach because random repairs waste time. Start by removing simple noise sources first: glass shades, loose chains, dusty blades, and visible screws. Then move upward into the canopy, downrod, hanger bracket, and control wiring. Working from easy to complex keeps the process sane.
Record a short video of the fan running on each speed if the issue is hard to spot. Watching the clip back can reveal a blade dip, canopy movement, or light kit shake that’s easy to miss in real time. Slow observation catches patterns. That pattern is the clue that points to the right repair path.
Don’t run a badly wobbling fan just to “see what happens.” Heavy shaking can loosen the mounting hardware further and stress the ceiling box. Turn it off, inspect the support, and fix the source before regular use. A fan that looks unstable is giving you a warning, not a quirky personality trait.
How to fix wobbly noisy ceiling fan problems comes down to respecting the small details. A centered canopy, matched blade pitch, secure downrod, clean blades, and fan-rated controls all work together. Miss one weak point and the noise may return. Catch them in order, and the fan has a much better shot at running smooth without rattling the room every time it spins.


Best Small Flush Mount Ceiling Fans 2026 Ultimate Picks

Best Smart Ceiling Fan India 2026 For Effortless Comfort

Best Smart Ceiling Fans with Lights for 2026: Top Picks

Best Smart Home Non Ceiling Fans 2026 For Ultimate Comfort

Best Outdoor Misting Ceiling Fan 2026 For Ultimate Comfort

Best Ceiling Fans With Lights For Vaulted Ceilings 2026 Top Picks

Best Outdoor Ceiling Fans For Porch 2026 With Style And Breeze

Best WiFi Enabled Ceiling Fan 2026 For Effortless Comfort





