
How to Make a Table Fan at Home Without Hassle
How to Make a Table Fan at Home sounds simple at first, yet plenty of homemade setups end up rattling, overheating, or barely moving air across the room. A shaky fan blade, weak motor, or unstable base can turn a clever idea into a frustrating afternoon real quick. Still, building one from scratch carries a certain charm. The process feels practical, hands-on, and surprisingly satisfying once cool airflow finally kicks in.
Small rooms often trap heat like a stubborn oven, especially during humid nights or stuffy afternoons. Store-bought fans don't always fit tight desks, compact corners, or DIY budgets either. That's where a homemade fan setup starts making real sense. With the right balance of airflow, blade positioning, and motor stability, even basic materials can produce steady circulation without turning the room into a noisy workshop.
Plenty of people underestimate how important the fan base actually is. A lightweight structure may wobble across the desk after a few minutes, while poorly aligned blades create annoying vibrations that drive anyone up the wall. Careful spacing and balanced assembly matter more than fancy materials. A sturdy frame paired with a correctly mounted motor helps maintain smoother operation and reduces unnecessary strain on moving parts.
Heat buildup inside compact rooms creates another common headache. Weak airflow usually leaves corners feeling stale and uncomfortable, especially near workstations or sleeping areas. Building a fan at home allows more control over fan direction, air circulation, and overall size. Some setups work better for bedside cooling, while others push air farther across larger indoor spaces.
Noise becomes a dealbreaker faster than most expect. A fan that buzzes loudly every few seconds can ruin concentration during work or make sleep nearly impossible. Proper blade balance and secure mounting points reduce those irritating sounds dramatically. Simple adjustments often create a smoother spinning motion without relying on expensive components.
Material choices also shape long-term durability. Thin plastic may crack under constant vibration, while heavier materials sometimes strain weaker motors. Lightweight plywood, reinforced cardboard, or compact metal frames usually strike a better middle ground. The goal isn't building something flashy. Reliable airflow and practical daily use matter far more.
Portable cooling remains one of the biggest reasons homemade fans keep gaining attention. Tight apartments, study corners, workshops, and temporary setups often need compact solutions instead of oversized appliances. A carefully planned DIY fan offers flexibility without swallowing valuable space. Better yet, small modifications can improve comfort based on seasonal heat or room layout.
How to Make a Table Fan at Home also opens the door to experimenting with battery power, USB connections, or recycled components sitting unused around the house. Old motors, spare wires, and leftover containers sometimes become surprisingly effective cooling tools. A little patience goes a long way here. Once the assembly starts coming together, the project feels less like random tinkering and more like building something genuinely useful.
How To Make A Table Fan At Home With Simple Parts
A stuffy room can turn a desk into a tiny sweatbox, especially after a laptop, charger, and warm afternoon air team up against you. Buying another fan isn't always tempting either, not if the space is tight, the budget is thin, or old parts are already sitting in a drawer. That is where how to make a table fan at home starts to feel practical instead of just crafty. The real goal is not a fancy-looking gadget, but steady airflow, safe wiring, and a build that does not wobble itself off the table.
Homemade Fan Basics
How to make a table fan at home begins with one honest question: what kind of breeze do you actually need? A small desk fan for a study corner does not need the same motor strength as a fan meant for a warm garage bench. Bigger blades move more air, sure, but they also need a stronger motor and a sturdier base. Start small, because a compact build is easier to balance, safer to test, and less likely to shake like a loose shopping cart.
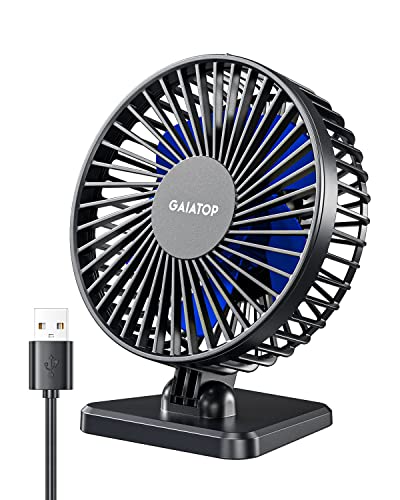
The main parts are pretty straightforward: a small DC motor, lightweight fan blades, a switch, wires, a power source, and a base. Recycled materials can work well if they are clean, dry, and firm enough to hold shape under vibration. Plastic container lids, thin plywood, old toy motors, and USB cables often show up in DIY builds. Still, electrical safety has to come first, because a homemade fan should cool the room, not create a headache.
A simple low-voltage setup is usually the friendliest place to begin. Battery packs, USB power banks, or low-voltage adapters reduce risk compared with direct wall-power tinkering. Keep wires insulated, avoid exposed copper, and never test the fan near water, damp soil, or humid plant trays. That last point matters in plant corners, where watering habits and condensation can sneak up on small electronics.
Airflow depends on more than motor speed. Blade angle, blade weight, motor alignment, and the fan’s height all affect how the breeze feels across a desk or shelf. A blade that is too flat may spin fast but push very little air forward. A blade with too much pitch can strain the motor and drain the battery quickly.
Materials That Keep The Build Stable
A homemade table fan lives or dies by its base. A flimsy stand may look fine before the motor starts, then drift, buzz, or tip once the blades spin. Use a wide base made from wood, thick cardboard layered with glue, a small plastic box, or another firm material that will not bend easily. A little extra weight at the bottom helps the fan stay planted instead of dancing across the table.
Blade material needs the same kind of common sense. Thin plastic is light and easy to cut, but sharp edges can be risky if the guard is missing. Cardboard blades are safer for trial runs, though they may soften in humid spaces or near indoor plant shelves. Lightweight plastic from a bottle can work, but each blade must be trimmed evenly so the motor does not fight an off-balance spin.
The motor should be mounted firmly, not pinched or glued in a crooked position. A tilted motor shaft can make even neat blades vibrate badly. Use a small bracket, bottle cap holder, or snug support piece to keep the motor straight. Motor alignment sounds fussy, but it is the difference between a smooth hum and a desk-rattling buzz.
Small details matter more than they seem. Rubber pads under the base can reduce sliding and soften vibration. A simple front guard made from mesh, wire, or a repurposed plastic grill helps protect fingers, pet whiskers, and loose paper. For nearby home projects, reduce wiring surprises by learning the basics first: Fix sudden lighting issues with how to fix a flickering bathroom light before adding more small electrical items around the room.
Motor And Power Choices
The motor sets the mood for the whole project. A weak motor may spin nicely with no blades attached, then slow down the second you add real airflow resistance. A stronger motor can push more air, but it may also create extra noise, heat, and battery drain. For a first build, a small DC hobby motor is usually easier to manage than salvaged parts with unknown ratings.
USB power is popular because it feels familiar and convenient. A 5V USB fan build can run from a power bank, laptop port, or USB adapter, but the motor still needs to match that voltage range. Do not force a motor to run on a power source it was not made for. Voltage mismatch can cause weak spinning, overheating, or early failure.
Battery setups are handy for portable cooling, especially for tiny desks, bedside corners, or plant workstations where cords get annoying. The tradeoff is runtime. A bigger battery lasts longer but adds weight and takes up space. A smaller battery keeps the fan light, but it may fade right when the room starts feeling sticky.
A simple switch makes the fan much nicer to use. Without one, unplugging wires every time gets old fast, and loose connections can wear out. Place the switch where your hand naturally reaches, not hidden behind the base or under the motor. Easy control keeps the build practical for daily use instead of feeling like a school science project that never leaves the shelf.
Blade Shape And Airflow Direction
Fan blades are not just spinning decorations. Their shape decides whether the fan pushes air forward, stirs air sideways, or mostly makes noise. A gentle curve or slight twist helps each blade scoop and move air more effectively. Keep the blades equal in length, weight, and angle, because blade balance is the quiet hero of a homemade fan.
Uneven blades create vibration that travels through the motor, stand, and table. That little shake may seem harmless at first, but it can loosen glue, stress wires, and make the fan annoying to sit beside. Trim slowly and test often. A few careful snips beat one big cut that ruins the whole set.
Air direction matters too. A fan sitting too low may blow straight into papers, keyboard dust, or plant leaves that prefer gentle circulation. Raising the fan a few inches can spread airflow across the upper body instead of blasting one spot. For plant shelves, softer movement helps reduce stale air without drying delicate leaves too quickly.
Blade size should match the motor’s strength. Wide blades on a tiny motor often spin slowly and heat up the housing. Narrow blades may spin fast but create a thin, weak breeze. Balanced airflow sits in the middle, where the motor runs smoothly and the breeze feels useful without sounding like a buzzing mosquito.
Building The Frame Without Extra Fuss
The frame should hold the motor, guide the airflow, and keep the fan stable without adding needless bulk. A vertical support made from wood, stiff plastic, or layered cardboard can work if it does not flex under vibration. Keep the motor centered over the base so the weight does not pull the fan forward. Stable structure matters more than a sleek shape.
Glue is convenient, but not every glue handles vibration well. Hot glue works for quick prototypes, though it can loosen in heat or under repeated movement. Small screws, zip ties, or tight brackets give stronger support when the fan will be used often. A neat build is nice, but a secure build is the one that survives regular use.
The fan head angle deserves attention. A fixed straight-ahead fan is easier to make, but an angled mount can send airflow where it actually helps. Tilt the motor slightly upward for a desk or bedside setup. Too much tilt, though, may make the whole fan top-heavy unless the base is wide enough.
Lighting and airflow often share the same small rooms, especially in hobby corners, indoor gardens, and art desks. Improve visual comfort while planning the workspace: Compare targeted lighting ideas with best led lights for art gallery so the fan does not end up fighting shadows, glare, or awkward placement. A good setup feels calmer because cool air and clean visibility work together instead of competing for space.
Testing Noise, Heat, And Safety
Testing should happen before the fan becomes part of the room. Run it for a short stretch, then touch the motor housing carefully to check for unusual heat. Warm is normal in many small motors, but hot enough to make you pull your hand away is a warning sign. Heat control protects the motor, wiring, and anything sitting near the fan.
Noise gives clues too. A smooth homemade fan usually produces a steady hum, while clicking, scraping, or pulsing sounds point to alignment problems. Look for blades brushing the guard, a loose motor mount, or a base that is too light. Fix the rattle early, because vibration rarely improves on its own.
Wire placement should stay clean and predictable. Keep wires away from spinning blades and sharp blade edges. Tape or clip them along the frame so they do not swing into moving parts. Clean wiring also makes repairs easier later, especially if the switch or battery connector needs replacing.
Guarding the blades is not optional for a fan used around kids, pets, plants, or busy desks. Even lightweight blades can sting fingers or fling dust if they spin fast enough. A simple mesh cover adds safety without blocking too much air. Outdoor rooms and coastal porches bring extra corrosion problems, so plan broader airflow needs with best outdoor ceiling fans for salt air instead of expecting a tiny homemade table fan to handle harsh moisture and salty air.
Easy Ways To Improve A Homemade Table Fan Setup
Even a fan that finally spins without wobbling can still feel disappointing after a few hours of use. Weak airflow, rattling sounds, or warm motor housing usually show up once the excitement wears off and real daily use begins. That is why improving how to make a table fan at home matters just as much as building it in the first place. A few practical adjustments can turn a rough DIY project into something that actually helps during sticky nights and cramped work sessions.
Reducing Fan Noise Indoors
Noise sneaks into homemade fan builds faster than most people expect. A slight imbalance in the blades or a loose screw can create a nonstop buzzing sound that becomes impossible to ignore during work or sleep. Tightening every connection helps, but the real difference usually comes from balanced blade rotation and solid motor support. Even lightweight rubber pads under the base can soften vibration traveling across the desk.
Hard surfaces tend to amplify small sounds. A fan sitting directly on thin wood or hollow shelving often sounds louder than it actually is because the surface acts like a drum. Placing a folded cloth or silicone mat beneath the base can reduce that sharp rattling effect. Tiny adjustments like that make a homemade setup feel calmer and easier to live with every day.
Blade shape also affects noise levels more than people realize. Wide blades pushing too much air at high speed create a harsh chopping sound instead of a smooth breeze. Slightly trimming the blade edges or lowering the voltage can improve airflow comfort without sacrificing all cooling power. The room feels more relaxed once the fan stops sounding like a small kitchen appliance fighting for survival.
Nighttime airflow needs a softer approach than daytime cooling. A strong breeze directly toward the face can dry the eyes and create throat irritation overnight. For better bedtime comfort, improve nearby lighting without flooding the room using best reading light to not disturb partner so both lighting and airflow stay gentle enough for quieter evenings. That balance keeps the space practical without turning the room into an overcomplicated setup.
Improving Airflow In Small Rooms
A homemade table fan often struggles because the room itself traps heat in awkward corners. Air may circulate near the desk while the rest of the room still feels stale and heavy. Raising the fan slightly above desk height usually spreads air farther across the space. That small change improves cool air movement instead of concentrating airflow on one narrow spot.
Wall placement matters too. A fan pressed directly against a wall pulls air inefficiently because the motor lacks breathing space behind the blades. Leaving several inches of clearance helps the fan intake move more freely. Better intake means the airflow feels steadier and less strained.
Some homemade setups push air too aggressively for tight indoor areas. Papers start flying, lightweight objects vibrate, and dry air settles over plants or electronics. Angling the fan upward softens the airflow path while still improving circulation. Gentle movement usually feels more comfortable than a direct blast aimed straight at the chest all day long.
Warm rooms with poor ceiling circulation sometimes need more than a small desk fan alone. Large spaces, enclosed patios, or humid covered porches often hold onto heat long after sunset. For broader airflow ideas in low-clearance areas, compare layouts using best outdoor hugger ceiling fans to see how lower-profile circulation setups manage tighter spaces more effectively. Homemade table fans handle personal cooling better than full-room airflow in oversized areas.
Protecting The Motor From Overheating
Small motors heat up quickly if the blades are too heavy or the airflow path gets blocked. Warm housing is fairly common during longer use, but excessive heat should never be ignored. A motor running hotter than expected often points toward blade resistance, poor ventilation, or unstable voltage. Letting the motor rest between long sessions can prevent premature wear.
Dust buildup creates another hidden problem. Tiny particles settle around the shaft and motor vents over time, especially in plant corners, garage benches, or window-side desks. A soft brush or compressed air helps clear debris before it interferes with airflow or rotation. Cleaner airflow inside the motor housing usually keeps spinning smoother and quieter.
Heavy decorative parts may look nice at first but often strain small fan motors. Thick guards, oversized blades, or bulky attachments force the motor to work harder than necessary. Lightweight designs typically last longer because the motor carries less stress during rotation. Practical airflow beats decorative weight almost every single time.
Power adapters deserve attention too. Cheap adapters sometimes deliver unstable current, causing inconsistent spinning speeds or sudden heating. A stable low-voltage supply helps maintain motor efficiency while reducing electrical strain. Homemade fans rarely need extreme power to feel useful inside compact rooms.

Using Recycled Materials Without Problems
Recycled materials save money, but not every leftover item belongs inside a fan build. Thin cardboard may soften after weeks of humid air exposure, especially near indoor plants or kitchen corners. Brittle plastic can crack around screws once vibration kicks in. Durable homemade fans rely on practical material choices more than random scraps glued together in a hurry.
Old USB cables, toy motors, and plastic containers often become useful parts if they stay in good condition. Damaged insulation, bent connectors, or corroded metal should be avoided completely. Electrical shortcuts rarely stay harmless for long. A cleaner setup usually lasts longer and feels safer during daily use.
Weight balance matters even with recycled pieces. A heavy base paired with ultra-light blades creates smoother operation than a top-heavy fan leaning forward on thin supports. Testing each component separately before final assembly reduces frustration later. Simple preparation saves time that would otherwise disappear into repeated repairs.
Paint and decoration should stay secondary. Thick paint layers can throw off blade balance, while glued decorations may loosen near spinning parts. Focus first on stable airflow, reliable spinning, and comfortable cooling. Cosmetic details can always come later once the fan actually performs the way it should.
Making The Fan Safer Around Daily Clutter
Desk fans rarely sit in perfectly clean spaces. Charging cables, notebooks, headphones, plant leaves, and loose paper all compete for space around the fan base. A missing guard or exposed blade edge can quickly become a problem in cluttered corners. Adding a lightweight front grill keeps the fan safer without reducing too much airflow.
Cable management helps more than people think. Loose wires hanging near the blades may eventually shift into the spinning path after repeated movement or accidental bumps. Tape clips, zip ties, or hidden cable channels keep everything predictable. Safer layouts also make the fan easier to clean and reposition later.
Pet owners should pay close attention to placement height. Curious paws and tails tend to investigate spinning objects sooner or later. Raising the fan slightly higher reduces accidental contact while improving air distribution across the room. The breeze usually feels smoother once airflow travels above floor level instead of directly through clutter.
Moisture creates another issue in indoor garden areas or humid corners. Water trays, misting bottles, and damp soil should stay well away from wiring and switches. A homemade fan can support better air circulation around plants, but electrical parts need dry conditions to remain dependable. Careful spacing prevents simple cooling setups from turning into unnecessary repair projects.
Adjusting The Fan For Different Seasons
A homemade fan may feel perfect during summer, then suddenly too harsh once temperatures cool slightly. Adjustable positioning helps the same fan stay useful year-round instead of ending up forgotten in a drawer. Lower speed settings or indirect airflow usually feel more comfortable during mild evenings. Flexibility matters because indoor comfort changes with the season.
Dry winter air can become irritating if the fan blows continuously toward the face or hands. Redirecting airflow toward walls or across the ceiling softens circulation without eliminating fresh movement. Small angle changes often create a more balanced indoor feel. Constant direct airflow tends to feel harsher in colder months.
Humid weather brings a different challenge. Damp air often feels heavy even when temperatures are moderate. A homemade fan positioned near windows or room entrances can help move stale air outward more effectively. Better circulation reduces that sticky indoor feeling without relying entirely on stronger cooling systems.
Long-term comfort usually comes from small adjustments instead of one permanent setup. Blade cleaning, motor checks, and airflow repositioning keep the fan feeling useful across changing conditions. A homemade project built with steady airflow, safe wiring, and realistic expectations often lasts much longer than people assume at the beginning.


Best Small Flush Mount Ceiling Fans 2026 Ultimate Picks

Best Smart Ceiling Fan India 2026 For Effortless Comfort

Best Smart Ceiling Fans with Lights for 2026: Top Picks

Best Smart Home Non Ceiling Fans 2026 For Ultimate Comfort

Best Outdoor Misting Ceiling Fan 2026 For Ultimate Comfort

Best Ceiling Fans With Lights For Vaulted Ceilings 2026 Top Picks

Best Outdoor Ceiling Fans For Porch 2026 With Style And Breeze

Best WiFi Enabled Ceiling Fan 2026 For Effortless Comfort





