
How to Remove Broan Ceiling Fan Cover Safely
How to remove Broan ceiling fan cover sounds simple until the glass refuses to budge, the clips feel jammed, or the entire fixture starts wobbling overhead. Plenty of people end up twisting the wrong direction or pulling too hard because Broan fan covers don’t always follow the same setup. Some use spring clips, others lock into grooves, and a few hide screws so well they’re easy to miss. One wrong move can leave cracked glass on the floor or bent mounting hardware hanging awkwardly from the ceiling.
Dust buildup usually becomes the breaking point. The fan starts looking dingy, airflow feels weaker, or the light cover traps bugs and grime that suddenly can’t be ignored anymore. That’s where understanding ceiling fan cover removal matters more than brute force. A calm approach, steady grip, and the right angle often solve the issue faster than wrestling with the fixture for half an hour.
Some covers loosen with a gentle twist, while others rely on hidden tension clips that need careful pressure. Frustration kicks in quickly when nothing moves, especially with older Broan units that haven’t been opened in years. Stuck glass can feel glued in place thanks to humidity, grease, or paint buildup around the edges. Oddly enough, slowing down usually works better than forcing it.
Lighting conditions also make a huge difference. Dim rooms hide small retaining screws and make clip placement harder to spot. A flashlight aimed upward often reveals tiny details that completely change the removal process. Little things like wearing gloves or supporting the glass with one hand can prevent those heart-dropping moments where the cover suddenly slips loose.
Broan ceiling fan maintenance becomes much easier once the cover comes off correctly the first time. Cleaning trapped dust around the motor housing helps airflow stay consistent while reducing rattling noises that tend to get worse over time. Many people also use this opportunity to swap bulbs, inspect wiring, or clear out moisture residue near bathroom fan combinations. Skipping regular cleaning usually leads to stubborn grime that makes future removal even harder.
Older fan covers sometimes develop hairline cracks around the mounting points. That’s why handling pressure evenly matters so much during removal. Twisting from one side only can strain the glass or plastic unevenly, especially on covers exposed to years of heat and humidity. Gentle support from underneath keeps the fixture stable while clips or screws release.
How to remove Broan ceiling fan cover also depends heavily on the specific model style. Flush-mounted covers behave differently than dome-style designs, and bathroom ventilation fan combinations often use spring-loaded clips hidden inside the housing. A little patience saves money, prevents damage, and avoids the classic mistake of turning a quick cleaning project into an annoying hardware replacement trip.
How To Remove Broan Ceiling Fan Cover Without Damage
A stuck cover can turn a quick cleaning job into a sweaty ladder moment. The glass may feel frozen, the clips may hide inside the housing, and one careless twist can leave you holding a cracked shade instead of a clean fixture. That is why how to remove Broan ceiling fan cover needs a slower, steadier approach built around safety, cover support, and knowing the mounting style before anything gets pulled loose.
Broan Cover Basics
Broan fan covers can look simple from the floor, but the hardware above them often tells a different story. Some covers use spring clips, some use small retaining screws, and others loosen with a careful twist. The tricky part is that dust, bathroom humidity, or old paint can make the cover feel stuck even after the fasteners are released. So, yeah, forcing it usually makes the job worse.
The first smart move is to shut off power at the wall switch and, for extra caution, at the breaker. A ceiling fan or fan-light combo may have wiring tucked close to the cover, and bumping the wrong part while balancing overhead is no fun. Let the bulbs cool before touching anything, especially if the light was just on. Cool glass is easier to handle and less likely to surprise you.
A steady ladder matters more than people think. Standing on a chair might feel quicker, but it leaves your hands fighting for balance instead of handling the cover properly. Keep one hand under the cover while the other checks the edges for screws, tabs, or clip tension. That little habit can save the glass if it releases suddenly.
Broan fixtures also vary by room type. A bathroom ventilation fan cover may pull down slightly before the spring clips become visible, while a ceiling fan light cover may need screws loosened around the rim. The shape of the cover gives clues, but it does not always tell the whole story. Patience beats guessing every single time.
Safety Steps Before Touching The Cover
Power should be off before your fingers get anywhere near the fixture. Even if you are only removing a cover, electrical safety is not something to shrug off. Fans can share wiring with lights, wall switches, or bathroom ventilation units, so shutting things down gives you room to work without that nagging worry. A non-contact voltage tester is helpful if the fixture has exposed wiring after the cover comes off.
Gloves help more than they get credit for. Thin work gloves give you better grip on smooth glass and protect your hands if an older cover has chipped edges. A towel on the floor below the ladder is not fancy, but it gives the cover a softer landing if something slips. Little precautions like that feel boring until they save the day.
Lighting is another easy win. Aim a flashlight around the rim before twisting or pulling, because hidden screws often sit where shadows collect. Older Broan covers may have paint buildup around the edge, especially after ceiling touch-ups. That paint can act like glue, making a released cover feel locked in place.
Keep your tools simple. A small screwdriver, flashlight, gloves, and a soft cloth handle most cover removal jobs. Heavy tools can scratch the housing or chip glass if they slip. Gentle pressure and clean visibility do more good than a crowded toolbox.
Spot The Cover Style First
A dome cover usually needs a different touch than a flat grille or vent-style cover. Dome covers often twist, loosen from side screws, or sit inside a lip that holds the glass in place. Vent-style covers may pull down slightly, revealing wire springs on both sides. Spotting that difference early keeps you from yanking on the wrong part.
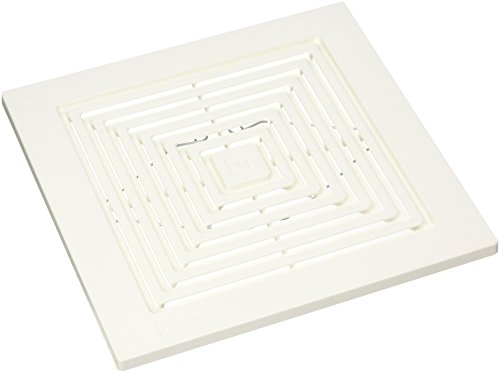
Look for three common signs before moving anything. Small screw heads around the rim suggest a screw-held cover. A smooth round glass shade with no visible screws may be a twist-lock style. A plastic grille that drops down a little and stops usually means spring clips are doing the holding.
Older fixtures can be stubborn because grime collects at the seam where the cover meets the housing. Bathroom fans are especially prone to this because moisture turns dust into a sticky film. A slightly damp cloth around the edge can soften surface grime before removal. Avoid soaking the area, since moisture near electrical parts is never your friend.
Broan model numbers can sometimes sit inside the housing, which is annoying because you may need the cover off to see them. Still, a quick look around the fixture may reveal a label near the rim or inside the grille slots. If the cover style is unclear, treat it as fragile and test for movement, clip tension, and hidden screws in that order.
Remove Screw Held Covers
Screw-held Broan covers are usually the most straightforward, but they still need a careful hand. Support the cover from underneath before loosening anything, because some screws only need a few turns before the glass shifts. Use the correct screwdriver size so the screw head does not strip. Firm support matters more than speed here.
Loosen screws slowly and evenly. If there are two or three around the rim, do not remove one completely while the others stay tight. That uneven pressure can tilt the cover and strain the glass. Work around the fixture in small turns so the cover weight stays balanced.
Paint can hide screw heads or seal them in place. A utility knife is not always needed, but a careful score around painted edges may help free the cover without tearing ceiling paint. Keep the blade away from wiring and plastic parts. Clean edges make removal smoother and reduce ugly chips around the fixture.
Once the screws are loose, lower the cover straight down if possible. Avoid twisting unless the cover still feels locked into a groove. Set the glass on a towel instead of a hard counter, because older shades can chip from a small bump. For better airflow in bedrooms after maintenance, compare fan options through ceiling fan for bedroom before replacing a noisy fixture.
Handle Spring Clip Covers
Spring clip covers can feel confusing because they often move a little and then stop. That stopping point is not a jam, at least not usually. Pull the cover down gently until you can see the metal spring clips on each side. Then squeeze the clips inward to release them from the slots in the housing.
The cover should stay supported while the clips come free. Letting it hang from one clip can bend the wire or crack plastic tabs on the grille. Use both hands if the ladder position allows it. Even pressure keeps the housing from flexing and keeps the cover from swinging.
Bathroom fan covers often collect lint, dust, and damp residue inside the grille. Once removed, wash the cover with mild soap and let it dry fully before reinstalling. Wet parts should not go back near the motor or light area. Dry reassembly helps prevent musty smells and sticky buildup later.
Spring clips can lose tension over time. If the cover sags after reinstalling, the clips may need gentle reshaping or replacement. Do not stretch them wildly, because thin metal fatigues faster than expected. For small-space airflow chores outside the bathroom, upgrade focused cooling with mini turbo jet fan if you need quick air movement at a workbench or cleaning station.
Deal With Twist Lock Covers
Twist-lock covers are the ones that tempt people into using too much force. The cover may need a small counterclockwise turn, but years of dust can make that movement feel impossible. Press upward slightly while turning to reduce friction on the locking tabs. Small movement is the goal, not a big dramatic spin.
If the cover does not turn, stop and inspect the rim again. A hidden set screw may be holding the shade in place, especially on fan-light combinations. Trying to twist past that screw can chip the glass or damage the bracket. Resistance usually means something still needs to be released.
A rubber jar opener can help grip smooth glass without scratching it. Place one hand under the cover and use the other to apply steady turning pressure. Do not use pliers on glass rims, since that can crush or nick the edge. Grip control beats metal-on-glass pressure every time.
Once the tabs unlock, the cover may drop slightly. Keep it level and lower it with both hands. Clean the tabs and rim before reinstalling, because gritty buildup makes the next removal harder. For better task lighting during overhead repairs, improve visibility with led floor lamp for reading placed safely beside the ladder area.
Fix A Cover That Feels Stuck
A stuck cover is not always stuck because of hardware. Dust, old paint, humidity, and heat can create a seal around the edge. Run a soft cloth around the seam and look for spots where grime has hardened. Surface buildup can grip surprisingly tight.
Gentle tapping sometimes helps, but keep it light. Tap around the metal housing with your fingertips or the handle of a screwdriver wrapped in cloth. Do not strike the glass directly. The goal is to break the grime seal, not shock the fixture loose.
Painted-over edges need extra care. Scoring the paint line with a small blade can free the cover without peeling a big patch off the ceiling. Work slowly and keep the blade shallow. Ceiling paint damage is easier to prevent than repair.
Heat can also make plastic covers slightly warped over the years. If a plastic grille flexes but refuses to release, check for hidden clip points instead of pulling harder. Warped plastic can crack near the corners. Controlled pressure keeps a simple cleaning job from turning into a replacement hunt.
Clean The Cover And Housing Properly
After removal, cleaning should start with the cover itself. Glass shades usually respond well to warm water, mild dish soap, and a soft cloth. Avoid harsh scrub pads because they can leave tiny scratches that catch dirt faster next time. Gentle cleaning keeps the cover clearer and safer to handle.
Plastic grilles need a lighter touch. Hot water can warp thin plastic, so warm water is safer. A soft brush can lift dust from vent slots without bending them. Clean airflow paths help the fan move air more consistently.
The housing deserves attention too, but do not flood it with cleaner. Use a vacuum brush or dry microfiber cloth to remove dust near the motor area. Keep liquid away from wiring, sockets, and switches. Dry cleaning inside the housing is the safer route.
Bulb areas often collect dead bugs and baked-on dust. Let everything cool, remove loose debris, and wipe only the safe exposed surfaces. If you see brittle wiring, burn marks, or a loose socket, stop and bring in qualified help. Electrical damage is not a DIY guessing game.
Reinstall Without Rattles Or Gaps
Reinstalling the cover deserves the same patience as removal. A cover that looks seated from one side may still sit crooked on the opposite edge. Line up tabs, screws, or spring clips before applying pressure. Proper alignment prevents rattles once the fan runs again.
Screw-held covers should be tightened evenly. Snug is enough, because overtightening can crack glass or strip small brackets. Work around the rim in small turns rather than cranking one screw all the way down. Even tension keeps the cover secure without stress.
Spring clip covers need both clips seated fully in their slots. Push the grille upward gently after clipping it back in to confirm it sits flush. A sagging corner usually means one clip missed its slot. Flush fit keeps vibration noise down.
Twist-lock covers should turn until they feel seated, not until your wrist runs out of patience. If the cover rattles, remove it and clean the rim again before trying another install. Grit in the groove can keep the tabs from locking. Smooth contact helps the cover stay quiet and secure.
How To Remove Broan Ceiling Fan Cover For Deep Cleaning
Loose dust around the rim is only the obvious mess. The real trouble usually hides behind the cover, where sticky lint, bug debris, and moisture stains collect in places a quick wipe can’t reach. After the cover is safely off, how to remove Broan ceiling fan cover becomes less about the first twist and more about what you do next. A careful cleanup keeps the fan quieter, helps the light shine better, and makes the next removal a whole lot less annoying.
Inspect The Inside Before Cleaning
Start with a slow look inside the housing before grabbing a cloth. The cover may be off, but hidden dust can sit close to wiring, sockets, and motor parts. A rushed wipe can push grime deeper into the fixture instead of removing it. Keep your flashlight angled upward so small cracks, loose screws, or stained areas don’t hide in the shadows.
Broan bathroom fan covers often reveal a ring of residue near the vent openings. That buildup comes from humidity, soap film, and regular household dust mixing together over time. It can look harmless, but it may make the cover harder to remove later if it dries along the rim. Cleaning that edge now saves you from wrestling with the same stuck cover again.
Check the bulb socket area if your Broan unit includes a light. Brown marks, brittle plastic, or a burnt smell should not be ignored. Those signs point to heat stress or a connection issue that needs more care than routine cleaning. A simple bulb swap is fine, but damaged wiring should be handled by someone qualified.
Look at the cover itself too. Tiny chips around glass edges or cracked plastic tabs can change how safely the cover fits back in place. If the clips no longer hold firm, the cover may rattle or sag after reinstalling. Secure fit matters because vibration slowly makes weak parts worse.
Clean Glass Covers Without Scratches
Glass covers need gentle cleaning, not aggressive scrubbing. Warm water and mild dish soap usually handle dust film, fingerprints, and dried grime without damaging the surface. Let the glass soak for a few minutes if the residue feels stubborn. Scraping with a metal tool is asking for chips, and nobody needs that headache.
Use a soft microfiber cloth instead of paper towels if the cover has a frosted finish. Paper towels can leave lint behind and may drag grit across the surface. A clean cloth helps preserve clear light output and keeps the shade from looking cloudy after it dries. Dry the cover completely before reinstalling it near any electrical parts.
Hard water spots can show up on bathroom fan-light covers, especially in rooms with poor ventilation. A little diluted vinegar may help, but keep it away from metal trim that could discolor. Rinse well so no cleaning residue remains. Residue-free glass looks better and attracts less dust afterward.
Set the cleaned cover on a towel while working on the housing. Placing it rim-down on a hard sink or countertop can chip the edge. That kind of tiny damage may not look serious, but it can spread after repeated tightening. Soft support is cheap insurance.
Clean Plastic Grilles And Vent Slots
Plastic Broan covers need a lighter hand because heat and age can make them brittle. Warm soapy water loosens lint, dust clumps, and bathroom residue without stressing the plastic. A soft brush works well inside narrow vent slots. Avoid boiling water, since thin plastic can warp faster than expected.
Clip areas deserve extra attention. Dirt packed around spring holes can stop the cover from seating correctly during reinstalling. Use a cotton swab or soft brush to clean those small corners. Clean clip channels help the cover snap back into place without forcing it.
Let the grille dry fully before it goes back up. Damp plastic near the fan housing can encourage musty smells, especially in bathrooms that already struggle with moisture. A dry towel speeds things up, but air drying for a bit is still smart. Moisture control keeps the fixture fresher after cleaning.
Plastic covers may discolor over time, and cleaning won’t always bring back the original color. That’s not a failure. Yellowing can come from heat, age, or older material, so focus on airflow, secure clips, and clean vent openings rather than chasing a brand-new look.
Refresh Lighting After Cover Removal
Removing the cover gives you a good chance to check the bulb setup. Dim lighting is not always caused by a weak bulb. Dust on the inside of the shade can block more light than people expect, especially with frosted glass. A clean cover often makes the fixture feel brighter without changing anything else.
Bulb size and heat matter in enclosed fan covers. Oversized bulbs may sit too close to the glass or trap heat inside the fixture. Use the wattage and bulb type recommended for the fixture label whenever you can see it. Proper bulb fit helps protect sockets, covers, and surrounding plastic parts.
Smart bulbs can be useful in fan lights, but they are not right for every enclosed cover. Some smart bulbs dislike heat buildup, and a fully enclosed shade may shorten their life. For ceiling fan lighting upgrades, compare practical options through smart bulb for ceiling fan before swapping bulbs in a tight fixture. Heat rating and fixture compatibility matter more than fancy app features.
Reading corners near a ceiling fan often need softer light than the main fixture can provide. A fan light may brighten the room, but it can cast shadows on books, crafts, or bedside tables. Add focused comfort with reading lights for books if the ceiling fixture leaves your favorite chair looking dim. Layered lighting usually feels better than pushing one overhead light to do every job.

Reduce Rattles After Reinstalling
Rattles usually come from uneven seating, loose screws, or clips that did not lock fully. After reinstalling the cover, press gently around the edges and listen for movement. A small gap can turn into a buzzing sound once the fan runs. Flush contact is the first thing to check.
Screw-held covers should feel snug, not squeezed. Overtightening can crack glass or bend small brackets out of shape. Tighten in small turns and move around the cover so pressure stays even. Balanced tension keeps the shade stable without stressing the material.
Spring clip covers may rattle if one clip is weaker than the other. Pull the cover down slightly and reseat both clips if the grille looks uneven. Bent clips can sometimes be nudged back into shape, but heavy bending can snap old metal. Clip tension should feel firm, not forced.
Twist-lock covers can buzz if the tabs sit on dirt or grit. Remove the cover again and wipe the rim if it does not lock cleanly. Even a thin line of grime can stop full contact. Clean locking grooves make a bigger difference than cranking harder.
Know What Not To Force
Force feels tempting when the cover barely moves, but it is usually the fastest path to damage. Glass shades can crack at the rim, plastic grilles can snap near clip slots, and metal housings can bend out of alignment. Stop as soon as resistance feels sharp or uneven. Controlled pressure keeps the repair simple.
Do not pry between glass and metal with a screwdriver unless you are protecting both surfaces and working very lightly. Bare metal can chip glass in a blink. A plastic putty knife or rubber grip is safer for easing a stuck edge. Non-marring tools help prevent ugly scratches.
Painted fixtures need patience because paint can glue the cover to the ceiling or trim ring. Scoring the paint seam lightly is safer than ripping the cover down. Pulling too hard may peel ceiling paint or crack the surrounding finish. Paint release should happen before the cover moves.
Stop working if the fixture shifts in the ceiling. A loose housing, wobbling bracket, or moving junction area points to a bigger issue than cover removal. The cover should release from the fixture, not drag the whole fixture with it. Fixture stability is non-negotiable.
Reinstall The Cover The Right Way
Reinstalling starts before the cover touches the housing. Make sure the rim, clips, grooves, and screw holes are dry and clean. Dirt trapped at the contact points can create gaps or make the cover sit crooked. Clean contact points help everything line up naturally.
For spring clip covers, squeeze both clips evenly and guide them into the housing slots. Letting one side catch first can twist the grille and weaken the clip. Push upward gently until the cover sits flat against the ceiling. Even seating keeps the fan from humming or buzzing later.
For screw-held covers, start every screw before tightening any of them fully. That gives you room to adjust the cover if it sits slightly off-center. Tighten until secure, then stop. Snug hardware is safer than overdone hardware.
For twist-lock covers, line up the tabs and turn only until the cover locks. If it does not turn smoothly, pull it back down and inspect the groove. Forcing a misaligned tab can chip glass or shave plastic. Smooth locking action tells you the cover is seated correctly.
Keep Future Removal Easier
A cleaned cover is easier to remove next time if the rim stays free of grime. Wipe the outside every few weeks in bathrooms, laundry rooms, and kitchens where moisture or dust builds faster. Small wipe-downs prevent that sticky edge from forming again. Routine cleaning saves effort later.
Run the bathroom fan long enough after showers to reduce moisture around the cover. Steam can cling to the grille and pull dust into the slots. Better ventilation lowers the chance of residue hardening around clips and seams. Humidity control keeps both the fan and cover easier to manage.
Listen for new sounds after reinstalling the cover. A buzz, click, or rattle usually means something is not seated right. Fixing it right away prevents screws from loosening or clips from wearing unevenly. Early noise checks protect the fixture from small problems growing bigger.
Keep a note of how your specific Broan cover releases. Write down whether it uses screws, clips, or a twist lock, then store that note with household maintenance info. Next time, you will not have to play the guessing game from the ladder. Model-specific memory turns a frustrating chore into a quick, calm routine.


Best Small Flush Mount Ceiling Fans 2026 Ultimate Picks

Best Smart Ceiling Fan India 2026 For Effortless Comfort

Best Smart Ceiling Fans with Lights for 2026: Top Picks

Best Smart Home Non Ceiling Fans 2026 For Ultimate Comfort

Best Outdoor Misting Ceiling Fan 2026 For Ultimate Comfort

Best Ceiling Fans With Lights For Vaulted Ceilings 2026 Top Picks

Best Outdoor Ceiling Fans For Porch 2026 With Style And Breeze

Best WiFi Enabled Ceiling Fan 2026 For Effortless Comfort





