
How to Remove CFL Light Bulb: Simple, Safe Steps
Removing a CFL light bulb might seem tricky, but it’s actually simple when you know the right steps. Whether you're replacing a bulb or handling one that’s burnt out, taking the right precautions is essential. CFL light bulbs contain a small amount of mercury, so proper handling is crucial for safety. This guide will walk you through every step to safely remove a CFL light bulb without risk. Always ensure you’re using gloves, and be aware of any potential hazards to avoid. The process involves turning off the power to the light source, carefully removing the bulb from the socket, and properly disposing of it. With the right tools and awareness, this task becomes a breeze. You’ll also find out how to deal with a bulb that has broken or is stuck in the socket. Understanding these tips will not only make the process safer but will also help you avoid common mistakes.
Removing a CFL light bulb isn’t something you do every day, but it’s good to know how to handle it when the time comes. Whether you’re replacing a burnt-out bulb or working on a home improvement project, safety is your top priority. CFL bulbs contain small amounts of mercury, so it’s important to follow the proper steps when removing them. This guide will help you understand how to safely remove CFL light bulbs without the hassle or risk. You’ll learn the right precautions to take, what tools to use, and how to dispose of the bulb correctly. With clear, simple steps, you’ll be able to handle this task confidently and without worry. And, if you’re facing issues with a bulb that’s broken or stuck, this guide offers solutions to those common problems as well.
Removing a CFL light bulb might seem like an easy task, but there are important precautions you must take to ensure it’s done safely. CFL bulbs contain mercury, and mishandling them can lead to health risks, especially if they break. Whether you're swapping out a bulb that's burned out or replacing one as part of a larger project, proper safety is key.
To begin with, always turn off the power before attempting to remove the CFL light bulb. Even though it’s obvious, this step cannot be skipped. Not doing so can expose you to the risk of electrical shock. If the light fixture has a switch, make sure it's in the off position, and if you can, turn off the circuit breaker for extra safety. This prevents any unwanted surprises while you’re working.
After ensuring the power is off, it’s time to think about how to handle the CFL bulb. These bulbs are known for their fragility and mercury content, so using the right tools is essential. Consider wearing gloves to avoid direct contact with the bulb. Gloves help protect your hands from broken glass if the bulb shatters, and they also keep oils from your fingers off the surface of the bulb, which can cause it to degrade over time.
Once you’ve taken the necessary safety precautions, proceed to carefully remove the CFL bulb from its socket. The typical CFL light bulb fits into most standard light sockets, but some fixtures may require a little more finesse. Grip the base of the bulb, ensuring you don’t touch the glass part, and gently twist it counterclockwise. If it’s tightly fixed in place, a bit of gentle rocking or wiggling might be required. Be cautious of the bulb’s sensitivity – force can break it, releasing dangerous chemicals into your home.
When removing a CFL bulb, always ensure you handle it gently. If you’re dealing with a broken CFL bulb, extra care is needed. Avoid directly touching the broken parts and carefully dispose of the pieces in accordance with local regulations. Mercury from broken bulbs can be harmful to both the environment and your health, so take every step to minimize risk.
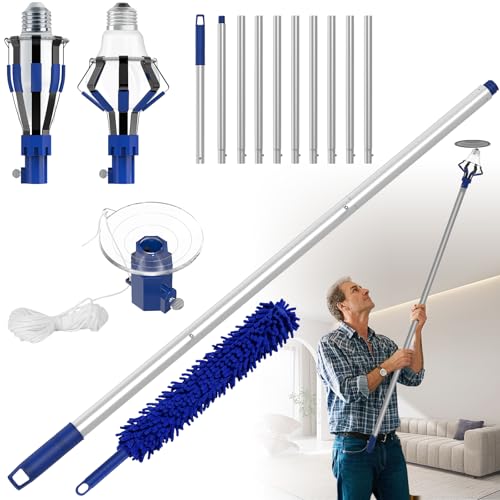
Before attempting to remove your CFL light bulb, it’s important to have the right tools for the job. CFL bulbs are fragile and require careful handling, so investing in the proper tools can make your task safer and more efficient.
First off, gloves are a must. Not only do they protect your hands from potential cuts, but they also prevent oil residue from your fingers from getting on the bulb, which could cause the CFL bulb to burn out prematurely. Gloves are a simple but highly effective safety measure. Look for rubber gloves that offer both dexterity and protection, allowing you to grip the bulb without exposing your skin.
Next, consider using a bulb removal tool. These tools are designed specifically for removing bulbs that are hard to grip or difficult to reach. A bulb removal tool typically has a suction cup or similar mechanism that will help you remove the bulb without much effort, especially for bulbs that are recessed or in high, hard-to-reach places. If you're dealing with an energy-efficient CFL bulb, this tool will give you the necessary leverage to twist and pull the bulb out without breaking it.
Another key tool that may come in handy is a step ladder if the fixture is high up. Reaching fixtures without proper support can be risky. A sturdy ladder or step stool ensures you stay balanced while working, reducing the risk of falling and hurting yourself. Once on your ladder, make sure you're not overextending your arms or standing on an unstable surface.
Also, keep a trash bag nearby for easy disposal. If you're changing out a burnt-out CFL bulb, you’ll want a safe place to discard the bulb as soon as you remove it. Since CFL bulbs contain mercury, they must be disposed of according to your local waste disposal regulations. Don’t just toss them in the trash or recycling bin – proper disposal is crucial to avoid contamination.
Accidents happen, and sometimes, a CFL bulb can shatter during removal. If this happens, don't panic – but be aware that there are specific steps you should take to handle the situation safely. Mercury is a hazardous substance found in the inner workings of CFL bulbs, so it’s important to manage the cleanup carefully to avoid exposure to it.
First, evacuate the area. If the bulb breaks, leave the room immediately to prevent inhaling any dust or fumes that may be released. It’s also important to ventilate the area, so open windows or doors to ensure the room is well-ventilated while you clean up. Mercury can vaporize and create a health risk if inhaled, so air circulation is essential.
Next, gather your supplies for the cleanup. You'll need duct tape or sticky tape to pick up any small glass shards, a stiff piece of cardboard to scoop up larger pieces, and wet wipes or a damp cloth to wipe the surface clean. Carefully pick up the glass shards using the tape, and ensure that no debris is left behind. Avoid using a broom to sweep up the glass, as this could spread mercury particles throughout the room.
When you’re sure all the pieces have been cleaned up, place the shards and any contaminated cleaning materials in a sealed container. Do not throw the pieces away in your regular trash. Instead, take them to a local recycling center or specialized disposal facility that handles mercury-containing waste. Many cities offer bulb disposal programs or designated drop-off points for these types of hazardous materials.

When you’re done replacing your CFL light bulb, it's time to think about proper disposal. CFL bulbs contain mercury, a toxic substance that can harm both your health and the environment if not disposed of correctly. Disposing of these bulbs safely is just as important as the process of removing them in the first place. Many people aren't aware of the hazards of mercury, so it's essential to follow the right steps.
Start by checking your local laws and regulations regarding CFL bulb disposal. Some areas have special recycling programs where you can drop off your used bulbs for safe handling. Others might have designated recycling centers where you can leave them. Retailers like hardware stores often provide drop-off boxes where customers can return used CFL bulbs for proper disposal. Be sure to check with local businesses, as many offer free and easy options for bulb recycling.
Another option for disposal is mail-back programs. Some manufacturers and environmental organizations offer programs where you can send your old bulbs back to be safely recycled. Mail-back programs are a great choice if you live in an area without easy access to recycling centers. These programs provide an eco-friendly way to ensure your CFL bulbs are dealt with safely and don’t end up in a landfill, which could contaminate soil and water supplies.
Never throw your CFL bulb directly into the regular trash. Because of the mercury inside, breaking the bulb or exposing it to high heat can cause the toxic chemicals to leak into the environment. Proper disposal is key to keeping both your home and the planet safe. By using recycling programs or taking advantage of store drop-off options, you can be part of a larger effort to manage mercury waste responsibly.
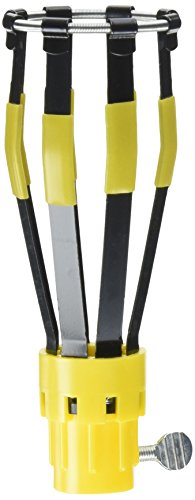
Sometimes, you might find that your CFL bulb is stuck in the socket and you can’t remove it, no matter how hard you try. It’s a common issue, but there are several techniques you can use to safely resolve the situation.
Start by turning off the power and ensuring the light is completely unlit. This step is essential for your safety. You should also give the bulb a few minutes to cool down if it was recently turned on, as it can get hot and increase the risk of burns. Once it’s cool, you can proceed with trying to remove the bulb.
If the CFL bulb is stuck because of dirt or corrosion, you might need to clean the socket before trying to remove the bulb again. Use a clean cloth and some mild cleaning solution to wipe away any buildup of dirt or corrosion. Make sure you don’t get any solution on the bulb itself. After cleaning, try twisting the bulb again, but be sure to do so gently to avoid breaking the glass.
Another method to loosen a stuck bulb is using pliers. Place the pliers around the base of the bulb, and gently twist in the counterclockwise direction. Avoid using excessive force as this could break the glass. If you’re worried about breaking the bulb, you can also try using a rubber jar opener. The rubber will provide you with better grip, giving you the leverage you need to turn the bulb without the risk of it shattering.
If none of these methods work, consider calling a professional to help you with the removal. Sometimes, the socket or fixture may be damaged, making the bulb nearly impossible to remove without expert intervention. Don’t force the bulb, as doing so can cause further damage to the light fixture or the bulb itself.

While removing a CFL light bulb may seem straightforward, many people make a few key mistakes that can lead to accidents or even damage. Knowing what to avoid can make your task much safer and easier. Let’s explore some of the most common mistakes.
One of the biggest mistakes is not turning off the power. Always make sure the fixture is completely powered down before attempting to remove the bulb. Forgetting this step can lead to serious electrical shock hazards. Double-checking the power source is a quick but essential step in ensuring your safety.
Another mistake people often make is gripping the glass directly while removing the bulb. CFL bulbs are fragile and can break easily, so it’s important to hold the base and avoid touching the glass. If the bulb breaks, it’s not only a hassle to clean up, but you also risk exposure to mercury.
Failing to dispose of the bulb properly is another common issue. Just tossing your CFL bulb in the trash is not only irresponsible but also harmful to the environment. Be sure to recycle it according to your local guidelines. Many people are unaware of the environmental risks, but CFL bulbs contain mercury, which can pollute soil and water when not disposed of correctly.
Lastly, some individuals forget to use gloves when removing the bulb. Gloves not only protect your hands from broken glass but also help prevent oils from your skin from affecting the bulb’s performance. It’s an easy, preventive measure that can save you from a lot of potential problems.
By avoiding these common mistakes, you’ll be able to safely and easily remove your CFL light bulb without any unnecessary headaches.


Best Boat Black Lights 2026 For Nighttime Adventure

Best Black 30 Inch Light Bar Reviews – Top Picks of 2026

Best Black Light For Aquarium 2026 For Vibrant Glow

Best Black Light for Authenticating Glass 2026 Top Picks

Best Waterproof Spotlight 2026 That Outshines Expectations

Best Solar Spotlight For Yard 2026 Brighten Outdoor Spaces With Ease
Best Led Spotlight Rechargeable 2026 Bright Picks

Best Rechargeable Spotlight For Boat 2026 That Cuts Through Darkness





