
How to Replace a Bathroom Ceiling Fan With Light
How to replace a bathroom ceiling fan with light sounds simple on paper, yet plenty of homeowners hit a wall halfway through the project. Old housings get wedged between ceiling joists, wiring colors don’t always match, and cramped attic access can turn a quick weekend fix into an all-day sweat session. Nobody wants a noisy fan rattling overhead or a dim light that makes the bathroom feel gloomy. A properly installed combo unit changes the whole vibe, though. Better airflow helps reduce stubborn moisture, peeling paint, and that damp smell that likes to linger after hot showers.
Bathroom upgrades often feel deceptively small. Still, replacing an outdated fan-light combo affects comfort, ventilation, and even long-term maintenance costs. Weak airflow allows humidity to stick around longer than it should, which can eventually lead to mildew around ceilings and corners. That’s the part many people don’t think about until stains start creeping in. Fresh lighting also matters more than expected because uneven bathroom lighting makes everyday routines feel frustrating, especially during early mornings.
Ceiling height, duct placement, and electrical box compatibility create the biggest headaches during installation. Some older bathrooms weren’t built for modern fan sizes, so squeezing in a larger housing can feel like solving a puzzle with one hand tied behind your back. Then there’s the noise factor. Cheap or aging fans often hum, click, or vibrate loudly enough to wake up half the house during nighttime use. Replacing the setup correctly helps create a quieter space that actually feels relaxing instead of irritating.
Energy efficiency sneaks into the conversation, too. Older fan motors usually pull more power while moving less air, which honestly feels backwards. Newer models improve air circulation while using less electricity, helping bathrooms dry faster after showers without overworking the system. Bright LED lighting also cuts down on frequent bulb replacements, which is a relief for anyone tired of dragging out a ladder every few months.
Safety plays a bigger role than most folks expect. Bathrooms combine electricity, humidity, and tight spaces, which means sloppy wiring isn’t something to brush off casually. Proper shutoff procedures, secure wire connections, and the correct mounting bracket all matter if you want the fixture to last without flickering or overheating. Little details, oddly enough, make the difference between a smooth installation and a repair project that spirals into frustration later.
How to replace a bathroom ceiling fan with light also depends heavily on the existing setup hidden above the ceiling. Some homes have flexible ductwork that tears easily during removal, while others use rigid metal ducts that need careful alignment. Access from above can make the process easier, but many people end up working entirely from below with limited visibility. Tight spaces test patience pretty quickly. A little planning beforehand saves a whole lot of muttering under your breath halfway through the install.
Lighting style affects the overall mood more than people expect. Harsh overhead bulbs can make bathrooms feel sterile, while softer balanced lighting creates a calmer atmosphere. Replacing an outdated unit gives homeowners a chance to improve both function and appearance without tearing apart the whole room. That balance between practicality and comfort is what makes this project worth the effort.
How To Replace A Bathroom Ceiling Fan With Light
A bathroom fan that rattles, flickers, or barely clears steam can make the whole room feel tired. Moisture lingers, the mirror stays foggy, and that old ceiling grille starts looking worse every week. The job sounds intimidating at first, but how to replace a bathroom ceiling fan with light becomes much easier once the work is broken into safe, practical steps. The real goal is simple: get stronger ventilation, steadier lighting, and a cleaner ceiling setup without turning the bathroom into a construction zone.
Bathroom Fan Replacement Basics
A bathroom fan-light combo does two jobs at once, so replacing it takes a little more care than swapping a plain light fixture. The fan needs a clear duct path, secure ceiling support, and safe electrical connections. The light needs the correct wiring, a snug cover, and enough brightness for daily routines. Miss one of those pieces, and the new unit may hum, leak air, or leave the bathroom dimmer than expected.
The first move is checking what already exists above the ceiling. Older bathrooms often hide undersized ductwork, brittle plastic vent hoses, or housings nailed tightly to a ceiling joist. That’s where frustration usually begins. A new fan may look similar from below, yet the housing size, wiring layout, and duct outlet can be completely different once the cover comes off.
Good preparation keeps the project from going sideways. Measure the existing housing, note the duct size, and confirm whether the fan vents outdoors instead of dumping moisture into an attic. That last detail matters because bathroom exhaust should move humid air outside the home. Venting into an attic can feed mildew, damp insulation, and wood moisture problems over time.
How to replace a bathroom ceiling fan with light also depends on whether the existing switch controls the fan and light separately. Some setups use one switch for both functions, while others use two switches for better control. A mismatch here can make the installation confusing fast. Labeling wires before disconnecting anything saves a lot of squinting, guessing, and colorful language later.
Safety Checks Before Removal
Electricity and bathroom moisture don’t play nice together. Before touching the fixture, shut off the correct breaker and test the wires with a voltage tester. Don’t trust the wall switch alone because someone may flip it back on without thinking. Power shutoff is the one step that should never be rushed, even if the old fan looks harmless.
Remove the grille and light lens carefully because old plastic can crack like a potato chip. Dust, lint, and dried moisture often pile up inside the housing, so a dust mask isn’t a bad idea. A flashlight helps reveal how the fan is attached to the joist or ceiling frame. Some units slide out from below, while others were nailed in before drywall was installed.
Check the wiring box before disconnecting the old fan. Black wires usually handle hot power, white wires usually handle neutral, and green or bare copper wires handle grounding, but older homes may not follow neat color logic. That’s why wire labeling matters. Tape small notes onto each wire so the new fan-light combo can be connected with less guesswork.
Also inspect the duct connection. A loose or crushed duct will weaken airflow no matter how nice the new fan looks. The fan may run, but steam will still hang around after showers. Strong installation starts with clear air movement, not just a shiny new cover plate.
Choosing The Right Fan Light Combo
The replacement fan should match the bathroom’s size and the home’s duct setup. A small powder room doesn’t need the same airflow as a full bath with a tub and shower. Fan capacity is commonly measured in CFM, which stands for cubic feet per minute. More airflow can help, but oversized fans may sound louder or pull conditioned air out faster than needed.
Noise matters more than people expect. Fan sound is measured in sones, and a lower sone rating usually means quieter operation. A quiet fan encourages regular use because nobody wants a roaring ceiling box during a late-night bathroom trip. Low-noise ventilation makes the room feel calmer while still clearing damp air.
Lighting should fit the bathroom’s daily rhythm. A bright LED fan light helps with shaving, makeup, cleaning, and spotting water stains before they become bigger trouble. Still, overly harsh light can make a small bathroom feel cold. A balanced fixture gives enough brightness without making the space feel like a clinic.
Ceiling fans in other rooms follow different comfort rules, so don’t confuse bathroom exhaust needs with air-circulating fixtures. For room airflow comparisons, compare designs through best 5 blade ceiling fan before assuming any ceiling fan can solve humidity. A bathroom exhaust fan needs outdoor venting, moisture-safe parts, and a housing built for steam-heavy spaces.

Removing The Old Fan Cleanly
The old fan usually comes out in stages. Start with the grille, bulb, and light lens, then remove the motor plate if the design allows it. Many older fans have a plug-in motor assembly inside the housing, which makes removal less awkward. Once the inside pieces are out, the housing becomes easier to inspect and loosen.
Drywall edges around the fan can crumble if the housing is yanked too hard. Work slowly with a screwdriver, utility knife, and small pry bar if needed. Cutting old caulk or paint around the grille opening helps prevent ceiling damage. Clean removal matters because a rough opening can leave gaps around the new cover.
Disconnect the wiring only after confirming power is off again. Separate the wire nuts, untwist the connections, and keep each wire visible. Don’t let wires slip back into the ceiling cavity. A small piece of tape can hold them in place while the old housing comes down.
The duct connection may be taped, clamped, or barely attached at all. Old foil tape often dries out and peels away, especially in warm attic spaces. Remove it carefully and check for tears in flexible ducting. A damaged duct should be repaired before the new fan goes in, or the fresh installation will still struggle with weak airflow.
Wiring Without The Guesswork
Wiring a fan-light combo can be straightforward, but only if the existing setup matches the new fixture. A single-switch setup usually powers both fan and light together. A two-switch setup separates them, which is more convenient for daily use. That separation lets the light run without the fan, or the fan run after a shower without keeping the room bright.
The new unit’s instructions should guide the exact wire connections. Most fan-light combos have separate hot leads for the fan and light, along with neutral and ground wires. Secure connections with approved wire connectors, then tuck the wires neatly into the electrical compartment. Tight wire connections help prevent flickering, buzzing, and heat buildup.
Grounding deserves attention. A proper ground connection helps protect the fixture if a fault occurs. Older homes may have limited grounding, and that’s not the moment for improvising. If the wiring looks brittle, scorched, loose, or confusing, hiring an electrician is a smart move rather than a defeat.
Lighting comfort doesn’t stop at the fan fixture either. A bathroom with poor task lighting may still feel shadowy after the fan-light replacement. For nearby room lighting ideas, upgrade the reading corner with best floor lamp with reading light so the home’s practical lighting feels more intentional from room to room. The bathroom fixture should handle moisture-safe overhead light, while other lamps can solve comfort lighting elsewhere.
Fitting The New Housing
The new housing needs a secure fit before the motor and cover go back on. Some replacement models are designed for room-side installation, which helps when attic access is limited. Others still require fastening brackets from above. Either way, the fan should sit firmly against framing and not wobble when the motor runs.
Measure twice before cutting the ceiling opening larger. A small gap can usually be hidden by the grille, but an oversized cut looks sloppy and may reduce support. The housing should slide into place without forcing the drywall to crack. Accurate sizing keeps the finished ceiling clean and avoids patchwork later.
Connect the duct to the fan outlet with a snug fit. Use proper foil HVAC tape rather than regular duct tape, which can dry out and fail. Keep the duct run as straight as possible because sharp bends restrict airflow. A fan can only perform well if the air has a clean path outdoors.
Some bathroom projects cross paths with other household repairs, and materials can get mixed up fast. Yarn, insulation, wiring, and venting all have their own rules, so avoid guessing based on unrelated DIY habits. For a separate craft reference, compare texture terms through what is light worsted yarn instead of mixing soft-material language with electrical or ventilation work. Bathroom fan replacement needs code-aware parts, not craft-store improvisation.
Testing Airflow And Light Function
Testing starts before the grille is fully snapped into place. Turn the breaker back on, then try each switch separately if the fan and light are wired that way. Listen for scraping, rattling, or a low buzzing sound that doesn’t seem normal. A smooth fan should sound steady, not like it’s fighting the ceiling.
Hold a tissue near the grille to check suction. The fan should pull the tissue toward the cover without needing help. This simple check won’t measure exact airflow, but it quickly reveals obvious duct or installation problems. Visible suction gives a quick clue that air is moving in the right direction.
Run the light for a few minutes and watch for flickering. A loose connection, incompatible bulb, or poor wire contact can cause annoying light behavior. LED modules should turn on cleanly and stay steady. If the light flickers only when the fan starts, the wiring may need a closer look.
After a hot shower, the room should clear steam faster than before. The mirror may still fog briefly in a small bathroom, but lingering dampness should drop noticeably with proper ventilation. Keep the fan running for a bit after showering to help dry walls and ceiling surfaces. Moisture control works best as a habit, not a once-in-a-while rescue mission.
Replacing An Old Bathroom Exhaust Fan Light Combo
Most bathroom fan replacements don’t fail because of the wiring. Trouble usually starts after installation, once the room still feels damp or the new fan rattles against the ceiling every time it runs. Small mistakes stack up fast. Loose brackets, poor duct angles, and weak ceiling support can quietly ruin an otherwise solid upgrade.
An older bathroom often hides years of moisture buildup around the fan opening. Paint peels, drywall softens, and dust cakes around the vent cover like felt. Replacing the fixture without checking those surrounding materials can shorten the lifespan of the new unit. A fresh fan works best when the ceiling itself is still stable, dry, and properly supported.
People also underestimate how much lighting affects the feel of a bathroom. Weak bulbs create shadows near the mirror, while overly bright LEDs can make a small room feel harsh. A balanced fan-light combo should improve airflow and everyday comfort at the same time. The fixture sits right in the center of the room, so every little detail becomes noticeable.
Humidity control remains the biggest reason for replacing the fan in the first place. Steam trapped inside a bathroom slowly wears down paint, trim, and even cabinet finishes. Running a stronger fan after showers helps surfaces dry faster and reduces that lingering damp smell that sticks around longer than anyone wants to admit.
Preventing Ceiling Damage During Installation
Ceiling damage happens more easily than people expect. Older drywall around the fan housing can become brittle after years of heat and moisture exposure. Pulling the old housing too aggressively may crack surrounding areas and turn a simple replacement into a patching project. Slow removal protects the ceiling and keeps cleanup manageable.
Support brackets deserve close attention before the new fan goes in. Some older fans were attached directly to thin framing that barely held the original weight. Modern fan-light combos can weigh more because of stronger motors and integrated LED assemblies. Reinforcing the mounting area creates a much more secure fit and reduces future vibration.
Attic access changes the difficulty level dramatically. Working from above makes bracket installation easier, but many bathrooms don’t offer that luxury. In those cases, room-side installation models save a lot of frustration. These designs slide into place from below and help avoid unnecessary drywall cuts.
Outdoor lighting upgrades often run into similar placement headaches around mounting and moisture exposure. For landscape inspiration around the home exterior, explore best solar lights for uplighting trees to compare how proper fixture positioning changes visibility without overloading the space with glare. Bathroom fan lighting follows a similar principle indoors because balanced brightness always feels more comfortable than harsh overhead light.
Reducing Noise And Vibration Problems
A loud bathroom fan gets ignored until late at night, then suddenly it sounds like a lawn mower hanging from the ceiling. Noise usually points to vibration, weak mounting, or restricted airflow. A new fan should sound steady and smooth rather than shaky or metallic. Quiet operation becomes one of the first things people notice after a successful replacement.
Duct bends play a huge role in fan noise. Flexible ductwork that twists sharply behind the housing forces the motor to work harder. That strain creates extra humming and weaker exhaust performance at the same time. Keeping the duct path straighter improves ventilation efficiency and helps reduce unwanted sound.
Loose fan grilles also create rattling noises that drive people crazy. A grille that doesn’t sit flush against the ceiling may vibrate every time the fan runs. Tightening the mounting springs or adjusting the housing position usually fixes the issue. Tiny adjustments often solve problems that seem much bigger at first.
Fan blade balance matters in larger rooms too, especially outside the bathroom. Compare room airflow styles through best ceiling fans with good lighting to see how quieter motor designs and balanced airflow improve comfort throughout the house. Bathroom exhaust fans focus on moisture removal, but stable motor performance still matters just as much.
Improving Airflow In Small Bathrooms
Small bathrooms trap steam surprisingly fast. A hot shower fills the room with moisture within minutes, especially if the ceiling is low or the door stays closed. Weak fans struggle to clear humid air before it settles onto mirrors and painted walls. Strong airflow keeps surfaces drier and helps reduce long-term maintenance headaches.
Fan sizing makes a noticeable difference. Installing a fan that’s too weak leaves the bathroom feeling muggy after every shower. Oversized fans can create extra noise and may remove heated or cooled air too aggressively. Matching the fan’s airflow rating to the room size creates a more balanced ventilation setup.
Air intake matters just as much as exhaust. A tightly sealed bathroom door without enough gap underneath may limit how efficiently the fan pulls air through the room. The fan can’t move air properly if replacement air has nowhere to enter from. A simple door gap often improves circulation more than people expect.
Cleaning habits also affect airflow over time. Dust buildup inside the grille slowly blocks air movement and forces the motor to work harder. Removing the cover occasionally and vacuuming the intake helps maintain steady performance. Small maintenance steps can keep the fan running smoothly for years without much effort.
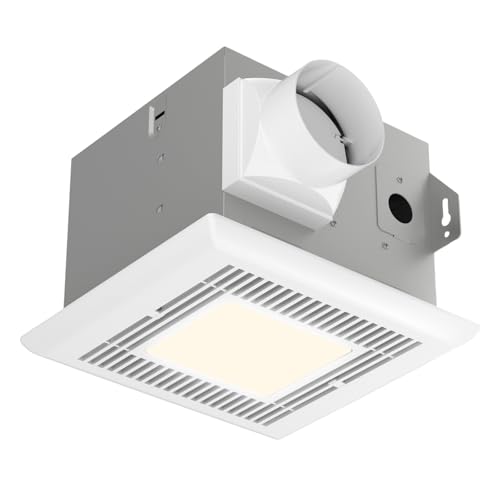
Managing Moisture After Shower Use
Running the fan only during a shower usually isn’t enough. Moisture continues floating through the bathroom long after the water shuts off. Letting the fan run another fifteen to twenty minutes helps clear lingering humidity from walls, mirrors, and corners. That extra runtime reduces condensation buildup and helps preserve paint finishes.
Cold weather creates another challenge. Warm shower steam hitting cool walls and mirrors increases condensation fast, especially in bathrooms with poor insulation. A stronger fan helps move humid air outside before water droplets settle everywhere. The bathroom feels fresher, and surfaces dry much faster afterward.
Ceiling corners often reveal moisture problems before any other spot. Peeling paint, small dark specks, or soft drywall usually point toward weak ventilation. Replacing the fan solves part of the issue, but consistent use matters too. Good airflow habits protect the bathroom far better than occasional deep cleaning.
Some homeowners shut the fan off quickly because older units sound obnoxiously loud. That habit changes once the replacement runs quietly enough to fade into the background. A quieter motor encourages longer use, which improves humidity control without anyone really thinking about it.
Keeping The New Fan Working Longer
Bathroom fans collect more grime than most people realize. Dust mixes with humidity and sticks to the fan blades, motor housing, and grille over time. Ignoring that buildup can reduce airflow and shorten motor life. Cleaning the cover every few months helps maintain consistent ventilation and keeps the fan from sounding strained.
LED light covers also benefit from occasional cleaning. Steam residue and dust dull the brightness little by little, even if the bulb itself still works perfectly. Wiping the lens with a soft cloth restores cleaner light output and keeps the bathroom from looking dim. Small maintenance habits often make the fixture feel newer for much longer.
Watch for changes in sound or airflow during daily use. A fan that suddenly hums louder or clears steam more slowly may have a loose duct connection or dirty motor assembly. Catching those issues early usually prevents larger repairs later. Most fan problems start subtly rather than failing all at once.
The bathroom should feel noticeably drier, quieter, and brighter after replacing the old fixture correctly. Strong airflow, stable mounting, and dependable lighting all work together to improve the room every single day. A well-installed fan-light combo doesn’t need flashy features to matter. Reliable performance and steady moisture control end up making the biggest difference over time.


Best Small Flush Mount Ceiling Fans 2026 Ultimate Picks

Best Smart Ceiling Fan India 2026 For Effortless Comfort

Best Smart Ceiling Fans with Lights for 2026: Top Picks

Best Smart Home Non Ceiling Fans 2026 For Ultimate Comfort

Best Outdoor Misting Ceiling Fan 2026 For Ultimate Comfort

Best Ceiling Fans With Lights For Vaulted Ceilings 2026 Top Picks

Best Outdoor Ceiling Fans For Porch 2026 With Style And Breeze

Best WiFi Enabled Ceiling Fan 2026 For Effortless Comfort





