
How to Replace a Ceiling Fan Light Pull Switch Fast
How to replace a ceiling fan light pull switch sounds simple right up until the chain snaps in your hand or the light refuses to turn back on. One tiny plastic switch can throw off an entire room, especially during late evenings when a dark ceiling fan suddenly becomes more annoying than expected. Frustration kicks in fast because most people assume electrical repairs automatically mean expensive service calls or confusing wiring diagrams. Still, this repair usually comes down to patience, basic tools, and knowing which wire goes where.
Pull switches wear out more often than people realize. Repeated tugging, dusty fan housings, overheated components, and cheap factory parts slowly grind them down over time. Some chains get stuck halfway. Others pull freely without clicking at all. That little “click” matters because it signals the internal contacts are still working properly, and once it disappears, the switch often needs replacement instead of another temporary fix.
How to replace a ceiling fan light pull switch becomes much easier after identifying the switch type hiding inside the fan housing. Some models use a two-wire switch, while others contain three or four wires depending on lighting features and fan design. A rushed repair can create bigger headaches later, especially if the replacement switch doesn’t match the original configuration. Matching the amperage, wire layout, and pull-chain style helps avoid flickering lights, buzzing sounds, or dead fixtures.
Ceiling fan repairs also carry a weird emotional side nobody talks about. A broken pull chain tends to linger because the fan still “sort of works,” so people keep putting off the repair for weeks or months. Then one evening, after yanking the chain for the tenth time, the entire switch gives out completely. Suddenly, the room feels darker, hotter, and far less comfortable than before.
Small repair jobs often look intimidating because electrical parts feel off-limits to many homeowners. That’s understandable. Nobody wants sparks flying overhead or loose wires dangling from a ceiling bracket. The good news is that basic safety steps, careful labeling, and shutting off power at the breaker dramatically reduce risk during this type of project.
Another common problem comes from replacement parts bought too quickly. Cheap switches may fit physically but fail electrically after a few months of use. Some chains jam easily. Others feel loose from day one. A reliable replacement switch with durable internal contacts usually saves time, money, and repeat repairs later.
How to replace a ceiling fan light pull switch also involves paying attention to fan housing space. Tight wiring compartments can make reconnecting wires awkward, especially inside older ceiling fans with brittle insulation or cramped switch brackets. Needle-nose pliers, a flashlight, and photos taken before disconnecting anything can make the entire process smoother. Those tiny preparation habits prevent the classic “Where does this wire go?” moment halfway through the repair.
Ceiling fans often stay ignored until something breaks, but a faulty pull switch can reveal other issues hiding inside the fixture. Burned wires, loose connectors, dust buildup, and aging light kits sometimes appear during inspection. Catching those problems early helps extend fan life and improves reliability. A quick switch replacement can quietly turn into a worthwhile maintenance check that prevents bigger electrical annoyances later.
How To Replace A Ceiling Fan Light Pull Switch
A snapped chain can make a perfectly decent ceiling fan feel useless in a hurry. The light won’t respond, the room feels awkwardly dim, and that tiny switch suddenly becomes the most annoying part of the house. Learning how to replace a ceiling fan light pull switch helps you fix the problem without guessing at wires or paying for a simple repair that careful hands can handle. The job isn’t glamorous, but it’s practical, satisfying, and surprisingly manageable once the steps are clear.
Ceiling Fan Pull Switch Basics
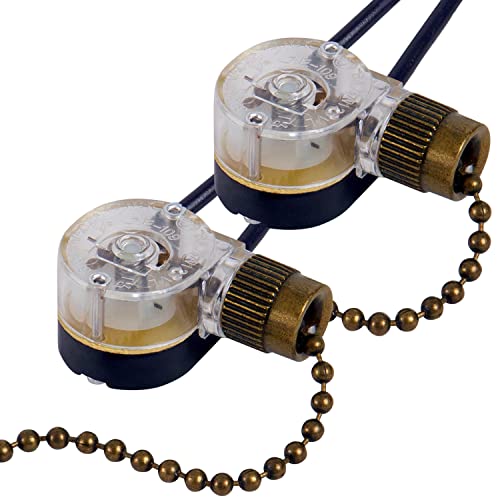
A ceiling fan light pull switch is a small part with a big job. It controls the flow of electricity to the light kit, so every tug either opens or closes the circuit. Once the internal contacts wear down, the chain may still move, but the light won’t respond. That’s why a broken pull chain often points to a failed switch rather than a bad bulb.
The most common signs are easy to spot. The chain feels loose, the click disappears, or the light flickers before turning off completely. Sometimes the chain breaks off inside the switch housing, which makes the repair look worse than it really is. In most cases, switch replacement solves the issue faster than trying to force the chain back into place.
Ceiling fan switches are not all identical. Some use two wires, while others use three or four depending on the light kit and fan design. Taking a quick photo before removing anything saves a lot of head-scratching later. That one habit protects you from mixing up wire placement once the old switch is out.
Older fans can add a little drama. Brittle insulation, cramped housings, and dusty parts can slow the job down. A steady approach matters more than speed here. Treat the repair like a small electrical puzzle, not a tug-of-war with the fan.
Safety Steps Before Touching Wires
Power has to be off before the fan housing comes apart. Flip the correct breaker, not just the wall switch, because a wall switch may not shut down every wire inside the ceiling fan. Use a voltage tester if one is available. That simple check gives you real peace of mind before your fingers go near the wiring.
A stable ladder also matters. Wobbling under a ceiling fan while holding a screwdriver is a bad bargain. Set the ladder on level flooring and keep tools within easy reach. Good footing helps you work slowly and avoid yanking on fragile fan wires.
Remove the bulbs and glass shades before opening the light kit. That keeps the fixture lighter and prevents broken glass from turning a small repair into a cleanup mess. Place screws in a cup or small tray so they don’t wander off. Tiny fan screws have a funny way of disappearing at the worst possible time.
Label wires before disconnecting them, even if the setup looks simple. A strip of tape and a marker can prevent confusion once the new switch is ready. For nearby lighting projects, compare the process with replace recessed light guidance so fixture removal, power checks, and trim handling feel less foreign. Small prep steps make electrical repairs feel less like guesswork.
Choosing The Right Replacement Switch
The replacement switch needs to match the old one closely. Wire count, amp rating, voltage rating, and terminal layout all matter. A switch that looks similar but uses a different internal setup can leave the light dead or cause odd behavior. Matching the original part is the safest path for reliable light control.
Many ceiling fan light switches are marked with ratings on the side. Check those markings before buying a new part. If the old switch has two black wires, a basic single-pole pull switch may fit. If it has more wires, slow down and match the exact configuration instead of grabbing the first switch on the shelf.
Cheap replacement switches can be tempting, but the chain feel often tells the story. A flimsy chain, weak click, or loose housing may wear out quickly. A sturdier switch with clean terminals usually feels more solid in hand. That small difference can mean fewer repeat repairs and a better long-term fix.
Ceiling fan light kits also vary by brand and age. Some older units use compact housings with very little extra room for wire nuts. Measure the old switch body if space looks tight. A replacement that fits the wiring but not the housing creates a fresh headache.

Removing The Old Pull Switch
Start by removing the fan light kit cover or lower housing. Most covers are held by small screws around the side or bottom. Support the cover with one hand as the last screw comes out. That keeps strain off internal wiring and prevents the housing from hanging awkwardly.
Take a clear photo of the switch and wires before loosening anything. Get close enough to see where each wire connects. This photo becomes your safety net if a wire slips free or the colors look similar. A simple phone picture can save twenty minutes of frustration.
Disconnect the wires from the old switch one at a time. Some switches use wire nuts, while others use push-in terminals. For push-in terminals, a tiny screwdriver may release the wire through a slot near the terminal. Pull gently because old copper can break if it’s twisted or bent too hard.
Unscrew the small retaining nut around the pull chain on the outside of the housing. Once that nut is off, the switch should slide out from inside the fixture. Keep the nut if the new switch doesn’t include one that fits nicely. Little hardware pieces often become surprisingly important during ceiling fan repair.
Installing The New Switch Correctly
Feed the new pull chain through the hole in the fan housing first. Then seat the switch body inside the light kit and tighten the retaining nut by hand. Don’t over-tighten it. Plastic switch threads can crack if treated like plumbing hardware.
Reconnect each wire according to the photo or labels you made earlier. Twist wire nuts firmly if your fan uses them, and make sure no bare copper sticks out below the connector. For push-in terminals, insert the wire fully so it seats securely. Loose connections can cause flickering lights, buzzing, or heat buildup.
Keep the wires tucked neatly inside the housing before replacing the cover. Crowded wiring can press against the switch and make the chain feel stiff. A tidy layout also helps the cover close without pinching insulation. That small detail protects the fan from future electrical problems.
Reinstall the light kit cover, bulbs, and shades after the switch is secure. Then restore power at the breaker and test the chain. If the light turns on and off cleanly with a firm click, the replacement did its job. If nothing happens, shut the breaker off again before checking connections.
Common Mistakes That Cause Trouble
Mixing up wires is the mistake that causes the most grief. Wire colors can help, but they aren’t always enough, especially in older fans. Photos and labels beat memory every time. A careful setup protects the switch wiring from accidental errors.
Another problem is replacing the switch without checking the bulb, socket, or wire connectors. A dead bulb can mimic a failed switch, and a loose socket tab can interrupt power to the light. Test the obvious parts before assuming the switch is the only issue. That said, a missing click or snapped chain still points strongly toward pull switch failure.
Some people pull too hard on stuck chains and damage the housing or wiring. A jammed chain usually means the internal spring or contact has failed. Forcing it rarely helps. Replacing the switch is cleaner than fighting a worn mechanism that’s already done.
Remote-controlled fans can complicate the diagnosis. The pull chain, wall switch, and receiver may all affect the light circuit. For separate control issues around remotes, compare options like universal remote control for sony tv only as a reminder that remote systems depend on proper signal and power paths. Ceiling fan remotes follow their own wiring rules, so don’t assume every light failure starts at the chain.
Where Ceiling Fan Size Changes The Job
Fan size doesn’t usually change the switch wiring, but it can change how awkward the repair feels. Larger fans often have heavier light kits and wider housings. Smaller fans may give you less room to work inside the switch compartment. Either way, workspace around the light kit affects comfort more than most people expect.
Compact fans can be tricky because the housing may be packed tight. Wire nuts, sockets, and the switch body can all fight for the same little pocket of space. Tucking wires neatly becomes more important on these models. Rushing can leave the chain rubbing against the housing.
Large ceiling fans may sit higher or use bulkier glass shades. Removing shades first makes the job safer and less tiring. A helper can hold the light kit cover if the fixture feels heavy. That extra set of hands can prevent tugging on ceiling fan wires.
Room size can also nudge future fan choices. A small room with a bulky fan may feel crowded, while a larger room needs enough blade span for comfortable airflow. For sizing ideas beyond this repair, explore 30 inch ceiling fans before replacing a worn fixture entirely. A switch repair fixes the light, but the right fan size improves everyday comfort.
Replacing A Broken Ceiling Fan Light Chain Switch
Some repairs look tiny on the surface but create daily irritation once they fail. A stubborn pull chain can leave the room too dark, make late-night light control frustrating, and slowly tempt people into ignoring the problem for months. Replacing a broken ceiling fan light chain switch keeps the fixture functional without replacing the entire fan, and honestly, that saves both time and unnecessary expense. A careful repair also helps prevent wire strain, overheated sockets, and repeated switch failures later.
Why Pull Chains Fail So Often
Pull switches deal with constant wear. Every tug puts pressure on a tiny internal spring and contact assembly that eventually weakens or cracks. Some chains start sticking halfway through the pull cycle, while others suddenly stop clicking altogether. That missing click usually points toward internal switch damage instead of a simple chain problem.
Dust buildup inside the light kit speeds up wear faster than many people expect. Fine debris settles around the switch housing and can interfere with moving contacts over time. Warm air trapped near ceiling fixtures also affects plastic switch parts, especially in older fans with enclosed globes. Heat and dust together quietly shorten switch lifespan.
Heavy-handed pulling creates another common issue. Some people yank the chain hard after the light hesitates once or twice, and that extra force can break the internal mechanism completely. Gentle pulls help the switch last longer, especially on older fans where plastic parts become brittle. Small habits make a noticeable difference in ceiling fan maintenance.
Humidity can also play a role. Bathrooms, kitchens, and enclosed patios expose fan switches to moisture that slowly affects metal contacts. In rooms with cooking steam or poor airflow, grime builds faster inside the fixture. Extra ventilation from a ceiling exhaust fan for kitchen setups can help reduce lingering moisture that affects nearby fixtures over time.
Tools That Make The Repair Easier
A basic screwdriver handles most of the work, but a few extra tools make the repair far smoother. Needle-nose pliers help grip small wires inside cramped housings without damaging insulation. A non-contact voltage tester adds an extra layer of electrical safety before touching anything inside the fan. Those simple tools remove a lot of uncertainty from the process.
A flashlight becomes surprisingly useful once the light kit comes apart. Ceiling fan housings often hide wires deep inside narrow compartments where shadows make colors difficult to see. Good lighting reduces mistakes during reconnection. That’s especially helpful when several black wires sit close together inside the fixture.
Wire labels or masking tape deserve more credit than they get. Labeling wires takes less than a minute but prevents confusion once the old switch comes out. People often assume they’ll remember wire placement, then freeze halfway through the repair after disconnecting everything. A few quick labels protect the wiring layout from unnecessary guessing.
Keep a small container nearby for screws and decorative caps. Ceiling fan hardware loves rolling under furniture at the worst possible moment. Losing one tiny mounting screw can delay the whole repair. Staying organized keeps the process calm instead of chaotic.
How To Test The Switch Before Replacement
Testing the switch before replacing it can save time and money. Sometimes the real problem is a dead bulb, loose socket tab, or disconnected wire hidden inside the housing. Start with the easy stuff first. Swapping in a known working bulb takes seconds and rules out the most obvious issue.
Listen closely to the switch while pulling the chain. A healthy switch usually makes a distinct click every time it changes position. If the chain moves silently or feels mushy, the internal contacts may have failed. That missing click often confirms pull chain switch failure.
Inspect the switch body for scorch marks or melted plastic. Burned spots can signal overheating from loose wire connections or worn contacts. Those signs mean replacement should happen sooner rather than later. Ignoring overheated electrical parts tends to create larger headaches down the road.
Some homeowners test continuity with a multimeter, though that step isn’t mandatory for every repair. The meter checks whether the switch completes the electrical circuit properly. If continuity fails while toggling the switch, replacement becomes the safest next move. Even simple testing helps narrow down electrical problems quickly.
Handling Tight Ceiling Fan Housings
Compact fan housings can test your patience fast. Wires, sockets, switch bodies, and mounting brackets all compete for space inside a surprisingly tiny compartment. Pulling wires too aggressively creates unnecessary strain on old insulation. Slow movements protect delicate fan wiring from cracking or loosening.
Some older ceiling fans leave barely enough room for fingers, let alone pliers. Rotating the housing slightly or removing extra bulbs may create better access. Working carefully matters more than brute force. A rushed repair inside a cramped housing often leads to pinched wires or loose connectors.
Wire placement matters after the new switch goes in. Crowded wires pressing against the switch body can make the chain feel stiff or uneven. Neatly folded wires allow smoother chain movement and reduce pressure inside the housing. That small detail improves both switch operation and long-term reliability.
Short ceiling fans in compact spaces can make access awkward too. In smaller bedrooms or apartments, a pedestal fan may temporarily improve airflow while the ceiling fan stays disconnected during repairs. Compare airflow setups like 18 inch pedestal fan options if cooling becomes uncomfortable during longer maintenance projects.
Signs The Light Kit Has Bigger Problems
A new switch won’t solve every lighting issue. Flickering bulbs after replacement may point toward loose sockets, failing wire connectors, or damaged internal wiring. A buzzing sound inside the light kit can also hint at poor electrical contact. Those warning signs deserve attention before the fixture gets regular use again.
Burned wire insulation is another red flag. Darkened or brittle insulation often means excess heat built up inside the fixture at some point. Heat usually comes from loose connections or overloaded sockets. Replacing damaged wiring becomes important for safe fan operation.
Socket tabs can flatten over time and lose contact with the bulb base. The bulb may flicker even with a brand-new switch installed. Gently lifting the metal tab after shutting off power sometimes restores better contact. Tiny adjustments can solve surprisingly stubborn lighting issues.
Light kits with repeated failures may simply be aging out. Plastic connectors weaken, wire coatings dry out, and internal parts lose reliability after years of heat exposure. At some stage, replacing the light kit or fan becomes more practical than repeated repairs. Still, a properly installed switch often restores stable light control for many more years.
Keeping The New Pull Switch Working Longer
Gentle handling helps more than people think. Pull the chain straight downward instead of jerking it sideways. Sideways pressure stresses the internal mechanism and can crack the switch housing over time. Smooth movement keeps the chain mechanism operating more consistently.
Regular cleaning also helps extend switch life. Dust buildup around the light kit traps heat and moisture inside the fixture. A soft cloth and occasional vacuum attachment keep debris from collecting around moving parts. Cleaner fixtures generally experience fewer annoying electrical quirks.
Pay attention to bulb wattage too. Overpowered bulbs create extra heat inside enclosed light kits, especially older designs with limited ventilation. Heat affects plastic switch parts faster than many homeowners realize. Matching bulb wattage recommendations protects both the socket and the light pull switch.
Seasonal humidity changes can also affect fan performance. Sticky air sometimes causes chains to feel sluggish or uneven during summer months. Running ventilation fans regularly and keeping airflow steady around the room helps reduce moisture buildup. Small maintenance habits quietly stretch the lifespan of electrical fixtures.
Repair Versus Full Fan Replacement
A pull switch replacement makes sense if the fan motor still runs quietly and the housing feels stable. Spending a few dollars on a switch beats replacing an entire fixture that otherwise works fine. Most repairs take under an hour once the tools are ready. That balance of effort and payoff makes switch replacement worth trying first.
Older fans with wobbling blades, loud humming, or repeated electrical issues may deserve closer inspection. Fixing one part only to face another failure a month later gets frustrating quickly. In some cases, replacing the entire fan provides better long-term reliability. Age and condition matter more than sentiment here.
Ceiling fan style can influence the decision too. Some outdated fixtures use inefficient lighting, bulky shades, or awkward pull chain placements that never felt convenient in the first place. Upgrading the fixture may improve airflow, lighting quality, and ease of use all at once. A repair solves one problem, while a replacement can improve overall comfort.
Budget plays a role as well. A simple switch repair stays inexpensive compared to replacing blades, brackets, mounting hardware, and electrical boxes. For many households, restoring the existing fan feels practical and less disruptive. A careful repair often brings the fixture back to reliable daily use without turning the project into a full room renovation.


Best Small Flush Mount Ceiling Fans 2026 Ultimate Picks

Best Smart Ceiling Fan India 2026 For Effortless Comfort

Best Smart Ceiling Fans with Lights for 2026: Top Picks

Best Smart Home Non Ceiling Fans 2026 For Ultimate Comfort

Best Outdoor Misting Ceiling Fan 2026 For Ultimate Comfort

Best Ceiling Fans With Lights For Vaulted Ceilings 2026 Top Picks

Best Outdoor Ceiling Fans For Porch 2026 With Style And Breeze

Best WiFi Enabled Ceiling Fan 2026 For Effortless Comfort





