
How to Replace a Ceiling Fan Remote Control Right
How to replace a ceiling fan remote control sounds simple until the fan suddenly ignores every button press, the light flickers randomly, or the replacement remote refuses to sync. That’s usually where frustration kicks in. Plenty of people end up buying the wrong receiver kit, mixing incompatible frequencies, or standing on a ladder longer than they expected because the instructions barely explain anything clearly. A ceiling fan should make life easier, not turn into a weekend headache.
Remote control problems often creep up slowly. One day the fan reacts with a delay, then suddenly only the light works, or the speed settings stop responding altogether. Battery swaps don’t fix it, resetting the dip switches feels like guesswork, and meanwhile the room feels stuffy and uncomfortable. Replacing a ceiling fan remote control becomes less about convenience and more about restoring everyday comfort without tearing apart the whole fixture.
Compatibility creates another major pain point people rarely expect. Ceiling fan brands use different receiver frequencies, wiring layouts, and pairing systems, so grabbing the cheapest remote online can backfire fast. Some universal kits work beautifully, while others struggle with older fans or integrated LED systems. That’s why understanding receiver matching, wiring colors, and signal syncing matters far more than flashy packaging claims.
Ceiling height also changes the experience. Fans mounted on vaulted ceilings or stairwells make manual pull chains nearly impossible to reach comfortably, which turns a broken remote into a daily annoyance. Nobody wants to drag out a step ladder every time the room gets warm. A properly installed replacement remote restores easy airflow control and keeps the fan practical again instead of becoming decorative dead weight.
Noise issues can also point toward remote or receiver trouble. Clicking sounds inside the fan housing, delayed speed changes, or random light dimming sometimes trace back to failing receiver components instead of the motor itself. Replacing the remote system early can prevent unnecessary spending on parts that aren’t actually broken. Small electrical quirks tend to snowball if they’re ignored for too long.
Some replacement kits look nearly identical but perform very differently once installed. Cheap remotes may lose signal range quickly or struggle through walls and larger rooms. Better-quality kits usually offer steadier communication between the transmitter and receiver, especially in homes packed with Wi-Fi devices and smart electronics. Stronger signal stability helps eliminate the annoying lag that makes fans feel unreliable.
Safety matters too, especially during wiring. Shutting off power at the breaker, labeling wires before disconnecting anything, and checking canopy space for the new receiver can save a lot of grief later. Plenty of fans have cramped housings that barely fit modern receiver units, so size compatibility becomes a hidden issue many people overlook at first. A little planning upfront prevents the classic “Why won’t this fit?” moment halfway through installation.
How to replace a ceiling fan remote control also involves knowing when replacement makes more sense than repair. Sticky buttons, cracked battery terminals, or outdated remotes with inconsistent frequencies often waste more time than they’re worth. Swapping the full remote-and-receiver kit usually delivers smoother operation, quieter response, and fewer random glitches. Once everything pairs correctly, the fan feels dependable again instead of acting like it has a mind of its own.
How To Replace A Ceiling Fan Remote Control
A fan that ignores the remote can turn a comfortable room into a small daily nuisance. The light sticks on, the blades won’t slow down, or the remote only responds after a few dramatic button presses. That’s the moment how to replace a ceiling fan remote control stops sounding like a tiny repair and starts feeling like the only reasonable way to get the room back under control.
Remote Trouble Signs
Remote failure usually shows up in annoying little ways before it quits completely. The fan may respond late, skip speeds, or refuse to dim the light even after fresh batteries. A weak button pad can also make normal use feel like a guessing game. Before blaming the whole fan, check whether the handheld transmitter is actually sending a clean signal.
Battery corrosion causes more headaches than people expect. A little white crust around the contacts can block power and make the remote seem dead. Clean contacts carefully, replace the batteries, and test the remote near the fan before opening the canopy. If nothing changes, the problem may sit inside the receiver module above the fan.
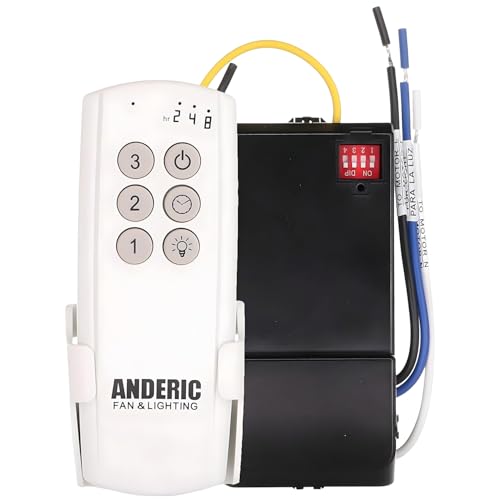
The receiver is the small control box tucked inside the ceiling fan canopy. It listens for the remote signal and sends power to the fan motor or light kit. A failing receiver can cause random flickering, stuck speeds, clicking sounds, or complete silence. That’s why replacing only the handheld remote may not solve the issue.
Brand-specific remotes can be picky, especially on older fans. Some models use dip switches, while newer ones pair through a learn button. A mismatched remote may look right but still refuse to communicate. A full remote and receiver kit often avoids that mess because both pieces are designed to talk to each other.
Safety First
Breaker power needs to be off before the fan canopy comes down. A wall switch alone isn’t enough because wiring can still be live inside the ceiling box. Use a voltage tester before touching any wires. That small step keeps a simple repair from becoming a scary lesson.
Ceiling fans are heavier and more awkward than they look from the floor. Keep one hand on the canopy or fan body while loosening screws, especially on older brackets. A stable ladder matters too, because reaching over your head while handling wires gets tiring fast. Good setup makes the whole job feel calmer.
Wire labels save time. Before disconnecting the old receiver, take a clear photo of the wiring and mark the line wire, neutral wire, fan motor wire, and light wire. Wire colors are usually consistent, but older homes can be full of surprises. A quick photo is cheap insurance.
Some fan canopies are cramped, and that can complicate the replacement. The new receiver should sit neatly inside without pinching wires or pressing hard against the mounting bracket. For rooms where fan size or ceiling clearance already feels tight, compare airflow plans with best size ceiling fan before replacing parts blindly. A remote fix helps, but the fan still needs to suit the space.
Pick The Right Kit
Compatibility decides whether the repair feels smooth or turns into a return-label situation. Match the fan’s voltage, light type, speed control style, and receiver size before buying a replacement. Universal kits can work well, but they aren’t magic. Integrated LED fans and DC motor fans may need specific controls.
Dip switch systems are old-school but practical. The remote and receiver must share the same tiny switch pattern, or the fan won’t respond. Newer remotes may use a pairing process where you restore power and press a learn button within a short window. Either way, signal matching is the heart of the repair.
Light dimming deserves extra attention. Some remotes support dimmable bulbs, while others only turn lights on and off. Using a dimming remote with non-dimmable bulbs can cause buzzing or flicker. Match the remote features to the actual light kit, not just the fan brand.
Low-profile ceiling fans can be a little fussier because the canopy space is smaller. A bulky receiver may not fit cleanly, even if the wiring looks correct. To keep ceiling clearance practical in tight rooms, compare layout options with best hugger ceiling fans before deciding whether repair or replacement makes more sense. A neat fit matters just as much as the remote buttons.
Remove The Old Receiver
Canopy removal starts with the screws near the ceiling bracket. Loosen them slowly and support the canopy as it drops. Inside, you’ll usually see wire connectors, the old receiver, and the mounting hardware. Don’t rush here, because tangled wires can hide the exact path of the old setup.
Most receivers have an input side and an output side. The input side connects to house power, while the output side sends controlled power to the fan and light. Look for labels such as AC in, motor, light, neutral, or ground. Those labels are more reliable than memory after the wires are loose.
Remove wire nuts one at a time. Cap any loose house wire temporarily if you need a pause. Keep the old receiver nearby until the new one is fully installed, because comparing labels can prevent silly mistakes. Patient wiring beats fixing a crossed connection later.
Old receivers sometimes show burn marks, melted plastic, or a faint electrical smell. That’s a warning sign, not just normal wear. If the ceiling box looks damaged or wires feel brittle, stop and bring in a licensed electrician. A remote replacement should never cover up a deeper electrical safety issue.
Install And Pair The New Remote
New receiver wiring should follow the included diagram exactly. Connect house hot to receiver input hot, house neutral to receiver neutral, then connect the receiver output wires to the fan motor and light kit. Ground wires should stay connected to the bracket or approved grounding point. Tight wire nuts matter because loose connections cause flickering and heat.
Push the receiver into the canopy gently. Wires should fold cleanly without sharp bends or crushed insulation. If the canopy won’t close without force, pull everything back down and reorganize the wire bundles. Forced installation can loosen connections after the fan vibrates for a while.
Pairing the remote usually happens right after power comes back on. Some kits require holding a learn button, while others sync automatically after the batteries go in. Test every function: fan speeds, light control, dimming, and reverse mode if included. A quick full test catches problems before the ladder gets put away.
Odd signal behavior can come from interference or duplicate dip switch codes. Change the code if another nearby fan responds to the same remote. Thick walls, metal housings, and weak batteries can also reduce range. For a separate comfort routine outside fan repair, ease sinus pressure at home with best red light therapy instead of trying to connect unrelated gadgets to the fan setup.
Best Way To Replace A Ceiling Fan Remote Receiver
A replacement remote can feel like a lifesaver for about five minutes until the fan starts acting weird again. The light dims on its own, the fan changes speed randomly, or the receiver clicks nonstop inside the canopy. That’s usually the point where people realize the handheld remote wasn’t the real issue. A worn-out ceiling fan receiver often creates the bigger problem behind inconsistent performance.
Receiver Problems People Miss
Receiver failure can mimic several different electrical problems at once. Some fans lose only the light function while the blades still spin normally. Others develop delayed speed changes that make the fan feel sluggish and unreliable. Those symptoms often point toward heat damage or aging internal relays inside the receiver box.
Ceiling heat quietly shortens receiver lifespan over time. Fans mounted near poorly ventilated ceilings trap warm air around the electronic components, especially during summer months. Small receivers packed tightly into shallow canopies struggle even more because airflow stays limited. Heat buildup eventually weakens the signal processing and causes erratic behavior.
Buzzing noises deserve attention too. A faint hum during dimming or speed changes can signal that the receiver struggles to regulate voltage properly. Some older remotes simply weren’t built for newer LED bulbs or modern electrical loads. Replacing the receiver with an updated compatible unit usually smooths out those strange little quirks.
Looks matter more than people admit, especially in living rooms or bedrooms where the fan becomes part of the décor. Before replacing the entire fixture out of frustration, compare room aesthetics with best looking indoor ceiling fan ideas to see whether a cleaner remote upgrade keeps the space looking balanced without a full remodel.
Common Wiring Mistakes
Crossed wiring causes a surprising number of installation headaches. Fan wires and light wires sometimes look nearly identical, especially in older fans where colors faded over time. Connecting the wrong output wire can leave the light permanently on or disable fan speeds entirely. Slow down and match labels carefully instead of trusting memory.
Loose wire nuts create another hidden problem. The fan might appear to work normally at first, then suddenly flicker or shut off after a few hours of vibration. Ceiling fans constantly move, even if the wobble looks minor from below. Secure connections protect the receiver from unstable electrical flow.
Ground wires are easy to ignore because the fan may still operate without them connected properly. That shortcut can create electrical safety issues later, especially during power surges or storms. Keep the ground connection attached to the mounting bracket or designated grounding wire. Small details like that help the entire system stay stable long-term.
Some universal receivers include extra wires that aren’t needed for every installation. Extra dimming leads or secondary light controls can confuse first-time installers fast. Cap unused wires exactly as the instructions recommend rather than stuffing everything together randomly. Cleaner wiring usually means fewer troubleshooting sessions later.
Fix Signal And Pairing Issues
Signal interference has become more common inside busy homes packed with wireless devices. Wi-Fi routers, smart home hubs, garage remotes, and even neighboring ceiling fans can interfere with older fan remotes. If the fan responds inconsistently from different spots in the room, interference may be the real culprit instead of bad hardware.
Dip switch remotes need identical settings on both the transmitter and receiver. One tiny switch out of place breaks communication completely. Some homeowners accidentally bump the switches while replacing batteries and spend hours chasing fake wiring problems afterward. Double-checking those switch patterns saves a ridiculous amount of frustration.
Learn-button systems simplify installation but still have quirks. Many receivers require pairing within thirty seconds after restoring power. Miss that timing window and the remote may never sync properly until the breaker gets reset again. Reading the pairing instructions slowly once before climbing the ladder helps avoid unnecessary trips up and down.

Weak batteries can also mimic pairing failures. Cheap batteries often struggle with signal consistency, especially through metal fan housings or larger rooms. Fresh name-brand batteries usually improve remote range and button response immediately. It sounds basic, but battery quality genuinely matters more than most people expect.
Older Fans Need Extra Attention
Older ceiling fans rarely match modern remote kits perfectly without a little patience. Some fans were originally designed for pull chains only and later adapted with aftermarket receivers. Tight canopy space, aging insulation, and outdated wiring layouts can complicate the upgrade. None of that makes the repair impossible, but it does require realistic expectations.
Pull chains should still work after the receiver replacement unless the kit specifically disables them. If both the remote and pull chain stop responding, recheck the receiver output wiring. That problem usually points toward a connection issue rather than a defective fan motor. Simple wiring mistakes cause more failures than defective new parts.
Motor hum deserves careful listening too. A low humming sound paired with weak blade movement may indicate a failing capacitor rather than a remote problem. Remote replacement won’t fix worn motor components. The fan may still need deeper electrical repair even after the receiver works properly again.
Lighting upgrades can complicate older fan systems as well. LED conversions draw power differently than older incandescent bulbs, and certain receivers struggle with those changes. Similar electrical quirks appear in automotive lighting too, especially with aftermarket upgrades like best led tail light bulbs that require proper compatibility instead of simple plug-and-play assumptions.
Make The Remote Last Longer
Remote maintenance doesn’t sound exciting, but it prevents plenty of repeat problems. Keep the remote away from humid bathrooms, direct sunlight, and kitchen grease buildup. Moisture slowly damages battery contacts and weakens button responsiveness. A simple wipe-down every few months keeps grime from building inside the controls.
Battery leakage ruins more remotes than physical drops do. Remove batteries if the remote won’t be used for an extended period, especially in guest rooms or seasonal spaces. Corroded contacts sometimes clean up, but badly damaged terminals often destroy the remote permanently. Fresh batteries installed at the right time save money later.
Wall cradles help more than people think. Tossing the remote onto couches or countertops increases the chances of cracked battery doors and worn buttons. Keeping the remote mounted in one consistent place also reduces the frantic “Where’d the fan remote go?” search during hot evenings. Small habits protect daily convenience.
Fans with stable receivers, clean wiring, and healthy batteries usually stay reliable for years without much attention. Once the remote responds instantly, the light behaves normally, and the airflow finally feels predictable again, the room stops feeling irritating every single day. That steady comfort tends to matter far more than people realize before the repair gets finished.


Best Small Flush Mount Ceiling Fans 2026 Ultimate Picks

Best Smart Ceiling Fan India 2026 For Effortless Comfort

Best Smart Ceiling Fans with Lights for 2026: Top Picks

Best Smart Home Non Ceiling Fans 2026 For Ultimate Comfort

Best Outdoor Misting Ceiling Fan 2026 For Ultimate Comfort

Best Ceiling Fans With Lights For Vaulted Ceilings 2026 Top Picks

Best Outdoor Ceiling Fans For Porch 2026 With Style And Breeze

Best WiFi Enabled Ceiling Fan 2026 For Effortless Comfort





