How to Replace a Rear Blinker Bulb

A turn signal suddenly clicking twice as fast as normal usually points to a dead rear bulb. Fixing it simply takes twisting the bulb socket free from behind the light assembly, pulling the old glass out, and pressing a fresh bulb into place. Most drivers can finish this repair by the curb in under ten minutes without paying a mechanic.
The exact process depends on how the vehicle is built. Some cars let you reach the plastic socket through a carpet flap inside the trunk, while others require loosening two screws to slide the entire rear light housing outward. The bulb base also makes a difference, since some pull straight out and others need a gentle twist to pop free. Looking at your setup first keeps the job simple and prevents broken plastic tabs.
Check your trunk interior before taking off exterior screws
Before you grab any tools, you need to find out how your vehicle gives you access to the rear light housing. Car makers use two common designs for tail lights. One design lets you reach the bulbs from inside your cargo area, while the other design requires you to remove the entire exterior light housing from the car body.
Start by opening your trunk, hatch, or tailgate. Walk up to the side of the car with the dead turn signal and look directly behind the tail light assembly (the entire plastic rear light unit). Look closely at the interior carpet or plastic trim covering the inner body panel. If you see a small rectangular access door, a flap in the carpet with a pull-tab, or large plastic wing nuts, your car uses an interior access setup.
With an interior access setup, you do not need to take the light fixture off the car. You simply flip open the carpet flap or pry off the plastic inspection door using your fingers or a flat plastic trim tool. Once that cover is open, you can see the back of the light assembly, the wiring, and the bulb sockets right in front of you.
If the interior sheet metal and trunk carpet are completely solid with no access panel, your vehicle uses an exterior-mounted light fixture. Stand in the open trunk opening and look at the inner edge of the plastic light lens. You will usually find two or three visible fasteners. These are typically Phillips-head screws, small hex bolts (often 8 millimeter or 10 millimeter), or plastic push-pins securing the light housing to the car frame.
When removing an exterior housing, unthread the fasteners and set them safely in your trunk. Grasp the edges of the plastic housing with both hands and pull it straight back toward you. Never pry sideways or yank the housing at an angle. Most tail light units use smooth plastic alignment pins that press into metal grommets on the car quarter panel. Pulling straight back releases these pins smoothly without snapping the plastic tabs or scratching your car paint.
Follow these straightforward steps to swap out the dead bulb
Once you have access to the rear of the light housing, swapping the bulb takes only a few minutes. Take your time, handle the plastic parts gently, and follow these steps in order.
- Shut off the car and switch off all lights. Turn the vehicle ignition completely off and remove the key from the switch. Make sure your headlight switch and emergency hazard flashers are switched off. This cuts power to the rear wiring and keeps you safe from minor electrical shorts while you work.
- Open your access path. Open your interior trunk access panel or unbolt the exterior light housing and slide it free from the body pins as described above. Support the exterior housing with one hand so it does not dangle by its thin electrical wires.
- Identify the turn signal socket. Look at the back of the housing. You will see several plastic twist-in plugs with wires running into them. The socket is the plastic twist-in plug that holds the bulb. Look through the front lens to confirm which section has the amber reflector or houses the blinker. The turn signal socket sits directly behind that specific lens section.
- Twist the socket to release it. Grip the base of the plastic socket firmly between your thumb and index finger. Twist the socket roughly one-quarter turn counterclockwise. You will feel a distinct click or release. Once unlocked, pull the socket straight backward out of the round opening in the tail light assembly.
- Remove the burnt bulb from the socket. Check how the bulb sits in the socket before applying force. Most modern cars use a wedge base, which is a flat bulb bottom that slides straight in. If your bulb has a flat plastic or glass bottom, grip the glass firmly and pull it straight out of the socket. If the bulb has a round metal base with two small side pins (a bayonet base), press the bulb gently downward into the socket, twist it counterclockwise a quarter turn, and let the spring push it up so you can lift it out.
- Install the fresh replacement bulb. Hold the new bulb by its base or use a clean tissue or clean cotton gloves. Keeping grease and hand oils off the glass helps the bulb handle operating heat evenly, similar to the care needed when learning how to change a halogen light bulb safely at home. Push the new bulb straight and firm into the socket until it clicks or seats fully against the bottom contacts. If installing a bayonet bulb, align the side pins with the socket slots, push down lightly, and twist clockwise until it locks.
- Lock the socket back into the housing. Guide the socket and new bulb back into the circular hole in the light housing. Notice that the plastic tabs around the rim of the socket have different widths so they only enter the hole one way. Turn the socket until the tabs slip into their matching notches, press inward, and twist one-quarter turn clockwise until the socket stops and snaps securely into place.
- Reassemble the trim or light housing. If you removed an exterior light housing, line up the plastic alignment pins with the holes in the vehicle body. Push the housing firmly straight forward until it clicks flush against the body. Reinstall the mounting screws or bolts snugly, but do not overtighten them, as excessive torque can crack the plastic mounting tabs. If you worked from inside the trunk, snap the plastic door or carpet flap back into position.
Match the numbers printed on the old base before buying a spare
Buying the correct replacement bulb prevents loose electrical connections, dashboard warning lights, and damaged sockets. Automotive miniature bulbs can look almost identical on a shelf, yet have subtle differences in their bases and internal wiring. Before heading to the auto parts store, bring your old bulb with you or verify these points on the bulb you just removed.
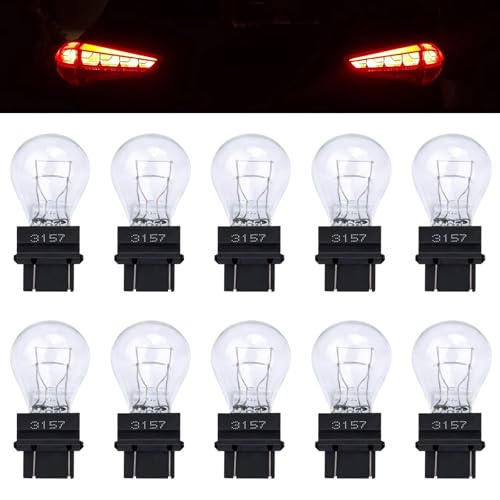
- Read the stamped part number on the bulb: Look closely at the glass globe or the flat edge of the base. Manufacturers stamp the exact industry trade number directly into the glass or metal collar. Common rear turn signal bulb numbers include 3157, 7440, 1156, and 3057. Match this number character for character.
- Distinguish single filament from dual filament bulbs: Peer through the clear or amber glass at the tiny wire coils inside. A single-filament bulb has one wire coil and functions only as a turn signal. A dual-filament bulb has two separate wire coils inside. Dual-filament bulbs handle two lighting duties at once, glowing dim for taillights and flashing bright for turn signals. In household lighting, you see separate circuits handle different brightness levels when learning what is a three way light bulb and how it works, and a dual-filament car bulb uses the same idea with two internal wire circuits.
- Check the glass color against your light lens: If your vehicle has a red or amber outer tail light lens, it uses a clear glass bulb because the colored plastic provides the amber or red light. If your vehicle has a clear or white rear lens over the blinker area, traffic laws require you to install an amber-colored glass bulb. Amber bulbs usually include an "A" or "NA" (natural amber) suffix on their trade number, such as 3157A or 3157NA.
- Inspect the physical base shape: Look at the bottom connection. Flat, all-glass wedge bases slide into straight clips. Round metal bases use locking side pins. On metal bases, confirm whether the two side pins are directly opposite each other or offset at different heights, as forcing an incorrect pin design into a socket will break the socket contacts.
Inspect the plastic socket for heat damage and corrosion
Turn signal and brake lights create significant heat when used in heavy traffic or left on at long stoplights. Over several years, that heat and exposure to outside moisture can damage the plastic socket that holds the bulb. Whenever you have the socket pulled out of the tail light assembly, inspect it closely before popping in a fresh bulb.
- Look for charred or melted plastic: Examine the plastic ring where the bulb slides in. If the plastic looks warped, bubbled, or black from heat, the socket can no longer hold the bulb firmly. A loose bulb vibrates while driving, causing intermittent flashing or short bulb life.
- Check the metal contact pins for discoloration: Look inside the opening where the bulb base touches the metal connectors. Clean contacts shine like silver or bright copper. If the pins look dark gray, crusty, or charred black, electrical resistance is building up heat and preventing full power from reaching the bulb.
- Scan for white or green powdery residue: Water entering past an old weather seal causes corrosion. Green or white chalky powder on the electrical contacts indicates moisture buildup. This corrosion breaks the electrical connection, causing the turn signal to fail even with a brand new bulb installed.
- Check the rubber weather seal: Inspect the silicone or rubber O-ring fitted around the neck of the socket. The seal should feel flexible, soft, and free of tears. If this gasket is flattened, cracked, or missing, water and road dirt will splash straight into the light housing during heavy rain or car washes.
If your socket shows melted plastic or heavy corrosion, replacing the bulb alone will not solve your problem. You can buy replacement pre-wired wire sockets that snap right into your factory housing and plug directly into your car wiring harness, completely restoring reliable electrical contact.
Confirm the flash speed from the driver seat to verify your fix
Before putting your tools away or packing up your trunk, you must verify that the new bulb operates correctly. Turn signal systems on modern vehicles use electrical resistance to monitor bulb health. When a turn signal bulb burns out, the circuit loses resistance, which makes the flasher unit trigger at double speed. Drivers call this rapid blinking "hyper-flash."
Start your verification by turning your vehicle ignition to the "on" or "accessory" position. Push the turn signal lever in the direction of the bulb you just replaced. Listen to the clicking rhythm and watch the green arrow indicator on your dashboard instrument cluster. The arrow should blink at a calm, steady rhythm of roughly one to two clicks per second. If the green arrow still blinks rapidly at double speed, the vehicle computer still senses an open circuit.
If your indicator continues to hyper-flash or the bulb fails to illuminate at all, turn off the ignition and recheck the socket. Pull the socket out and verify that the bulb is pressed completely down into the metal spring clips. With certain wedge-style bulbs, the tiny wire leads on the base must align precisely with the contacts inside the socket. Gently pulling the bulb out, checking that the thin wire leads on the glass base are straight, and firmly reseating it often solves the issue.
Finish your check by switching on the emergency hazard flasher switch on your dashboard. Walk to the back of the car and stand several feet away from the rear bumper. Look directly at both the left and right rear lights. Confirm that both blinkers shine with identical brightness and flash in perfect synchronization. Once both sides match, your repair is complete and your vehicle is safe and road-legal.
Choose the right replacement miniature bulbs and wiring plugs
Fixing a dead turn signal requires simple replacement parts that match your vehicle specifications. Automotive miniature bulbs come in standard industry sizes designed for specific voltage and base configurations. When shopping for replacement bulbs, always match the trade number from your owner manual or your old bulb base, and check whether your vehicle lens requires amber or clear glass. Buying a two-pack or multi-pack is smart practice, as keeping an extra bulb in your glove box ensures you never get stranded with an illegal signal.
If your socket inspection revealed melted plastic, blackened pins, or cracked gaskets, pick up a replacement wiring socket designed for your vehicle make and model. Quality replacement sockets feature durable, high-temperature composite housings and flexible silicone O-rings that stop moisture leaks. Replacing a damaged socket alongside your new bulb guarantees solid electrical contact, eliminates hyper-flashing, and protects your rear lighting for years to come.

- LFR Score10.0
LFR Score is a ranking system developed by lightfansreviews.com. LFR Score has no relationship or impact from any manufacturers or sales agent websites. Learn more
- BrandSixity Auto

- LFR Score9.4
LFR Score is a ranking system developed by lightfansreviews.com. LFR Score has no relationship or impact from any manufacturers or sales agent websites. Learn more
- BrandPiumeif

- LFR Score9.0
LFR Score is a ranking system developed by lightfansreviews.com. LFR Score has no relationship or impact from any manufacturers or sales agent websites. Learn more
- BrandBawkars
- LFR Score8.8
LFR Score is a ranking system developed by lightfansreviews.com. LFR Score has no relationship or impact from any manufacturers or sales agent websites. Learn more
- Brandecocstm

- LFR Score8.6
LFR Score is a ranking system developed by lightfansreviews.com. LFR Score has no relationship or impact from any manufacturers or sales agent websites. Learn more
- BrandX AUTOHAUX

- LFR Score8.6
LFR Score is a ranking system developed by lightfansreviews.com. LFR Score has no relationship or impact from any manufacturers or sales agent websites. Learn more
- BrandiJDMTOY

- LFR Score8.4
LFR Score is a ranking system developed by lightfansreviews.com. LFR Score has no relationship or impact from any manufacturers or sales agent websites. Learn more
- BrandMOTOKU
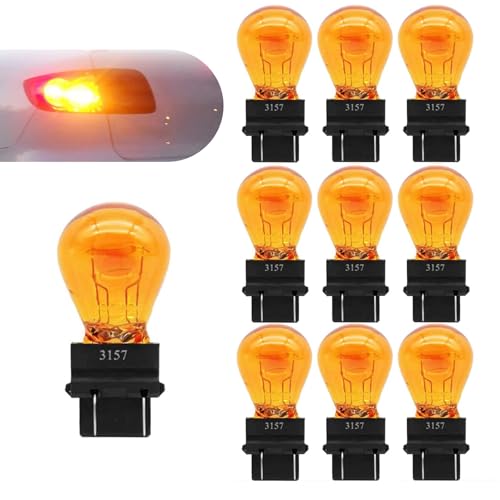
- LFR Score7.4
LFR Score is a ranking system developed by lightfansreviews.com. LFR Score has no relationship or impact from any manufacturers or sales agent websites. Learn more
- BrandGseigvee

- LFR Score7.0
LFR Score is a ranking system developed by lightfansreviews.com. LFR Score has no relationship or impact from any manufacturers or sales agent websites. Learn more
- BrandMerdege
Last update on 2026-10-02 / Affiliate links / Images, Product Titles, and Product Highlights from Amazon Product Advertising API
FAQs
Why is my blinker still flashing fast after installing a new bulb?
Rapid flashing usually means the electrical circuit has lower resistance than the vehicle computer expects. Verify that the bulb is seated completely in the socket so the contact pins make solid contact. Also confirm that you installed the exact trade number bulb specified for your car, because a single-filament bulb placed in a dual-filament socket will cause continuous hyper-flashing.
Can I touch a new automotive bulb with bare fingers?
Miniature incandescent automotive bulbs do not run as hot as high-wattage headlight bulbs, but you should still avoid touching the glass directly. Natural oils and sweat from your fingers leave residue on the surface that creates uneven hot spots when the light operates. Using a clean paper towel, clean cloth, or disposable gloves keeps the glass clean and helps the bulb last its full rated lifespan.
Do I need special tools to change a rear blinker bulb?
Most vehicles require only basic hand tools or no tools at all. If your car has an interior trunk access panel, you can complete the entire job by hand using simple thumb-latches. If your car requires removing the exterior housing, you will usually need only a standard Phillips-head screwdriver, a small flat plastic trim tool, or an 8 millimeter or 10 millimeter socket wrench.
Should I replace both rear turn signal bulbs at the same time?
Replacing both rear bulbs at the same time is good practice, although not strictly required. Both original bulbs were installed at the factory and have logged identical operating hours under the same driving conditions. When one rear bulb reaches the end of its lifespan, the bulb on the opposite side is usually not far behind, so changing both saves you from repeating the job a few weeks later.

Best Bulb For Exposed Light 2026 That Shines Bright

Best Industrial Light Bulb Reviews: Top Picks for 2026
Best Outdoor Light Bulb Reviews: Top-Rated Picks for 2026
Best LED Reading Light Bulb Reviews - Top Picks for 2026

Best Vintage Light Bulb 2026 With Style And Glow
Best Yellow Fog Light Bulb 2026 For Clearer Night Drives

Best Z Wave Light Bulb 2026 Top Picks For Smart Control

Best Light Bulb For Vanity Mirror 2026 Brightness Boost