
How to Replace a Switch on a Ceiling Fan Without the Headache
How to replace a switch on a ceiling fan sounds simple until the fan suddenly stops responding, the pull chain snaps halfway through, or the light flickers like it’s haunted. Plenty of people put off the repair because electrical work feels intimidating at first glance. Still, a worn-out switch often causes everyday frustrations that pile up fast, especially during hot nights or busy mornings when airflow matters most. A noisy click, inconsistent fan speed, or a stubborn light kit usually points to one tiny component begging for attention.
Old ceiling fan switches rarely fail all at once. They tend to act up slowly, which makes the problem easy to ignore for weeks. One day the fan only works on high speed, then suddenly the light won’t turn on unless the chain gets tugged just right. That annoying trial-and-error routine wears thin pretty quickly. Replacing the switch helps restore consistent airflow, smoother operation, and a more reliable fan setup without replacing the entire fixture.
Electrical repairs also carry a layer of hesitation because nobody wants sparks flying overhead. That nervous feeling is completely normal. Loose wiring, cramped fan housings, and faded wire colors can make the inside of a ceiling fan look messy and confusing. Still, once the power is safely shut off and the wiring gets organized properly, the process becomes far more manageable than most people expect.
How to replace a switch on a ceiling fan often starts with identifying the exact issue instead of swapping random parts. Pull chain switches, wall switches, and reversing switches can all behave differently when they fail. Some fans lose speed control while others stop responding entirely. Pinpointing the faulty component first saves time, avoids wasted money, and prevents the classic mistake of replacing parts that weren’t broken in the first place.
Fan age matters too. Older models may use outdated wiring layouts or compact switch housings that feel awkward to access. Dust buildup inside the motor housing can also complicate repairs, especially if the fan has been running for years without maintenance. A little patience goes a long way here. Slow, careful handling usually prevents broken wire connectors or stripped screws that turn a quick repair into a drawn-out chore.
Small details make a noticeable difference during installation. Matching wire placement correctly, securing connectors tightly, and choosing the proper replacement switch all help avoid repeat problems later. Nobody enjoys taking the fan apart twice because one wire slipped loose. Reliable connections improve fan performance, reduce electrical interruptions, and help the fixture operate more smoothly over time.
Noise reduction becomes another hidden benefit after replacing a faulty switch. Fans with damaged switches sometimes produce humming sounds, delayed starts, or inconsistent motor behavior that gradually gets worse. Fresh switch components often eliminate those irritating quirks immediately. That smoother operation creates a more comfortable room environment without the constant distraction of clicking, buzzing, or uneven spinning.
How to replace a switch on a ceiling fan also helps avoid unnecessary replacement costs. Plenty of fans still have strong motors and sturdy blades even after the switch wears out. Tossing the entire unit because of one inexpensive part feels like throwing away a good pair of boots over a broken shoelace. Repairing the switch instead keeps the fan running efficiently while extending the life of the fixture already installed overhead.
How To Replace A Switch On A Ceiling Fan
A fan that only works after three angry pulls can make a calm room feel annoying fast. The light may flicker, the chain may feel gritty, or one speed may vanish like it packed a suitcase and left. That is usually the moment how to replace a switch on a ceiling fan stops sounding like a random repair topic and starts sounding like the fix that saves the whole fixture. With the right part, safe power shutdown, and a careful wiring check, this repair becomes far less intimidating than it looks from the floor.
Spot The Switch Problem First
A bad switch often gives little warnings before it quits completely. The fan may skip a speed, the light may need several pulls, or the chain may feel loose inside the housing. Those signs point toward worn internal contacts, not always a bad motor or a ruined light kit. Guessing too quickly can waste money, so the first smart move is to separate a switch issue from a wiring issue.
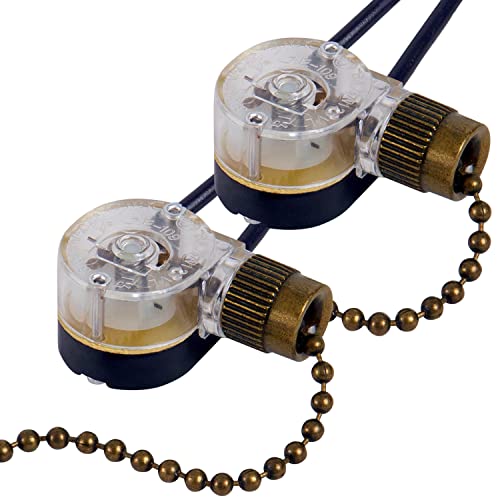
The pull chain switch is the usual troublemaker on many ceiling fans. It sits inside the switch housing and controls either the light kit or fan speed, depending on the fan design. A light switch version is often simpler, while a fan speed switch may have several wire positions. That difference matters because the wrong replacement switch can leave the fan stuck on one speed or not working at all.
Listen closely before taking anything apart. A clean click usually means the chain is still moving the switch mechanism, while a limp chain often means the internal spring or cam has failed. A buzzing sound or delayed start may point to another part, such as a capacitor, but a dead pull chain with no resistance usually screams failed switch. The repair starts with reading these clues instead of tearing into the fan blindly.
Wall controls can muddy the water a little. Some ceiling fans use a wall switch for power and a pull chain for speed or light control. A dead fan may simply have no incoming power, especially if another switch controls the fixture from across the room. Before blaming the fan, test the wall switch, breaker, and bulb so the replacement work stays focused on the actual failure point.
Gather The Right Parts And Tools
The replacement switch should match the old switch in function, wire count, and rating. A two-wire pull chain switch usually controls a light, while a three-wire or four-wire switch often controls fan speeds. The markings on the old switch, such as L, 1, 2, and 3, are not random decorations. They tell you how power moves through the circuit, so keeping those positions straight is absolutely critical.
Basic tools usually cover the job. A screwdriver, wire stripper, voltage tester, small pliers, and wire connectors can handle most ceiling fan switch replacements. A phone camera helps more than people expect, especially before unplugging or cutting any wires. Snapping clear photos gives you a visual map in case wire colors look faded, dusty, or weirdly similar under ceiling light.
Replacement switches are small, but they are not all built the same. Some use push-in wire terminals, while others require wire nuts or screw connections. Cheap switches may feel loose right out of the package, and that is not a great sign for a fan that vibrates every day. A snug chain pull, firm terminals, and a matching electrical rating are practical quality checks worth doing before installation.
Room setup matters too. A wobbly chair is asking for trouble, so use a stable ladder and keep tools within reach. Ceiling work gets awkward fast because your hands are above your head and tiny screws love to disappear. For better room comfort after the repair, Upgrade the surrounding lighting setup with a floor lamp for high ceilings studio if the fan light has never covered the space evenly.

Shut Off Power The Right Way
Power safety is the line nobody should dance around. Turn off the breaker that controls the ceiling fan, not just the wall switch. Wall switches can fail, wiring can be shared, and ceiling boxes sometimes surprise people in the worst way. A non-contact voltage tester helps confirm the wires are dead before fingers get anywhere near the connections.
After the breaker is off, pull the chain and flip the wall switch to confirm nothing responds. The fan blades should stay still, and the light should remain off. That simple check adds another layer of confidence before opening the housing. Electrical repairs reward patience, and this step is where patience beats speed every single time.
The switch housing usually sits below the fan motor, often under the blades. Remove the screws carefully and support the housing as it drops. Wires may be tucked inside tightly, so yanking the cover can pull connections loose or damage insulation. Slow handling protects the wire layout and makes the repair easier to reverse if something looks wrong.
Dust inside the housing is normal, especially on older fans. Wipe away loose debris gently, but do not soak anything or spray cleaner into the wiring area. Dry cleaning keeps moisture away from connectors and switch terminals. A clean workspace makes wire labels, terminal numbers, and connection points much easier to see.
Map The Wires Before Removal
Wire mapping saves more repairs than any fancy tool. Before removing the old switch, take photos from more than one angle. Focus on where each wire enters the switch, not just the general color pattern. Fan wiring can vary by brand, so copying the old layout is often safer than trusting a generic diagram.
Labels help if the wires look similar. A tiny piece of tape marked L, 1, 2, or 3 can prevent a headache later. Some older fans use colors that no longer match modern replacement diagrams exactly. The switch terminal markings become the real guide because terminal position controls the circuit behavior.
Light switches are usually easier to map because they often involve fewer wires. Fan speed switches need more care because each wire may connect to a different speed winding or capacitor path. Mixing those wires can make the fan run backward, skip speeds, or fail to start. That is why wire order matters more than wire color alone.
Household setups can overlap with other comfort upgrades. A small ceiling fan in a tight room may still be useful after repair, but an undersized fan can struggle in larger spaces. To compare size and lighting needs before replacing the whole fixture, Explore a 36 ceiling fan with light for rooms where compact airflow and built-in lighting make more sense than a bulky unit.
Remove The Old Switch Cleanly
The old switch may be held by a small nut around the pull chain. Unscrew that nut from the outside of the housing, then ease the switch inward. Keep one hand under the switch so it does not tug on wires as it comes free. This is a small step, but it protects older brittle wires from unnecessary stress.
Some switches release wires through tiny slots or push tabs. Others require cutting the wires close to the old switch, then stripping fresh ends for the new one. Cutting should be a last clean move, not a rushed hack. Leave enough wire length to make secure connections without stuffing a cramped mess back into the housing.
Push-in terminals can be stubborn. A small flat screwdriver may help release the wire, but forcing it can nick the copper or crack the switch body. If the old switch is already broken, careful cutting may be cleaner than wrestling with damaged terminals. Clean copper ends create better contact and reduce the chance of loose connections later.
Keep the old switch nearby until the new one is fully installed. The body shape, chain length, terminal labels, and wire positions can all provide useful comparison points. Tossing it too early removes your best reference. A little clutter on the ladder tray is better than losing the wiring roadmap halfway through the job.
Install The New Switch Carefully
The new switch should sit in the same orientation as the old one whenever possible. Match each labeled wire position, then check the connections before mounting the switch back into the housing. Loose terminals cause flickering, heat buildup, and random failures that feel like a brand-new problem. Firm, clean connections are the heart of a reliable ceiling fan repair.
Wire nuts should twist on tightly without exposed copper hanging out below the connector. Push-in terminals should grip the wire with no wiggle. Give each wire a gentle tug after connecting it. That quick test catches weak connections before the housing gets closed and the ladder gets put away.
The pull chain should move freely through the housing hole. If it rubs against the metal edge or sits at a sharp angle, it may wear out faster. Align the switch body before tightening the exterior nut. A smooth chain path helps the new switch last longer and keeps the control feeling clean and predictable.
Ceiling fan controls can share a room with streaming setups, lamps, and remotes, so convenience matters after the repair. If the fan area doubles as a TV room, Compare a remote control for hulu live tv to reduce the clutter of multiple remotes while keeping everyday controls easier to reach. Separate comfort upgrades make sense only when they solve a real annoyance, not because every gadget needs another gadget.
Test The Fan Before Closing Up
Testing should happen before every screw goes back in. Keep hands clear, restore power at the breaker, and try the switch carefully. The light should respond consistently, or the fan should move through speeds in the expected order. A smooth first test confirms the switch wiring is doing its job.
If the fan does not respond, shut the breaker off again before touching anything. Do not poke around with live wires because the first test failed. Recheck the photos, terminal labels, and wire connections one by one. Most mistakes come from one swapped wire or a loose connector, not from some mysterious ceiling fan curse.
Speed order may vary after replacing certain fan switches. Some replacement switches use a different internal sequence than the original, even with similar markings. If the fan runs but the speeds feel odd, the switch may not be an exact match. That is a compatibility issue, and matching the original part number can save the next round of frustration.
Once everything works, shut the power off again before tucking wires back in and closing the housing. Arrange wires so they do not pinch under the cover or press hard against moving parts. Tighten screws evenly without stripping them. A neat closure protects electrical connections and keeps the fan housing from rattling during use.
Replacing A Ceiling Fan Switch Without Wiring Mistakes
A ceiling fan repair can feel smooth one minute and frustrating the next, especially after the new switch is installed but the fan still acts weird. Some fans hum without spinning. Others reverse speed order or keep the light stuck on. Those annoying little problems usually trace back to wiring placement, loose connectors, or mismatched replacement parts rather than a completely ruined fan. Replacing a ceiling fan switch without wiring mistakes takes patience, careful testing, and a few practical habits that prevent repeat repairs.
Watch For Common Wiring Errors
The most common mistake happens before the fan is even turned back on. Wires get crossed because two colors looked similar under dim light or dusty housing conditions. That tiny mix-up can create strange fan behavior that makes the new switch seem defective. A careful wire map and clear terminal matching protect the entire repair process from turning into a second round of frustration.
Loose wire nuts cause another headache people rarely notice at first. The fan may run briefly, then suddenly stop or flicker during operation because vibration slowly loosens weak connections. Ceiling fans shake constantly during normal use, so every connection needs to feel firm and stable. A solid wire connection improves electrical reliability and reduces intermittent failures that drive people crazy later.
Switch compatibility also trips people up. Some fan switches look identical from the outside but use different internal sequences for speed control. Installing the wrong switch may scramble the speed order or remove one setting entirely. Matching the original switch model or terminal layout keeps the fan speed cycle operating normally instead of turning low speed into high speed unexpectedly.
Shared wall controls can complicate troubleshooting too. A fan connected to dimmer switches or older wall controls may behave oddly even after the pull chain switch gets replaced. Certain dimmers are not designed for ceiling fan motors and can create buzzing or inconsistent performance. If the room already struggles with ventilation, Compare a ceiling extractor fan kitchen setup for spaces where heat and moisture build up faster than a standard ceiling fan can handle.
Fix A Ceiling Fan Pull Chain That Feels Stuck
A stuck pull chain usually feels rough, tight, or uneven before it snaps completely. Internal switch gears wear down gradually from years of constant pulling, especially in rooms where the fan runs daily. Some people tug harder when resistance appears, but that often damages the chain or breaks the switch body. Gentle pressure and early replacement protect the internal switch mechanism from total failure.
Short pull chains can make the problem worse because people yank downward at awkward angles. That side pressure stresses the switch housing over time. Adding a slightly longer chain extension can improve comfort and reduce strain on the internal mechanism. Better pull alignment helps preserve smoother switch movement and reduces unnecessary wear.
Dust buildup inside the switch housing also contributes to sticky movement. Ceiling fans collect dirt surprisingly fast because the blades circulate airborne particles constantly. Fine debris can settle around the switch body and interfere with moving parts. Cleaning the housing carefully during replacement helps restore clean mechanical movement and keeps the new switch operating more consistently.
Plastic pull chains sometimes crack under heat exposure in rooms with poor airflow or direct sunlight. Metal chains usually hold up better over time, though they can still stress weak switches if pulled aggressively. Small upgrades like stronger chain materials make everyday use feel sturdier without changing the entire fixture. Reliable movement matters because people interact with the switch every single day.
Test Fan Speeds The Smart Way
Speed testing should happen slowly instead of flipping through settings rapidly. Let each speed run for a minute so the motor settles properly before switching again. Fans with new switches occasionally hesitate during the first few cycles while connections stabilize. That short pause is normal as long as the fan reaches stable operation afterward.
Listen for unusual humming while changing speeds. A soft motor hum is common, but sharp buzzing or clicking sounds usually point toward wiring problems or capacitor issues. Some people blame the switch immediately even though the capacitor may already be worn out behind the scenes. Separating motor noise from switch issues prevents unnecessary repeat repairs.
Fan wobble can also distract from electrical problems. A shaky fan may appear to have speed control trouble when the real issue comes from blade imbalance or loose mounting hardware. Tightening blade screws and checking balance kits can improve airflow and reduce stress on internal components. Stable operation protects the fan motor and helps the new switch last longer.
Rooms with smart devices, tablets, or streaming setups often benefit from simplified controls after a repair. Too many remotes scattered around the room create clutter fast, especially near entertainment spaces. To simplify device control nearby, Explore an remote control for android tablet setup that keeps streaming and smart device access easier without crowding side tables with extra accessories.
Handle Older Ceiling Fans Carefully
Older ceiling fans can hide brittle insulation, faded wire colors, or cramped switch housings that feel frustrating to work inside. Pulling wires too hard during replacement may crack insulation or loosen hidden connections near the motor. Slow movements matter much more than force during repairs on aging fixtures. Gentle handling protects older electrical components that may already be fragile.
Some older fans use discontinued switch designs that are harder to match exactly. Universal replacement switches can work, but terminal order must match correctly or the fan may behave unpredictably. Comparing wiring diagrams side by side helps avoid confusion during installation. Careful compatibility checks prevent the fan from developing new operating problems after the repair.
Paint buildup around the switch housing can also complicate removal. Layers of ceiling paint sometimes glue the housing screws in place over the years. Rushing those screws often strips the heads or cracks the metal housing edge. A patient approach keeps the repair cleaner and avoids cosmetic damage that becomes impossible to ignore once the fan is back overhead.
Older motors sometimes reveal hidden problems only after the switch is replaced. The fan may start running again but still struggle with weak speeds or delayed starts because the capacitor is aging too. That does not mean the switch replacement failed. It simply means the new switch exposed another weak component that was already fading behind the scenes.
Keep The New Switch Working Longer
Constant hard yanking shortens switch life faster than most people realize. A ceiling fan pull chain is designed for smooth, steady movement instead of aggressive snapping. Quick jerks place extra strain on the tiny internal contacts and springs inside the switch body. Gentle use helps preserve consistent switch performance and reduces premature wear.
Dust control matters more than people expect. Fans operating in kitchens, garages, or humid rooms collect grime much faster than fans in cleaner spaces. Dirt buildup can creep into the switch housing and interfere with moving parts over time. Occasional cleaning around the housing helps maintain smoother operation without needing another repair too soon.
Loose ceiling fan mounting hardware creates vibration that slowly stresses electrical connections. A rattling fan may seem harmless at first, but constant shaking can weaken wire terminals inside the switch housing. Checking screws periodically keeps the fixture stable and reduces long-term strain on the wiring system. Stable mounting protects both the switch assembly and the motor itself.
Power surges can shorten the life of fan electronics in homes with unstable electrical systems. Sudden voltage spikes stress switches, capacitors, and light kits all at once. Surge protection for entertainment centers often gets attention, but ceiling fans benefit from cleaner electrical supply too. Small preventive habits usually cost far less than replacing another failed switch a few months later.
Know When The Fan Needs More Than A Switch
A new switch cannot rescue every ceiling fan problem. Burnt wiring, overheating motors, or severe internal corrosion usually point toward deeper electrical issues that need broader repairs. A fan that smells hot or trips breakers repeatedly deserves immediate attention before further use. Those symptoms go beyond a simple switch replacement issue.
Capacitor problems often mimic bad switches because both affect speed control. The fan may hum loudly, spin slowly, or require a push start with your hand before moving normally. Replacing only the switch will not solve that type of behavior for long. Watching for these signs helps separate electrical component failure from ordinary switch wear.
Excessive wobbling can damage internal wiring over time as repeated movement strains connectors inside the housing. Some fans eventually develop loose internal splices or cracked wire insulation from years of vibration. Tightening mounting brackets and balancing blades early can prevent much bigger electrical repairs later. Small maintenance habits protect the overall lifespan of the fixture.
A ceiling fan that still struggles after proper switch replacement may simply be nearing the end of its usable life. Older motors lose efficiency gradually, especially in humid spaces where corrosion develops around internal components. Replacing the switch still provides useful troubleshooting insight because it rules out one major failure point cleanly. That clarity helps avoid wasting time guessing at random repairs while the room keeps getting hotter and more uncomfortable.


Best Small Flush Mount Ceiling Fans 2026 Ultimate Picks

Best Smart Ceiling Fan India 2026 For Effortless Comfort

Best Smart Ceiling Fans with Lights for 2026: Top Picks

Best Smart Home Non Ceiling Fans 2026 For Ultimate Comfort

Best Outdoor Misting Ceiling Fan 2026 For Ultimate Comfort

Best Ceiling Fans With Lights For Vaulted Ceilings 2026 Top Picks

Best Outdoor Ceiling Fans For Porch 2026 With Style And Breeze

Best WiFi Enabled Ceiling Fan 2026 For Effortless Comfort





