
How to Replace Ceiling Fan Remote Receiver Smoothly
Replacing a ceiling fan remote receiver can feel intimidating at first, but understanding the steps and safety measures makes the process surprisingly straightforward. The receiver acts as the brain of your ceiling fan's remote system, translating button presses into smooth motor responses. Without a functioning receiver, the fan might behave erratically or not respond at all, making this component crucial for comfort and convenience. Learning to swap it out empowers you to fix issues quickly without waiting for professional help.
Start by cutting power to the fan at the breaker to ensure safety. Once the fan is de-energized, accessing the receiver involves removing the canopy and carefully noting wire connections. Labeling each wire and taking a photo can save headaches later, keeping the reassembly accurate and stress-free. Modern receivers often feature plug-and-play connectors, which simplifies the replacement while maintaining reliable operation.
After connecting the new receiver, check that all wires are securely attached and insulated. Tucking wires neatly prevents strain and reduces the risk of short circuits. Restoring power and testing the fan ensures that the remote responds consistently to speed changes, light controls, and any preset functions. A properly installed receiver not only restores functionality but also prolongs the lifespan of your fan.
Some receivers include advanced features like programmable speeds or built-in light dimmers, adding versatility to your ceiling fan setup. Understanding these options enhances your home environment, letting you customize airflow and lighting to suit different moods or activities. By mastering the replacement process, you gain confidence in managing minor electrical projects and maintaining your fixtures effectively.
Regular checks and gentle maintenance keep the receiver performing optimally. Avoid exposing it to moisture or overloading circuits, and ensure the canopy is secured to prevent vibrations that could loosen connections. Investing a little attention here prevents repeated issues, making your ceiling fan a reliable and enjoyable part of your living space.
How to Replace Ceiling Fan Remote Receiver Efficiently
Power interruptions, flickering lights, and unresponsive speeds can turn a cozy living space into a frustrating environment. The annoyance multiplies when the culprit is the hidden ceiling fan remote receiver. Tackling this issue can save you countless hours and prevent repeated fan malfunctions. Knowing how to identify, remove, and replace the receiver ensures you regain smooth control and reliable operation without unnecessary stress.
Quick Fan Control Fix
The ceiling fan remote receiver serves as the intermediary between your remote and the fan motor. Without a properly functioning receiver, fans can behave unpredictably, switching speeds erratically or failing to respond. Replacing it restores full functionality, letting you regain control over lighting and airflow instantly. Experienced homeowners note that a correctly installed receiver reduces noise and prevents sudden motor stalls, a common frustration.
Safety is the foremost concern. Always cut power at the breaker before removing the canopy. This prevents short circuits or accidental shocks while working on live wires. Once the canopy is down, labeling each wire or taking a quick photo ensures you can reconnect the new receiver with zero guesswork. This small step guarantees a smooth installation process.
Modern receivers often feature plug-and-play connectors that eliminate complex wiring. They are designed to adapt to various fan models, reducing compatibility headaches. By securing the wires correctly and testing the remote functions, you ensure that your fan operates at optimal speeds and light settings. Minor adjustments in wire placement can prevent long-term failures, making attention to detail crucial.
Installing a new receiver is not only about restoring function; it also provides a chance to enhance features. Some models allow dimming, speed presets, or improved remote range. Choosing the right receiver adds convenience and improves energy efficiency by giving you precise control over your fan settings.
Step-By-Step Replacement Guide
Start by ensuring the breaker is off, confirming that no current flows to the fan. Remove the canopy and observe the existing receiver connections. Labeling each wire with tape or markers is vital to prevent mistakes during reassembly. Take note of the color coding and position of each wire before disconnecting the old receiver.
Carefully remove the receiver from its housing. Many are secured with clips or screws that are simple to manage but must be handled gently. Avoid tugging on wires directly, as this can damage the fan motor or the receiver housing. Place the old receiver aside and prepare the new one for installation, keeping connectors organized.
Connect each wire to the new receiver according to your labels. Ensure that all connections are snug and insulated properly to prevent shorts. Double-check the layout and secure the receiver within the canopy or mounting bracket. Proper positioning prevents interference with the fan motor and maintains airflow efficiency.
Once wired, restore power and test each function with the remote. Check fan speeds, light controls, and any preset features. Adjustments may be necessary for fine-tuning, but with the correct installation, the fan should operate smoothly without any flicker or lag. This step ensures that the receiver’s performance is fully optimized.
Common Installation Mistakes
One frequent error is confusing wire colors, leading to erratic fan behavior. Always label and verify connections before powering the fan. Another mistake is leaving loose wires or not securing the receiver inside the canopy, which can cause rattling or signal interference. Ensuring everything is tightly fastened prevents future headaches.
Some homeowners neglect testing the remote after installation, only to find a speed or light function malfunctioning. Running through all functions immediately after installation identifies problems early. Avoid forcing connectors into incompatible slots, which can break pins or damage the receiver, resulting in additional costs.
Overlooking the mounting orientation is another common oversight. The receiver must fit comfortably without stressing the wires. If the unit is crammed or tilted, it may compromise both signal reception and electrical safety. Correct positioning is essential for long-term reliability.
Neglecting safety precautions such as turning off the breaker or wearing gloves increases the risk of injury. Following proper safety guidelines is not optional it’s the backbone of a successful and incident-free replacement. The process may seem tedious, but careful execution ensures smooth and dependable operation for years.
Testing And Troubleshooting
After replacing the ceiling fan remote receiver, systematically test each fan speed and light function. Observe the fan for unusual sounds or flickering, which might indicate loose connections or faulty wiring. If any issues arise, turn off the power before adjusting wires to prevent accidents. Keeping the troubleshooting focused and methodical reduces stress.
Remote range should also be checked. If signals are weak or inconsistent, reposition the receiver slightly within the canopy to avoid interference. Sometimes, other electronic devices can interfere with the remote signal, so ensuring clear line-of-sight and minimal obstacles is important. Fine-tuning the receiver placement maximizes response reliability.
Some receivers include adjustable settings or dip switches to synchronize multiple remotes with a single fan. Verifying these settings after installation prevents conflicts with other nearby ceiling fans or devices. The proper configuration guarantees that each function is precise and repeatable. This ensures that your fan works exactly as intended, restoring comfort and convenience.
Documenting the installation process, including wire colors and positions, is a good practice. This reference can save time for future maintenance or replacements. Clear notes reduce the chances of errors and help you troubleshoot efficiently if the fan behaves unexpectedly over time.
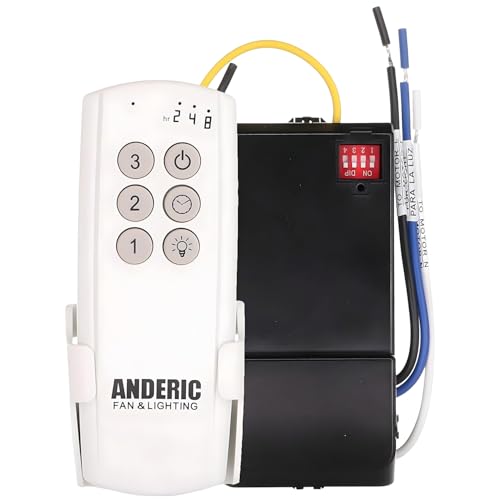
Choosing The Right Replacement Receiver
Selecting a compatible ceiling fan remote receiver is crucial for seamless performance. Not all receivers work interchangeably; choosing a model suited to your fan’s specifications ensures full functionality. Consider voltage ratings, supported fan speeds, and light control capabilities when evaluating options. Matching the receiver to your fan prevents signal errors and mechanical strain.
Voltage And Compatibility
Check the voltage rating of your fan before purchasing a replacement receiver. Most residential fans operate on standard 120V circuits, but variations exist in certain models. Using an incompatible receiver can cause malfunctions, short circuits, or permanent damage to the fan motor. Ensuring correct voltage alignment is a fundamental step for safety and performance.
Compatibility extends beyond voltage. The receiver should accommodate the number of fan speeds and any integrated lighting. Some fans feature multi-speed or dimmable lights, requiring a receiver with matching features. Failing to account for these differences often results in incomplete fan control or flickering lights.
Manufacturer-specific receivers sometimes include proprietary connectors. While generic replacements may fit, they can lack full functionality or fail after a short period. Selecting a receiver with verified compatibility ensures longevity and preserves all fan features. This attention to detail avoids repeated replacements and frustration.
Physical size and fit are also important. The receiver must fit within the canopy without straining wires or compromising airflow. A receiver that is too bulky can interfere with motor operation, while one that is too small may shift during operation. Proper fit enhances performance and safety.
Enhanced Features And Functionality
Some modern receivers offer programmable features such as speed presets, light dimming, or multi-device control. These enhancements increase convenience and energy efficiency by tailoring fan performance to your lifestyle. Choosing a receiver with additional capabilities can upgrade your fan’s usability beyond basic replacement.
Wireless synchronization options allow multiple remotes to control a single fan, or one remote to control several fans in a room. This flexibility can streamline daily operation and reduce the need for multiple devices. Integrating these features ensures your fan remains a practical and versatile fixture in your home.
Receivers with built-in surge protection or thermal cutoff provide added durability. They safeguard the fan against voltage spikes and prevent overheating, extending the lifespan of both the fan and the receiver. Investing in a receiver with protective features reduces maintenance costs and enhances reliability.
Energy-saving models can help reduce electricity consumption by optimizing fan speeds and light intensity. Selecting a receiver with efficiency-focused design benefits your home’s energy profile while maintaining comfort. These considerations turn a simple replacement into a strategic upgrade for your living space.
Installation Accessibility
Ease of installation is an often-overlooked factor. Receivers with plug-and-play connections minimize errors and reduce installation time. This simplicity is especially valuable for homeowners without extensive electrical experience. Clear labeling and intuitive connectors ensure that even first-time installers can complete the process successfully.
Compact design matters too. A receiver that fits snugly within the fan canopy avoids excessive wire bending or pressure on components. Well-designed receivers improve airflow and reduce mechanical stress, supporting long-term operation. Physical accessibility also makes future maintenance or upgrades easier and safer.
Some receivers come with adjustable mounts or brackets to secure them in place. Proper mounting prevents rattling, wire strain, and signal interference. Ensuring stable installation is key to maintaining reliable performance over years of use. Taking the extra moment to secure the receiver pays off in smooth operation.
Documentation and clear instructions are vital. Manufacturers who provide detailed guides, wiring diagrams, and troubleshooting tips help reduce installation errors. Having access to clear instructions ensures that you handle the replacement confidently, with minimal risk of mistakes or damage.
Advanced Tips for Installing Ceiling Fan Remote Receiver
Struggling with intermittent fan response or lights flickering can be frustrating. A worn-out or incompatible ceiling fan remote receiver is often the hidden culprit. Fixing it efficiently restores full control, improves comfort, and prevents repeated fan issues. With a few practical steps and attention to detail, replacing the receiver becomes a straightforward task that even casual DIYers can handle safely.
Proper Wire Connections
Wire connections are the backbone of a reliable receiver installation. Start by confirming the breaker is off and the canopy is safely removed. Label each wire and note its color to prevent errors during reconnection. Secure connections with wire nuts or clips, ensuring tight contact to avoid intermittent performance. Loose or misaligned wires can trigger erratic fan speeds or unresponsive lights, so precision here is crucial.
Some receivers have color-coded wires corresponding to fan functions. Take extra care matching these to avoid signal interference. Even minor mistakes can lead to non-functional speeds or lights that flicker under load. A well-executed connection is a key factor for long-term reliability.
Insulating exposed wires adds another layer of safety. Electrical tape or heat-shrink tubing prevents shorts and preserves integrity. Ensuring that wires are not under tension reduces the risk of strain over time. This small effort translates into fewer malfunctions and smoother fan operation.
Organizing wires neatly inside the canopy prevents rattling and interference with the motor. A compact, tidy setup enhances airflow and avoids noise. It also simplifies future maintenance, making the system easier to troubleshoot if issues arise.
Optimizing Receiver Placement
Receiver placement within the canopy affects both signal strength and fan performance. Position it away from metal surfaces that might block remote signals. Allow adequate space for wires to avoid pinching or bending. Correct placement ensures the receiver’s signal range is maximized and the fan motor operates smoothly.
Testing the remote after placement helps identify weak spots. If the fan responds sluggishly, slight adjustments to the receiver’s orientation can dramatically improve performance. Even small shifts in position reduce interference and improve responsiveness. Proper placement is a subtle but critical factor for reliable control.
Consider receivers with integrated mounts or brackets to secure them in place. This prevents movement that could strain wires or affect signals. A firmly installed receiver supports consistent performance and avoids unnecessary maintenance. Stability within the canopy is an essential feature for long-lasting operation.
Some fans benefit from elevated placement of the receiver to avoid dampness or heat accumulation. Keeping it away from potential environmental stressors enhances durability. A smart placement strategy reduces the risk of premature failure.
Integrating Advanced Features
Modern receivers offer more than basic fan control. Features like dimmable lights, multiple speed presets, and multi-device synchronization expand functionality. Incorporating these into your setup allows customized control and improved energy efficiency. Leveraging these advanced features turns a simple replacement into a practical upgrade.
Programmable receivers allow you to sync multiple fans or adjust settings remotely. This is especially useful in larger spaces where one control can manage several fans efficiently. The added convenience and control enhance the overall user experience.
Some units include surge protection or thermal cutoff, shielding your fan from voltage spikes and overheating. Protecting both the fan and the receiver increases longevity and reduces repair costs. Investing in these protective features is a smart strategy for reliable operation.
Enhanced energy-saving options help reduce electricity bills by optimizing speed and light usage. Pairing these with efficient fan models contributes to a more eco-friendly home. Thoughtful integration of features improves comfort while saving energy.
Testing Remote Functions
Once the receiver is installed, systematically test every remote function. Check all fan speeds, light intensity, and preset programs to confirm consistent response. Unexpected behavior may indicate loose wires, misconfigured dip switches, or placement issues. Early detection of these problems saves time and prevents repeated frustration.
Verify signal strength at different distances and angles. Obstructions like furniture or metallic objects can interfere with remote signals. Adjust the receiver or the fan position to enhance signal reliability. Proper testing ensures your fan responds exactly as intended.
Some receivers allow remote reprogramming to avoid conflicts with other nearby fans. Synchronizing correctly guarantees each fan functions independently, preventing unintended operation. This precise setup adds convenience and reduces confusion.
Documenting settings and wire arrangements aids future maintenance. A clear reference prevents errors during repairs or upgrades, preserving the performance of your ceiling fan remote receiver over time. Proper documentation is a practical step often overlooked but highly beneficial.

Maintenance Strategies for Longevity and Safety
Regular care keeps the ceiling fan remote receiver functioning smoothly and extends the fan’s lifespan. Dust, moisture, and physical strain can degrade components over time, so proactive maintenance is key. Simple habits like cleaning the canopy, inspecting wires, and testing the remote prevent major failures.
Cleaning and Protection
Removing dust and debris from the fan and canopy protects the receiver from overheating. A soft cloth or compressed air helps maintain cleanliness without damaging components. Preventing accumulation ensures the receiver maintains optimal signal and electrical performance.
Protecting the receiver from moisture is equally important. Humid environments can corrode wires or contacts, leading to malfunctions. Using protective covers or ensuring proper ventilation reduces the risk of moisture-related issues. This simple step significantly enhances reliability.
Check for signs of wear or fraying in wires during routine inspections. Addressing small problems early prevents shorts or component failure. Keeping connections tight and insulated contributes to safe operation and long-term durability.
Replacing worn or outdated receivers with modern, robust units ensures consistent control. Advanced models often feature protective elements like thermal cutoffs or surge shields, enhancing safety and longevity. Investing in quality components pays off in performance and peace of mind.
Energy Efficiency And Upgrades
Optimizing fan performance saves energy while improving comfort. Selecting a receiver with programmable speeds allows you to run the fan only at necessary power levels. Fine-tuning light dimming features further reduces energy consumption without compromising functionality.
Pairing the fan with a low voltage transformer for outdoor lighting can create seamless control over integrated systems. This improves efficiency and reduces load on electrical circuits. Smart integration ensures both fan and lighting systems operate harmoniously.
Some receivers support syncing with multiple fans or advanced home automation. Upgrading to these units enables centralized control and energy monitoring. The feature flexibility allows for both convenience and sustainability in your home setup.
Maintaining optimal settings prevents overuse and unnecessary wear. Adjusting speeds according to season or occupancy keeps motors from overworking. This strategy enhances both performance and lifespan of the fan and receiver.
Troubleshooting Tips
If issues persist after replacement, isolate the problem methodically. Test the fan without the remote to determine if the receiver or remote is at fault. Consistent malfunctions may indicate a defective receiver, requiring replacement. Proper diagnosis prevents repeated installation errors.
Check wiring integrity and receiver orientation if signals remain weak. Even minor misalignments or loose connections can cause inconsistent fan operation. Correcting these ensures the receiver functions reliably.
Environmental factors like interference from other devices can affect remote performance. Minimizing obstacles and maintaining line-of-sight enhances responsiveness. Attention to these details ensures the fan system delivers consistent comfort and control.
Keeping a maintenance log for each receiver and fan combination helps track issues over time. This historical record aids in preventing recurring problems and informs future upgrades or replacements. Organized records contribute to a well-maintained and reliable fan setup.
Upgrading To Hugger Models
Low-profile or hugger ceiling fans integrate seamlessly into spaces with limited clearance. Selecting a hugger ceiling fans with led light ensures compatibility with your home while providing full functionality. These models often incorporate updated receiver designs for smoother remote operation and modern features.
Hugger fans reduce wobbling and increase stability, which complements a properly installed receiver. Their compact design simplifies wiring and enhances safety by limiting strain on electrical connections. This combination ensures both aesthetic appeal and functional reliability.
Advanced hugger models often include energy-efficient motors and dimmable lighting. Pairing these with a well-chosen receiver optimizes energy usage and control. The integration of design and electronics enhances overall user experience.
Routine inspection and cleaning remain essential even for hugger models. Maintaining clear airflow around the receiver and fan ensures long-term durability. Paying attention to these details reinforces both performance and safety.


Best Small Flush Mount Ceiling Fans 2026 Ultimate Picks

Best Smart Ceiling Fan India 2026 For Effortless Comfort

Best Smart Ceiling Fans with Lights for 2026: Top Picks

Best Smart Home Non Ceiling Fans 2026 For Ultimate Comfort

Best Outdoor Misting Ceiling Fan 2026 For Ultimate Comfort

Best Ceiling Fans With Lights For Vaulted Ceilings 2026 Top Picks

Best Outdoor Ceiling Fans For Porch 2026 With Style And Breeze

Best WiFi Enabled Ceiling Fan 2026 For Effortless Comfort





