
How to Replace Ceiling Fan Switches With Four Wires
How to replace ceiling fan switches with four wires sounds simple until the old switch comes out and four loose wires stare back like a tangled mess. One wrong connection can leave the fan humming oddly, spinning backward, or refusing to power on at all. That’s the part that catches many people off guard. The wiring colors don’t always match expectations, and older ceiling fans often skip clear labels entirely.
Confusion usually starts the second the fan housing opens. Dusty wiring, faded terminals, and cramped spaces make even basic repairs feel frustrating. Still, replacing a faulty switch doesn’t have to spiral into an all-day headache. A careful approach, paired with attention to wire placement and switch compatibility, keeps the repair manageable without unnecessary stress.
Most switch failures begin with subtle warning signs. The fan may work on one speed only, the pull chain might stick halfway, or the light flickers after every tug. Those little annoyances tend to grow worse over time, especially in rooms where the fan runs daily. Ignoring the issue often leads to overheating inside the switch housing, and nobody wants that lingering electrical smell hanging in the room.
Proper wire identification matters more than fancy tools. Plenty of homeowners grab a replacement switch without checking terminal markings, then wonder why the fan suddenly loses two speed settings. Four-wire switches rely on specific sequencing inside the switch body, so swapping wires randomly rarely ends well. Matching the old switch configuration before disconnecting anything saves a ton of frustration later.
Ceiling fans installed years ago can make things trickier. Manufacturers sometimes used different color combinations or uncommon switch layouts that don’t match newer replacement parts. That mismatch creates one of the biggest pain points during repair work. Taking photos before disconnecting wires helps prevent those “wait, where did this wire go?” moments halfway through reassembly.
Safety also sneaks into the conversation pretty quickly. A loose wire nut or partially connected terminal can create intermittent power issues that are difficult to trace later. Turning off the breaker sounds obvious, sure, but rushed repairs often lead to skipped steps. Slowing down for a few extra minutes usually prevents repeat repairs and unnecessary troubleshooting.
Another challenge comes from cramped ceiling fan canopies. Tight working spaces make wire placement awkward, especially when stiff older wires refuse to bend cleanly. Small details suddenly matter a lot. Needle-nose pliers, clear lighting, and patience can turn a frustrating repair into a surprisingly smooth fix.
How to replace ceiling fan switches with four wires becomes much easier once the internal wiring logic finally clicks. The process isn’t really about memorizing colors. It’s about understanding how the switch cycles fan speeds and routes power between terminals. Once that puzzle makes sense, the repair stops feeling intimidating and starts feeling practical.
People often expect every replacement switch to behave exactly the same. That assumption creates unnecessary setbacks because terminal layouts vary between models. Some switches label connections as L, 1, 2, and 3, while others use completely different markings. Comparing the original switch pattern carefully before installation avoids that irritating trial-and-error cycle.
Then there’s the relief after everything works again. The pull chain clicks smoothly, the fan changes speeds correctly, and the wobbling frustration disappears. That small repair can restore comfort to a bedroom, living room, or covered patio without replacing the entire fan assembly. A steady breeze and quiet operation suddenly feel worth every minute spent sorting out those four stubborn wires.
How To Replace Ceiling Fan Switches With Four Wires
A ceiling fan that only runs on one speed can make a room feel oddly stubborn. The pull chain clicks, the motor hums, and nothing changes, which usually points straight toward a worn switch inside the housing. Learning how to replace ceiling fan switches with four wires helps you fix that problem without guessing, rewiring the whole fan, or buying a new unit too soon. The job rewards patience because wire order, terminal markings, and switch compatibility matter more than muscle.
Four Wire Switch Basics
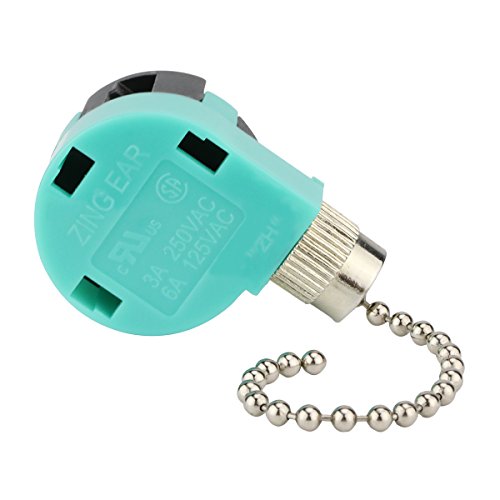
A four-wire ceiling fan switch usually controls the fan’s speed sequence. The small plastic switch body may look simple, but inside it routes power through different combinations each time the chain is pulled. That’s why how to replace ceiling fan switches with four wires depends on matching the old switch pattern, not just matching wire colors. A black wire often handles incoming power, while the other wires usually connect to speed settings through the capacitor.
The biggest mistake is assuming every replacement switch works the same way. Some switches use labels like L, 1, 2, and 3, while others use a different layout or switching pattern. A switch may physically fit inside the housing but still produce wrong speeds if its internal sequence differs. That tiny detail can turn a quick repair into a head-scratcher.
Take a photo before pulling off even one wire. Seriously, that single habit saves a lot of grumbling later. Old fan wiring can fade, wires can look nearly identical under dim light, and terminal letters can hide behind the switch shell. A clear photo gives you a real reference instead of relying on memory after the wires spring loose.
Safety starts before the screwdriver touches anything. Turn off the breaker, not just the wall switch, because some ceiling fan boxes carry more than one live feed. A non-contact voltage tester adds a helpful second check before you handle the wires. That step may feel slow, but it beats working blind around electricity.
Tools And Prep Work
Good prep makes the repair feel less like a wrestling match. You’ll usually need a screwdriver, needle-nose pliers, wire strippers, wire nuts, electrical tape, and the correct four-wire fan switch. A bright work light helps too, especially inside older fan housings where shadows hide labels and wire colors. Clear visibility can prevent one of the most common repair errors, which is mixing up terminals.
Before opening the fan, set a small bowl or magnetic tray nearby for screws. Ceiling fan screws love to roll under furniture at the worst possible moment. Keep the pull-chain nut, switch cap, and housing screws together so reassembly doesn’t turn into a floor search. Little habits like that keep the repair calm and tidy.
The replacement switch should match the old switch’s amp rating, voltage rating, number of wires, and terminal arrangement. Do not buy a random four-wire switch just because the package says ceiling fan. Fan speed switches are not all wired internally the same way. Matching the printed part number from the old switch is the cleanest route if it’s still readable.
Some repairs become easier after checking nearby electrical details. A flickering fan light, for example, may not come from the speed switch at all. For light-related repairs, compare symptoms with the bulb style and fixture setup, and use a practical reference like To identify fixture compatibility faster, review long light bulbs before blaming the fan switch. That small detour can keep you from replacing the wrong part.
Remove The Old Switch Safely
Start by turning off power at the breaker and testing the fan wires. The wall switch alone is not enough because someone could flip it back on while you’re working. After the fan is confirmed dead, remove the light kit or lower switch housing, depending on your fan design. Keep one hand steady under the housing so wires are not pulled hard.
The switch usually sits behind a small threaded collar where the pull chain exits the housing. Unscrew the collar, then gently pull the switch into view. Avoid yanking because older wire insulation can stiffen and crack. Gentle handling protects the capacitor leads and nearby connections from accidental damage.
Now document the wire positions. Take a close photo of each wire entering the switch, and write down the terminal labels if they’re visible. Mark wires with small tape flags if colors look faded or similar. This is the point where wire mapping matters more than speed.
Once everything is documented, release the wires from the old switch. Some switches use push-in terminals that require a small pick or screwdriver to press the release slot. Others may need the wires cut close to the old switch, then stripped fresh for the new connection. Leave enough wire length to work comfortably, but don’t strip so much copper that bare wire sticks out after installation.
Match Wires To New Terminals
The new switch should receive each wire in the same terminal position as the old switch. If the old switch had black on L, keep black on L unless the manufacturer’s diagram says otherwise. The remaining wires should follow their original numbered terminals. Random swapping is the fast lane to lost speeds, buzzing, or a fan that won’t start.
Push-in terminals need firm, clean wire ends. Strip only the amount recommended by the switch design, then insert each wire until it seats fully. Tug lightly on each wire after insertion. A wire that slips out easily is not secure, and a loose connection can create heat inside the switch housing.
Wire nuts are different. If your replacement setup uses pigtails, twist matching wires together clockwise, cap them with the correct-size wire nut, and check for exposed copper. A snug cap should not wobble or slide off. Solid connections help the fan switch cycle smoothly and reduce the chance of intermittent operation.
Ceiling fan repairs sometimes overlap with fixture upgrades. A badly worn fan, undersized blade span, or noisy motor may make replacement more sensible than switch repair. For larger rooms where airflow still feels weak after switch replacement, Upgrade airflow planning with a 56 inch ceiling fan with light instead of forcing an aging unit to do more than it can. That choice makes sense only when the fan itself is worn, not when a simple switch is clearly the culprit.
Test Speeds Before Closing
Reassemble just enough to test safely before tightening every screw. Keep wires tucked away from moving parts, reinstall the switch collar, and make sure no bare copper touches metal housing. Then restore power at the breaker. Stand clear of the blades before pulling the chain through each speed.
A healthy four-wire switch should cycle through off, high, medium, and low in the expected order. Some fans use a slightly different order, but each pull should create a clear change. If the fan hums without spinning, shut power off immediately and recheck the wiring. Humming often means the switch sequence or capacitor connection is wrong.
Wrong speed order is annoying but usually fixable. Compare your new switch markings with the photo of the old one, then check whether the replacement part uses the same internal circuit pattern. The terminals may look identical while the switch logic differs inside. That hidden difference is why part numbers matter.
After the fan speeds test correctly, close the housing without pinching wires. Arrange wire nuts so they sit neatly inside the compartment, not pressed hard against the pull chain. Tighten screws evenly and check that the chain moves freely. A smooth pull tells you the switch is seated properly and not rubbing against the housing.
Common Mistakes That Cause Trouble
The first common mistake is skipping the photo. Memory feels reliable until four wires are loose and two colors look almost the same. A quick snapshot gives you a backup plan when the switch label is tiny or stained. Documentation is the cheapest tool in the whole repair.
The second mistake is mixing up the fan speed switch with the light switch. Both may sit in the same lower housing, and both may use pull chains. The light switch usually has fewer wires, while the fan speed switch often ties into the capacitor. If the wrong switch gets replaced, the original problem stays right where it was.
The third mistake is ignoring the capacitor. A failed capacitor can mimic a bad switch by causing weak starts, buzzing, or missing speeds. If the new switch is wired correctly but the fan still struggles, the capacitor deserves attention. Switch replacement fixes mechanical pull-chain failure, but it won’t cure every motor-speed problem.
Bright tools and gadgets can also create distractions around electrical work. Laser pointers, work lights, and inspection pens may help in some settings, but eye safety still matters. For tool awareness outside the fan repair itself, Compare safety habits with a blue light laser pen before using bright beam devices around reflective fan parts. The better move during wiring is a steady lamp, not a harsh beam pointed near your face.
Repair Limits And Realistic Expectations
A switch replacement should restore proper chain control if the old switch was cracked, stuck, or electrically worn. It will not fix warped blades, dry bearings, loose mounting brackets, or a failing motor. That distinction matters because ceiling fans can stack multiple problems over years of use. Accurate diagnosis keeps you from blaming the new switch for an old mechanical issue.
Older fans can be worth repairing if the motor runs quietly and the housing is solid. The switch is a small part, and replacing it costs less effort than removing a full fan assembly. But a fan with burnt wiring, brittle insulation, or repeated electrical smells deserves a harder look. At that point, safety beats squeezing one more season out of worn equipment.
Rental homes and shared spaces add another layer. A quick repair may seem tempting, but electrical changes can create responsibility issues if something fails later. Keep the old switch, take photos, and follow the replacement wiring diagram closely. Clean records make the repair easier to explain if questions come up.
Patience pays off most during reassembly. Wires need room, the switch needs a straight pull, and the chain should not scrape against the metal opening. A rushed closing job can create a new problem after the electrical work is already correct. Neat wire placement is not just cosmetic, because it protects connections every time the fan vibrates.
Replacing A 4 Wire Ceiling Fan Pull Chain Switch
Some ceiling fan problems don’t show up all at once. The fan may start skipping speeds for a few weeks, then suddenly stop responding after one hard tug on the chain. That slow decline usually points toward internal wear inside the pull chain switch rather than a dead motor. Replacing a 4 wire ceiling fan pull chain switch becomes a practical fix once you know how the wiring sequence actually controls the fan speeds.
Signs The Switch Is Actually Bad
A stuck pull chain is the most obvious warning sign, but other symptoms can sneak in quietly. The fan may only run on high speed, or one speed setting disappears completely. Some switches even feel loose inside the housing long before they fail electrically. Inconsistent fan speeds, clicking sounds, and delayed startup usually point toward switch wear instead of blade or motor problems.
Pay attention to how the chain feels while pulling it. A healthy switch has firm clicks with distinct stops between speeds. A worn switch often feels mushy, loose, or oddly rough inside. That mechanical wear builds over time, especially in bedrooms or living rooms where the fan runs daily through every season.
Heat can also shorten switch life. Ceiling fans installed near kitchens or enclosed patios tend to collect grease, humidity, and dust inside the housing. That buildup slowly affects the switch contacts and internal spring mechanism. Moisture exposure and heavy daily use create more strain than many people realize.
Lighting problems sometimes confuse the diagnosis. A dim or flickering fan light may come from the bulb setup instead of the switch itself. Before opening the housing, Compare lighting layouts with best desk lamps for dorm rooms to separate fixture brightness issues from actual electrical switch failure. That quick comparison can prevent replacing parts unnecessarily.
How Fan Capacitors Affect Speed Control
The capacitor works closely with the four-wire switch, which is why speed problems can feel confusing. The switch changes electrical paths, while the capacitor adjusts how much power reaches the motor windings. If either part fails, the fan speeds may behave strangely. Weak airflow and slow blade startup often involve the capacitor, not just the switch.
A damaged capacitor may bulge, leak oil, or produce a faint burnt smell inside the housing. Some older capacitors fail quietly with no visible warning signs at all. The fan may still spin, but the speeds feel uneven or weaker than before. That symptom tricks many people into replacing the switch twice before realizing the capacitor caused the issue.
Switch replacement still matters because damaged contacts can overheat. A failing switch may interrupt the capacitor’s sequence and create unreliable motor behavior. Replacing both parts together sometimes makes sense for older fans that have seen years of heavy use. Balanced electrical flow keeps the motor quieter and reduces stress during startup.
Capacitors are not universal, so matching ratings matters just as much as matching switch terminals. Wrong capacitor values can produce odd speeds or excessive motor heat. Keep the original capacitor nearby while shopping for replacement parts. A quick photo of the label usually helps avoid compatibility headaches later.
Wire Colors Can Be Misleading
People naturally trust wire colors, but ceiling fans don’t always follow consistent patterns. One manufacturer may use gray where another uses purple or brown. Older fans can also fade from heat and dust, making colors harder to identify accurately. Terminal positions matter far more than color assumptions during switch replacement.
Some fans include aftermarket repairs from previous owners or electricians. That means wire colors may not even match the original factory setup anymore. A black electrical tape splice hidden inside the housing can completely change what you expected to see. Taking clear photos before disconnecting wires protects you from those surprises.
Fans with integrated lights often crowd extra wires into a tight switch compartment. That cramped layout makes it easier to confuse the light switch wire with the fan speed wiring. Keep the wires separated carefully during repair work. Organization inside the housing prevents accidental cross-connections later.
Large room fans sometimes include heavier motors and slightly more complicated wiring layouts. Those fans may also use larger capacitors or different speed-switch configurations. For oversized bedrooms or play areas with constant airflow demands, Upgrade airflow ideas with a best ceiling fan for large kids room if the current fan struggles even after electrical repairs. A healthy switch can only do so much if the fan itself no longer suits the room.
Reassembly Without Pinching Wires
Reassembly sounds easy until the housing refuses to close cleanly. Four-wire switches take up more room than many people expect, especially in compact ceiling fans. Stuffing wires carelessly into the compartment can pinch insulation or stress the switch terminals. Neat wire routing protects the repair long after the housing screws go back in.
Start by folding wires gently instead of forcing sharp bends. Wire nuts should sit naturally without pressing hard against the switch body. The pull chain also needs enough clearance to move freely through the housing opening. A chain that rubs metal edges constantly may wear out faster or feel rough during operation.
Housing screws deserve patience too. Tightening one side aggressively before the others can tilt the switch housing slightly. That uneven pressure sometimes causes rattling noises once the fan starts spinning again. Slow, even tightening usually produces a cleaner fit.
Check the chain movement before restoring power fully. Pull it through every position while the fan remains off. Smooth clicks usually signal proper switch alignment inside the housing. Mechanical resistance or grinding sounds mean something shifted during reassembly.

Why Cheap Replacement Switches Fail Early
Not every replacement switch holds up equally well over time. Some low-cost switches use thinner internal contacts that wear down faster under heavy daily use. The chain mechanism may feel stiff right out of the package or loosen within a few months. Contact durability and internal spring quality matter more than flashy packaging.
Cheap switches often struggle in rooms where the fan runs almost nonstop. Warm rooms, enclosed patios, and upstairs bedrooms create steady heat inside the switch housing. That heat gradually weakens lower-grade plastic and contact points. A slightly better switch can handle repetitive pulling and electrical load more consistently.
Chain length can also affect wear. Long decorative pull chains place more stress on the internal mechanism because they swing harder during operation. Shorter chains or lightweight extensions reduce strain over time. That tiny adjustment can help preserve the switch longer than people expect.
Packaging labels don’t always tell the full story either. Some switches list compatible fan types without matching the original switching sequence exactly. Comparing the old switch pattern directly remains the safer route. Matching internal circuitry beats relying on vague packaging descriptions every single time.
Testing The Repair Over Several Days
A fan that works perfectly for five minutes can still reveal issues later. Let the fan cycle through multiple speed settings over the next few days. Listen for humming, clicking, or inconsistent startup behavior during normal use. Stable speed transitions usually confirm the switch wiring is correct.
Watch how the fan behaves after running for longer periods. Heat buildup sometimes exposes weak wire connections that seemed fine initially. A fan that slows down unexpectedly or loses one speed setting again deserves another inspection. Loose terminal seating is often the culprit.
Pay attention to the pull chain feel too. The chain should move smoothly with clean clicks between settings. Resistance, snagging, or partial movement may mean the switch shifted slightly inside the housing. Catching those small issues early helps avoid reopening the fan later.
Dust cleanup matters after the repair as well. Ceiling fan housings collect grime around vents and switch compartments, especially near kitchens or humid rooms. A soft brush or vacuum attachment helps keep airflow around the motor more consistent. Cleaner internal airflow reduces heat buildup and helps electrical parts last longer.
Situations Where Replacement Makes More Sense
Some fans simply reach the point where another repair stops making financial sense. Brittle wiring insulation, loud bearings, and wobbling blade brackets usually signal broader wear beyond the switch itself. Replacing one electrical part won’t solve deeper structural problems. Repeated electrical issues deserve a realistic evaluation instead of endless patch repairs.
Older fans may also lack modern airflow efficiency. A repaired switch can restore functionality, but weak airflow may still leave the room uncomfortable during warmer months. That tradeoff matters in larger spaces where airflow consistency affects sleep or daily comfort. A newer fan sometimes solves multiple frustrations at once.
Ceiling box stability should never get ignored during fan repairs. A shaky mounting bracket or loose electrical box creates long-term safety concerns, especially with larger blade spans. If the fan rocks excessively even after balancing adjustments, structural inspection becomes more important than switch replacement alone. Secure mounting matters just as much as correct wiring.
Still, plenty of ceiling fans gain years of additional life from a properly installed four-wire switch. The repair itself is usually manageable once the wire sequence, terminal layout, and housing organization finally make sense. Careful wiring, patient testing, and clean reassembly often restore quiet, reliable operation without replacing the entire fixture.


Best Small Flush Mount Ceiling Fans 2026 Ultimate Picks

Best Smart Ceiling Fan India 2026 For Effortless Comfort

Best Smart Ceiling Fans with Lights for 2026: Top Picks

Best Smart Home Non Ceiling Fans 2026 For Ultimate Comfort

Best Outdoor Misting Ceiling Fan 2026 For Ultimate Comfort

Best Ceiling Fans With Lights For Vaulted Ceilings 2026 Top Picks

Best Outdoor Ceiling Fans For Porch 2026 With Style And Breeze

Best WiFi Enabled Ceiling Fan 2026 For Effortless Comfort





