How to Replace a Tail Light Bulb in Under 20 Minutes

Open the trunk to check behind the dark lamp before loosening any exterior screws. Checking this space first shows whether you can reach the wires without removing the outer plastic housing from the car body. Once inside, simply twist the bulb socket counterclockwise, pull the burned-out piece free, and push the new one straight into the plug.
A few details change depending on your vehicle. Some cars require taking out two outer frame bolts to slide the whole lens assembly forward, while others hide the wiring behind a quick-release fabric flap. The bulb might pull straight out or need a gentle push and turn to release, and high heat can sometimes leave the plastic socket slightly scorched. Here is how to reach the plug safely, swap the bulb without cracking plastic clips, and confirm it lights up properly.
Check your vehicle manual and gather basic hand tools
Replacing a dead tail light bulb does not require an expensive trip to an auto shop. You can complete the entire job right in your driveway using just a few common hand tools. Before you touch anything on your vehicle, park on a flat, level surface. Turn off the engine, switch the headlights to the off position, set the emergency brake, and remove the key from the ignition so no electrical power runs to the back of the car.
Next, confirm the exact replacement bulb number you need. You can find this number printed in the maintenance or specifications section of your owner manual. You can also wait until you pull the burned-out bulb free, as manufacturers stamp the part number directly onto the metal collar or the flat glass rim. Common automotive numbers include 3157, 7443, and 1157. Getting the correct number matters because each base shape fits into its socket only one specific way.
To keep the repair fast and smooth, gather these everyday items before you begin:
- A small socket set or screwdriver: Most vehicle tail lights use 7mm, 8mm, or 10mm bolts, or a standard Phillips head screw.
- A flathead screwdriver wrapped in painter tape: The tape cushions the metal tip so you do not scratch the exterior car paint or crack plastic trim if you need to gently ease a clip loose.
- Clean nitrile gloves or a dry cloth: Clean gloves keep skin oils off the new glass and give your fingers extra grip on slick plastic parts.
- A flashlight or work light: Deep trunk corners and rear cargo panels can be dark, and extra light makes finding hidden clips simple.
- The replacement bulb: Keep the new bulb in its packaging until the moment you install it so it stays clean and protected.
Find the mounting style your car uses before pulling anything
Automakers secure tail lights in one of two ways. You will either access the bulb from inside the rear cargo area or remove the entire clear plastic light unit mounted to the car body, which is called the housing. Taking two minutes to figure out your vehicle setup prevents snapped plastic clips and expensive body repairs.
The first design is an interior access panel, common on many sedans and passenger cars. Open your trunk and look at the carpeted lining directly behind the tail lamp. You will usually see a small removable plastic door, a cutout flap in the felt liner, or a few round plastic push-pins. Popping that panel open gives you direct access to the back of the light without touching the exterior lens. If your car uses this setup, you never have to remove the outer light assembly from the body.
The second design requires removing the exterior housing from the outside of the vehicle. This layout is standard on pickup trucks, hatchbacks, and sport utility vehicles. Open your tailgate or rear liftgate and inspect the painted door jamb next to the light lens. You will see two or three exposed screws or hex-head bolts holding the assembly to the sheet metal. Unscrew these fasteners with your hand screwdriver or socket ratchet, and place them safely in your pocket or a small cup so they do not roll away.
If you must pull the outer housing free, pull it straight back toward the rear of the car. Do not yank the plastic sideways or pry violently against the vehicle paint. Most housings use small ball-and-socket alignment pins near the outer edge to stay steady at highway speeds. A firm, straight tug toward you will release these guide pins smoothly without snapping the brittle plastic posts.
Unlock the plastic socket and remove the burned-out bulb gently
Once you reach the back of the light, you will see several plastic plugs with wires running into them. The plastic twist-in plug that holds the bulb is called the socket, and the wire bundle plugged into the back of it is the harness. Identify which socket aligns with your dead tail light or brake lamp, then follow these steps to remove the old bulb:
- Grip the socket base firmly: Place your thumb and forefinger on the raised plastic tabs on the back of the socket. Avoid tugging on the colored wires, because pulling the wires can loosen the metal terminals inside the plug.
- Twist counterclockwise: Turn the socket about a quarter turn counterclockwise until you feel a soft click. This motion disengages the locking tabs from the housing notches.
- Slide the socket out: Pull the socket straight back out of the housing opening. The wire bundle will give you a few inches of slack to work comfortably. Let the socket rest where you can see the glass clearly.
- Identify the bulb base design: Look closely at where the glass enters the plastic plug. Automotive bulbs generally use either a flat wedge base or a round metal twist base.
- Extract the old bulb: If your bulb has a wedge base (a flat glass bulb end that pushes straight into place), grip the glass and pull it straight out of the socket. If your bulb has a round metal base, push the glass gently down into the socket, twist it counterclockwise about an eighth of a turn, and lift it out.
If an old bulb feels stuck, road grime or high heat may have bonded the base to the plastic. Do not squeeze the bare glass with metal pliers, or you risk shattering the glass into your hands. Wrap a small strip of painter tape or a dry rag around the bulb for extra grip, and wiggle it gently from side to side until the base slides free.
Seat the fresh bulb with clean gloves and confirm it lights up
Installing the replacement requires a clean touch and quick verification before you put all the trim back together. Just as you would learn when reading about how to change a halogen light bulb safely at home, keeping your natural skin oils off the glass helps prevent localized hot spots that weaken automotive bulbs over time. Put on clean gloves or hold the new bulb with a clean tissue.
- Insert the replacement bulb: Align the base with the opening of the socket. For a flat wedge bulb, push the glass firmly into the center slot until it seats with a clean, solid stop. For a round metal base, line up the small raised metal pins on the sides with the grooves inside the socket, push down gently against the internal spring, and twist clockwise until the pins lock into their resting slots.
- Confirm the light works before closing up: Leave the socket hanging out in the open air for a moment. Turn on your vehicle parking lights to see if the tail light filament glows. If the bulb also handles your brake function, have a helper press the brake pedal or wedge a snow brush between the driver seat and the pedal. You should see a bright jump in light output when the brake engages, much like the dual output levels you find when exploring what is a three way light bulb and how it works in household lamps.
- Reinstall the socket into the housing: Line up the outer plastic tabs on the socket with the matching cutouts on the back of the housing. Push the socket inward so the rubber weather seal compresses flat against the opening, then turn it a quarter turn clockwise until it stops firmly.
- Remount the housing or secure the interior panel: If you pulled the outer light unit loose, align the guide pins with the rubber grommets on the car body and push the lens straight forward until it sits flush. Reinstall the mounting screws by hand first to avoid cross-threading, then tighten them snugly with your tool. If you worked through an interior trunk flap, snap the carpet clips or access door back into position.
Inspect the wiring and socket if the new bulb stays dark
Sometimes you seat a brand-new bulb into the socket, switch on the lights, and nothing happens. Do not panic or assume you bought a broken part. A few minor issues account for nearly all tail light snags, and you can run through this quick checklist in minutes:
- Check for heat damage on the socket: Look inside the plastic socket cavity with your flashlight. Because standard brake bulbs generate substantial heat during long stops in traffic, factory plastic can soften, scorch, or turn brittle. If the plastic looks warped or melted, the internal metal prongs may no longer touch the base of the bulb.
- Flip the bulb if you upgraded to an LED: Standard incandescent bulbs work regardless of which way you plug them in. Many basic light-emitting diode (LED) replacement bulbs, however, require electrical current to flow in one specific direction. If you installed an LED bulb and it stays dark, pull it out, rotate the base 180 degrees, and push it back in.
- Look for corrosion on the contacts: Water occasionally leaks past worn weather seals, creating chalky white or green residue on the small metal contact prongs inside the plug. Scrape the contacts clean with a wooden toothpick or spray them with quick-drying electrical contact cleaner before trying again.
- Inspect the wire harness connection: Make sure the wire clip that feeds power into the back of the socket is pressed completely shut. Road vibrations can wiggle loose harness clips over time.
- Check your vehicle fuse box: If both tail lights fail to turn on, or one entire side of the vehicle remains dark, you likely have a blown fuse. Check the fuse diagram on the inside lid of your fuse box, pull the tail light fuse with plastic tweezers, and replace it if the thin internal metal bridge is broken.
Choose the right replacement bulbs and socket parts for your repair
Fixing your tail light successfully comes down to matching the replacement hardware to your vehicle original factory setup. When shopping for replacement bulbs, always check your dead bulb part number or owner manual guide. Standard miniature automotive bulbs feature clear or red-tinted glass envelopes designed to fit specific base widths, pin locations, and dual-brightness requirements.
If you prefer brighter light and faster illumination, modern LED replacement bulbs offer an energy-efficient alternative to traditional incandescent glass. When choosing an LED upgrade, verify whether the bulb features non-polarity circuitry, which allows it to light up no matter which way you insert it into the socket. Look for options with built-in current regulation so the light output stays steady and does not flicker over rough pavement.
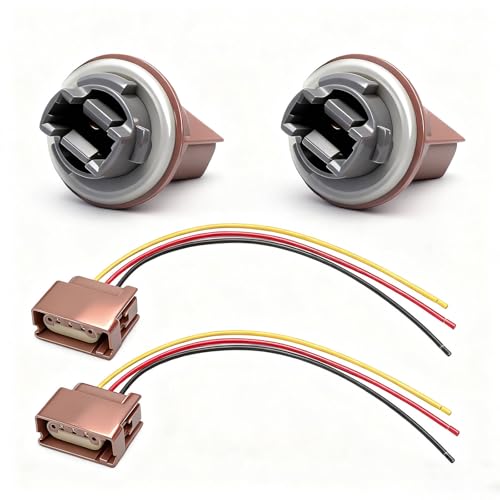
Pay close attention to the condition of your original plastic socket during the swap. If your inspection reveals blackened, heat-cracked plastic or loose electrical contacts, simply inserting a new bulb will not fix the problem long-term. In that case, purchasing a replacement socket harness or pigtail adapter is the smartest choice. High-temperature replacement sockets made from durable plastic with pure copper wiring cores provide a tight, weather-resistant grip that stops dimming and prevents electrical shorts for years to come.

- LFR Score10.0
LFR Score is a ranking system developed by lightfansreviews.com. LFR Score has no relationship or impact from any manufacturers or sales agent websites. Learn more
- BrandMotoforti
- LFR Score10.0
LFR Score is a ranking system developed by lightfansreviews.com. LFR Score has no relationship or impact from any manufacturers or sales agent websites. Learn more
- BrandBSNOVT

- LFR Score9.4
LFR Score is a ranking system developed by lightfansreviews.com. LFR Score has no relationship or impact from any manufacturers or sales agent websites. Learn more
- BrandSYLVANIA

- LFR Score9.2
LFR Score is a ranking system developed by lightfansreviews.com. LFR Score has no relationship or impact from any manufacturers or sales agent websites. Learn more
- BrandFugedox

- LFR Score8.8
LFR Score is a ranking system developed by lightfansreviews.com. LFR Score has no relationship or impact from any manufacturers or sales agent websites. Learn more
- BrandAWGUKA

- LFR Score8.8
LFR Score is a ranking system developed by lightfansreviews.com. LFR Score has no relationship or impact from any manufacturers or sales agent websites. Learn more
- BrandAUXITO

- LFR Score8.6
LFR Score is a ranking system developed by lightfansreviews.com. LFR Score has no relationship or impact from any manufacturers or sales agent websites. Learn more
- BrandiFunyLED

- LFR Score8.4
LFR Score is a ranking system developed by lightfansreviews.com. LFR Score has no relationship or impact from any manufacturers or sales agent websites. Learn more
- BrandSamWinGear
Last update on 2026-10-02 / Affiliate links / Images, Product Titles, and Product Highlights from Amazon Product Advertising API
FAQs
Can I touch a new automotive bulb with bare fingers?
You should avoid touching the glass of a new automotive bulb with bare skin. Natural oils from your fingertips transfer to the glass envelope, creating uneven surface heat when the filament reaches high operating temperatures. This localized heat stress weakens the glass and can cause the bulb to burn out early. Always wear clean disposable gloves or use a dry paper towel while sliding the replacement into its socket.
Why does my new turn signal bulb blink twice as fast?
Fast blinking, commonly known as hyper-flashing, happens when your vehicle flasher module detects a change in electrical resistance. If you replaced a standard factory bulb with an energy-saving LED bulb, the LED draws significantly less electrical power, tricking the car into thinking the bulb is burned out. You can resolve this issue by selecting an LED bulb with built-in resistance control or by sticking with a standard incandescent replacement.
Do I need to disconnect the car battery before swapping a bulb?
You do not need to disconnect your vehicle battery for a simple tail light bulb replacement. You only need to ensure the ignition is off, the keys are out of the switch, and your exterior lighting controls are set to off. Taking those simple precautions cuts power to the rear lighting circuits, keeping you completely safe while you handle the socket and replace the bulb.
How do I know if my socket is melted or just dirty?
A dirty socket usually has loose dust, dried road salt, or light surface film that wipes clean easily with a cotton swab or a burst of electrical cleaner spray. A melted socket shows physical structural damage, such as blackened or brown scorch marks, warped plastic walls that fight against your fingers when you turn the plug, or metal contact prongs that have sunken deep into heat-softened plastic. If the plastic is deformed or brittle, replace the socket assembly rather than forcing a new bulb into damaged prongs.

Best Bulb For Exposed Light 2026 That Shines Bright

Best Industrial Light Bulb Reviews: Top Picks for 2026
Best Outdoor Light Bulb Reviews: Top-Rated Picks for 2026
Best LED Reading Light Bulb Reviews - Top Picks for 2026

Best Vintage Light Bulb 2026 With Style And Glow
Best Yellow Fog Light Bulb 2026 For Clearer Night Drives

Best Z Wave Light Bulb 2026 Top Picks For Smart Control
Best Light Bulb For Vanity Mirror 2026 Brightness Boost