
How to Unscrew a Light Bulb Without Breaking It

Turn the bulb to the left. Always shut off the wall switch first, let the glass cool down, and turn it counterclockwise with gentle, steady pressure. Grasping the glass with a dry cloth or a rubber glove gives you plenty of traction, so the base spins freely out of the metal socket without slipping in your fingers.
A few details can change how you approach the fixture. High ceilings and recessed spotlight cans leave very little room for your fingers, making a suction tool much safer than balancing on a chair. Some specialty bulbs also use locking pins that require a gentle push before they rotate, while older bulbs can freeze in place from years of heat. Here is how to handle each situation cleanly without breaking the glass.
Two Critical Safety Checks Before Touching the Glass
Before you raise your hands to touch a light bulb, two simple safety checks will keep you from getting burned or shocked. Taking thirty seconds to confirm power and temperature prevents the vast majority of household lighting accidents.
First, cut the power source entirely. If you are changing a portable desk lamp, floor lamp, or bedside reading light, pull the electrical plug out of the wall outlet. That guarantees zero electrical current can reach the socket (the threaded metal cup that powers the bulb). For hardwired ceiling fixtures, wall sconces, and recessed overhead lights, flick the wall switch to the off position. If the fixture is controlled by a multi-switch setup, a dimmer switch, or if you feel nervous about old home wiring, walk over to your main electrical panel and flip the circuit breaker off for that room. A switched-off wall toggle can still leave power at the fixture if a previous installer wired the switch to the neutral wire instead of the hot wire.
Second, check the glass temperature before wrapping your fingers around it. Traditional incandescent bulbs and halogen lights convert most of their energy into heat, reaching surface temperatures that can blister bare skin in a fraction of a second. Even modern LED bulbs build up significant heat around their lower neck and heat-sink base. If the light was on recently, give it at least five to ten minutes to cool down completely. Touch the outer glass with the back of your hand for a split second first. If you feel any warmth radiating outward, give it a few more minutes. When you are ready to work, slipping on a clean pair of rubber-dipped work gloves or holding a dry microfiber cloth gives you an extra layer of protection against unexpected heat and slippery glass.
How to Unscrew a Standard Light Bulb Step by Step
Most common household lamps and ceiling fixtures use a standard medium screw base (labeled E26 on retail packaging). Removing one is straightforward, but applying uneven pressure or twisting at an awkward angle can crack the glass globe right where it joins the metal base. Follow these numbered steps to release the bulb cleanly on your first attempt.
- Set up a stable, level footing. Never stand on your tiptoes, balance on an unstable rolling desk chair, or stretch your arms past their comfortable reach. Bring in a sturdy stepladder or step stool so your chest sits roughly level with the fixture, which keeps your wrists straight and prevents sudden slips.
- Position your grip around the widest part of the bulb. Place your palm and fingers evenly around the middle curve of the glass rather than pinching the fragile rounded tip. Spreading your hand across the wider body distributes your grip evenly so you do not squeeze too hard in one weak spot.
- Turn the bulb counterclockwise (to the left). Remember the standard rule: "lefty-loosey, righty-tighty." Rotate your wrist smoothly to the left. The threaded metal base will begin riding up the spiral tracks inside the socket cup.
- Keep turning with light, steady pressure until the threads release. You will typically need two to four full rotations before the metal base disconnects from the internal brass contact. Maintain steady contact with the bulb the entire time so it does not wobble loose and drop out prematurely.
- Lower the bulb straight downward out of the fixture. Once you feel the threads disengage, pull the bulb straight out along the centerline of the socket. Tilting the bulb sideways while the final thread is releasing can bend the soft metal rim of the socket or crack delicate glass shades.
- Inspect the empty socket before installing a replacement. Take a quick look inside the metal socket cup with a flashlight. Verify that the center brass tab at the bottom looks clean, dry, and slightly raised, with no black scorch marks, melted plastic, or trapped debris. If you are servicing a multi-setting fixture that uses a specialized base, like those explained in this guide to what is a three way light bulb and how it works, make sure both electrical contact tabs inside the socket sit undamaged.
How to Remove Recessed Bulbs and High-Ceiling Lights Safely
Recessed cans (the flush metal spotlight housings installed inside ceilings) present a unique challenge. In these fixtures, wide flood bulbs for recessed ceiling cans (often labeled BR30) or directional spotlight bulbs (such as PAR20 or PAR38) sit sunken into the ceiling. The gap between the bulb glass and the metal trim ring is often narrower than a human finger, leaving you with nothing to grab.
If you cannot get your fingers around the sides of a recessed bulb, create a temporary grip on the flat face of the glass. Tear off a piece of heavy-duty duct tape about twelve inches long. Press the center six inches of the tape firmly across the flat glass surface of the bulb, smoothing out any air bubbles with your thumb. Fold the two loose ends of the tape back against themselves to form a two-inch vertical handle in the middle. Grasp that tape handle firmly between your thumb and forefinger, twist counterclockwise to start the unscrewing process, and then finish spinning the bulb by hand once it lowers below the trim ring. Afterward, peel the tape away clean.
For two-story entryways, vaulted ceilings, and high stairwells, do not risk balancing on a ladder leaned against high drywall. A specialized telescoping extension pole equipped with a suction cup attachment allows you to unscrew ceiling bulbs while standing firmly on the floor. Wipe dust off the bulb face using a dry duster first, press the silicone suction cup squarely against the center of the bulb face to create an airtight seal, and slowly rotate the pole counterclockwise. If your ceiling holds modern accent lights, look closely at how the bulb is seated before applying heavy turning pressure. Some miniature directional fixtures do not use standard screw threads at all; instead, they use a GU10 twist-and-lock two-prong base that requires just a gentle quarter-turn counterclockwise to drop free. Reviewing how to change a halogen light bulb safely at home will help you identify whether your spotlight uses twist pins, push pins, or traditional screw threads. If you are planning an upgrade to modern overhead lighting once the old bulb is down, selecting the best spot light bulbs indoor ensures you match the correct beam angle and base style for your specific recessed fixture.
How to Loosen a Bulb That Feels Frozen in the Socket
Over months or years of use, a light bulb can become stubbornly locked in place. The continuous heating and cooling cycles expand and contract the metal base, which can create a tight friction lock against the socket wall. In outdoor porches, bathrooms, or damp basements, mild corrosion can also bind an aluminum bulb base to a brass socket shell. When a bulb refuses to budge, forcing it with bare hands can easily tear the glass dome right off the metal base.
The safest way to break that frozen seal is by increasing surface friction rather than squeezing harder. Put on a clean pair of rubber dishwashing gloves or wrap a wide strip of rubber shelf liner around the bulb body. Rubber provides immense surface grip against slick glass, allowing you to transfer rotational torque directly to the threads with only moderate hand pressure. If the bulb still resists, try the micro-tightening trick: gently turn the bulb a tiny fraction of an inch clockwise (to the right), just enough to feel it resist, and then immediately reverse direction counterclockwise to the left. That microscopic rocking movement often snaps the thin layer of corrosion or heat binding the threads without putting destructive stress on the glass.
Never spray standard penetrating oils, water-displacing sprays, or kitchen cooking oils into a light socket to loosen a stuck bulb. Liquid sprays can soak into the electrical wiring behind the socket, dissolve plastic insulation, and turn the fixture into a severe fire hazard the moment the switch turns back on. If heat and corrosion have completely fused the metal base to the socket shell, your safest move is to stop forcing it, keep the breaker turned off, and have a licensed electrician replace the socket or fixture assembly entirely.
How to Safely Remove a Broken Bulb Base Without Getting Cut
If a stuck bulb shatters during removal, or if the glass globe twists completely off the metal base, you are left with a jagged metal collar stuck inside the fixture. This looks alarming, but you can extract the remaining base safely using common household tools as long as you respect the electrical hazard.
- Shut off power at the main circuit breaker panel. This step is non-negotiable. You will be touching bare, conductive metal components inside the socket. Flip the breaker switch to off, and use a reliable non-contact voltage tester right against the socket rim to verify that no electrical current is present.
- Put on thick work gloves and protective safety glasses. The metal base of a light bulb is made of razor-thin aluminum or brass, and small sharp glass fragments often remain glued to the inner rim. Eye protection prevents glass splinters from falling into your eyes while looking upward.
- Use needle-nose pliers for the cleanest extraction. Insert the narrow tips of closed needle-nose pliers deep into the center of the stuck metal base. Spread the handles apart firmly so the outer jaws of the pliers press outward against the interior walls of the metal shell. While maintaining that outward expansion pressure, twist the pliers counterclockwise. The metal collar will unthread from the socket tracks and back out smoothly.
- Use a dense raw potato if you lack pliers. Cut a medium-sized raw potato in half crosswise. Press the flat, cut face of the potato firmly into the socket opening so the sharp, broken glass filaments and metal edges embed deeply into the firm potato flesh. Once the potato has a solid hold on the inner structure, rotate the potato counterclockwise. The embedded edges will catch, turning the metal base right out of the threads.
- Clean away all residual moisture and debris. If you used the potato method, use a dry rag to thoroughly wipe out any potato moisture or residual glass crumbs from the socket interior. Let the empty socket dry completely before installing a new bulb and flipping the circuit breaker back on.
Choosing the Right Bulb Changer Tool for Tough Fixtures
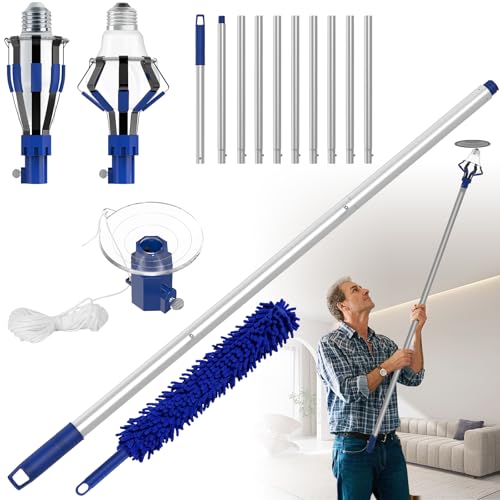
When you have tall ceilings, recessed lighting cans, or fixtures positioned over open stairwells, a dedicated light bulb changer tool is the safest way to tackle the job without risking a dangerous fall from a ladder. Before purchasing a tool kit for your home, take note of the specific bulb shapes and heights you need to service.
For flat-faced floodlights and spotlights seated flush inside recessed cans, look for a changer head that utilizes a heavy-duty silicone suction cup. The suction cup must sit flat against the glass face to create an airtight vacuum. Check that the diameter of the suction cup matches the face of your bulbs; a standard two-inch to two-and-a-half-inch suction cup works well for common ceiling flood bulbs. Quality suction models feature an attached release string that allows you to easily break the vacuum seal once the new bulb is threaded securely into the ceiling.
For traditional rounded teardrop bulbs, decorative globe bulbs, or smaller accent lights, choose a changer head equipped with flexible, rubber-coated basket fingers. These spring-loaded fingers slide up over the rounded shoulders of the bulb, gripping the glass on all sides without applying crushing point pressure. If you are buying a kit that includes a telescoping extension pole, verify that the pole sections lock firmly in place with flip-cam or positive mechanical twist locks. A pole that wobbles or spins at its joints will frustrate your efforts to turn a threaded base overhead.

- LFR Score8.6
LFR Score is a ranking system developed by lightfansreviews.com. LFR Score has no relationship or impact from any manufacturers or sales agent websites. Learn more
- BrandEnhon

- LFR Score8.6
LFR Score is a ranking system developed by lightfansreviews.com. LFR Score has no relationship or impact from any manufacturers or sales agent websites. Learn more
- BrandLupar
- LFR Score8.4
LFR Score is a ranking system developed by lightfansreviews.com. LFR Score has no relationship or impact from any manufacturers or sales agent websites. Learn more
- BrandOJLUOJ

- LFR Score8.4
LFR Score is a ranking system developed by lightfansreviews.com. LFR Score has no relationship or impact from any manufacturers or sales agent websites. Learn more
- BrandSTAUBER

- LFR Score8.0
LFR Score is a ranking system developed by lightfansreviews.com. LFR Score has no relationship or impact from any manufacturers or sales agent websites. Learn more
- BrandQWORK

- LFR Score8.0
LFR Score is a ranking system developed by lightfansreviews.com. LFR Score has no relationship or impact from any manufacturers or sales agent websites. Learn more
- BrandFemitu

- LFR Score8.0
LFR Score is a ranking system developed by lightfansreviews.com. LFR Score has no relationship or impact from any manufacturers or sales agent websites. Learn more
- BrandBAYCO

- LFR Score7.2
LFR Score is a ranking system developed by lightfansreviews.com. LFR Score has no relationship or impact from any manufacturers or sales agent websites. Learn more
- BrandZLY
Last update on 2026-10-02 / Affiliate links / Images, Product Titles, and Product Highlights from Amazon Product Advertising API
FAQs
Which way do I turn a light bulb to loosen it?
Turn the bulb counterclockwise, which means rotating it toward the left. This follows the standard "lefty-loosey, righty-tighty" mechanical rule used for virtually all screw-threaded household fittings. If you are standing directly beneath a ceiling fixture looking up at the bulb face, turning counterclockwise means sweeping your hand in the opposite direction that clock hands travel.
Do I need to turn off the main circuit breaker to change a bulb?
For routine replacement of an unbroken bulb in a standard lamp or simple ceiling fixture, turning off the lamp switch or the wall light switch is sufficient. However, you should always flip the circuit breaker off at your main panel if you are working on a fixture controlled by multiple switches, if you must reach inside a recessed fixture housing, or if the bulb has broken and exposed bare internal wiring.
Why did my light bulb separate from its metal base when I tried to unscrew it?
Light bulb glass is bonded to its threaded metal base with industrial heat-resistant adhesive. Over thousands of hours of operation, intense operating temperatures and age can degrade this glue, making it brittle. If the metal threads have also bound to the socket through heat expansion or minor corrosion, the force you apply to the glass can shear through the weakened adhesive before the threads turn, leaving the metal base stuck inside the socket.
What should I do if a new bulb will not screw in smoothly?
Stop immediately and back the bulb out if you feel rough grinding resistance or if the bulb sits at a crooked angle. Forcing a bulb that is cross-threaded will permanently damage the soft brass threads inside your fixture socket. Ensure the replacement bulb matches the socket base size, hold the bulb completely straight along the socket axis, and gently turn counterclockwise until you feel the threads click into alignment before turning clockwise to tighten.


Best Bulb For Exposed Light 2026 That Shines Bright

Best Industrial Light Bulb Reviews: Top Picks for 2026

Best Outdoor Light Bulb Reviews: Top-Rated Picks for 2026

Best LED Reading Light Bulb Reviews - Top Picks for 2026

Best Vintage Light Bulb 2026 With Style And Glow

Best Yellow Fog Light Bulb 2026 For Clearer Night Drives

Best Z Wave Light Bulb 2026 Top Picks For Smart Control

Best Light Bulb For Vanity Mirror 2026 Brightness Boost






