
How to Unscrew a Stuck Light Bulb Without Breaking It

Most people assume a stubborn bulb just needs a harder twist with bare hands, but cranking on fragile glass usually shatters it. The safest fix is to cut the power at the breaker and use rubber gloves or a duct-tape strap for gentle grip. Turning counterclockwise with steady pressure frees the threads without cutting your fingers.
The exact approach depends on the fixture and the bulb. A desk lamp within reach is much simpler to handle than a bulb wedged deep inside a high recessed ceiling can. If the glass has already cracked off, you will need to back out the trapped metal base using insulated needle-nose pliers instead. Crusty thread corrosion or heat-fused metal will also demand extra care. Here is how to work the stuck piece free without damaging the socket.
Always cut power and let the socket cool first
Before you touch a stubborn bulb, you must make the work area electrically dead and physically safe. Light fixtures cycle through intense heat every time they turn on, which causes the base (the metal screw bottom of the bulb) to expand against the socket (the threaded metal cup inside the fixture). Over months or years, heat and moisture create corrosion (crusty rust or oxidation on metal threads) that binds the two metals together. Forcing a stuck bulb while the electrical current is active exposes you to severe shocks or spark hazards if the glass separates from its base.
Follow this safety checklist before putting your hands near the fixture:
- Shut off the circuit breaker: Flip the switch on your main electrical panel that feeds power to the room. Never rely on the wall toggle switch alone. Wall switches sometimes only cut the hot wire, leaving residual electrical voltage running through the threaded metal cup if the house wiring has a switched neutral.
- Confirm the circuit is dead: Turn the wall switch on and off after flipping the breaker to verify no lights turn on. If you have a non-contact voltage tester, hold it near the rim of the fixture to confirm that no power reaches the unit.
- Allow the glass to cool completely: Wait at least 15 to 20 minutes after the light was last lit. Hot glass expands tightly against the fixture threads and shatters much more easily under twisting pressure than cool glass.
- Protect your eyes and floor: Put on safety glasses before looking directly up into a ceiling can or hanging pendant. Spread an old towel, sheet, or drop cloth directly underneath the fixture to catch any stray glass shards in case the bulb cracks.
- Set up steady footing: Never stand on tiptoes or balance on an unstable chair. Place a sturdy stepladder directly beneath the fixture so your chest aligns with the bulb, giving you balanced leverage without straining your shoulders.
Always remember the standard turning rule: turn counterclockwise to loosen the bulb, and turn clockwise to tighten it. When you look directly up at the face of the bulb, twist it to the left. If you are reaching over the top of a table lamp or down into an upward-facing floor uplight, keep that same orientation in mind so you do not accidentally tighten the stuck base even further.
Use rubber gloves or tape for extra turning traction
When an intact glass bulb refuses to move, the real problem is usually traction rather than strength. Smooth glass offers almost no grip for bare fingertips, causing your hands to slip and tempting you to squeeze harder until the glass snaps. Standard household teardrop bulbs (often labeled A19 or A21 on packaging) and wide flood bulbs for recessed ceiling cans (BR30) require friction spread evenly across the curved surface to break the bond of corrosion.
- Put on rubber-coated work gloves: Clean, dry rubber dishwashing gloves or silicone-palm work gloves provide immediate friction against slippery glass. Cup your fingers flat around the widest circumference of the bulb rather than pinching the fragile tip with your fingertips. Push gently upward into the socket while twisting steadily counterclockwise. In many cases, the high-friction rubber breaks the surface seal on your first firm attempt.
- Create a duct-tape grip handle: If gloves slip, tear off a piece of heavy-duty duct tape about 18 to 24 inches long. Wrap the center portion of the tape strip firmly around the middle of the glass dome. Bring the two loose ends of the tape together below the center of the bulb and press them flat against each other, creating a sturdy two-inch tab or handle. Grasp this tape handle with your fingers and pull counterclockwise. The tape distributes twisting torque across the entire glass shell without placing concentrated crushing force on any single point.
- Use suction tools for smooth floodlights: If you are dealing with recessed ceiling cans or directional indoor/outdoor spotlight and floodlight bulbs (PAR20 or PAR38), your fingers cannot fit around the sides of the casing. Press a dedicated rubber suction cup firmly against the center of the flat glass face. Turn the suction handle counterclockwise while keeping constant forward pressure against the bulb face so the suction seal does not release. If you are dealing with smaller specialty bulbs, you can check our guide on how to change a halogen light bulb safely at home to handle fragile quartz capsules properly.
- Apply steady, progressive torque: Never jerk or wrench the bulb quickly. Apply firm, gradual pressure counterclockwise. You will often feel a tiny snap or gritty sensation as the crusty oxidation along the threads breaks loose. Once that initial bond fractures, the bulb will spin out smoothly by hand.
If you feel the glass twisting independently while the metal base stays frozen inside the socket, stop immediately. That spinning sensation means the factory adhesive securing the glass to the metal shell has sheared off, and continuing to twist will twist off the electrical contact wires and shatter the bulb in your palm.
Back out broken metal bases with insulated pliers safely
If a bulb breaks while turning, or if the glass separates entirely from the screw base, you are left with a jagged metal collar stuck inside the threaded cup. This looks intimidating, but it is straightforward to fix using simple hand tools. Take a breath, sweep away any fallen glass fragments, and tackle the metal shell methodically.
- Double-check that the power remains off: Never touch an exposed metal bulb base until you are entirely sure the breaker is open. An exposed base contains bare contact wires that will cause a direct electrical shock if energized. Confirm the circuit switch at your electrical panel is locked off.
- Put on heavy work gloves and safety goggles: Broken glass edges and sharp brass collars can slice through thin rubber. Wear thick leather work gloves to protect your palms and wrists while working around the rim of the fixture.
- Insert needle-nose pliers into the base: Take a pair of long needle-nose pliers that feature rubber-insulated handles. Insert the closed tips of the pliers directly into the center opening of the stuck metal shell. Spread the plier handles outward with your hand so the outer serrated edges of the plier jaws press firmly against the inside walls of the threaded metal collar.
- Twist counterclockwise using outward tension: While keeping outward pressure on the handles to hold the plier tips locked against the inside metal walls, slowly rotate the tool counterclockwise. The outward wedge action forces the metal shell to spin along the socket threads without slipping.
- Peel the rim if the shell resists: If the metal base refuses to turn, grip the exposed edge of the metal collar with the tips of your needle-nose pliers. Gently bend a small section of the metal rim inward toward the center of the socket to pull it away from the fixture threads. Once you have bent a small inward tab, bite down on that tab with your pliers and turn counterclockwise, walking the collar out of the socket cup.
- Clear out remaining debris: Once the metal base backs out of the socket, inspect the interior of the fixture with a flashlight. Shake or vacuum out any stray glass fragments or loose metal shavings before touching the socket interior.
If you encounter miniature track heads or ceiling fixtures featuring two-pin push-in bases (GU5.3) or twist-and-lock two-prong bases (GU10), remember that these do not unscrew like a standard medium screw base. A twist-and-lock base only requires a quarter-turn counterclockwise to release its locking pins, while a two-pin base pulls straight out without twisting at all.
Never force stuck glass or use wet food tricks
When a light bulb resists removal, trying aggressive shortcuts often turns a minor household annoyance into an expensive repair or a dangerous injury. Knowing what not to do is just as important as knowing the proper removal steps.
Avoid these common mistakes when dealing with a frozen bulb:
- Do not crush the glass with channel-lock pliers: Gripping an intact glass bulb with metal plumbing pliers will instantly shatter the bulb. The intense point-pressure sends microscopic glass shards flying across the room and leaves a jagged mess that is much harder to remove than an intact bulb.
- Avoid the raw potato trick: A popular online suggestion advises pressing a cut raw potato into a broken bulb socket to twist out the base. This method is messy, unpredictable, and hazardous. Potatoes are full of natural moisture and conductive water. Jamming raw vegetable flesh into an electrical fixture introduces wet starch into the socket, ruins the socket insulation, and poses severe shock hazards if anyone restores power before the socket dries completely. The soft potato flesh also shears easily against sharp metal, leaving moist potato pulp jammed behind the broken brass rim.
- Never spray liquid penetrating oils into the fixture: Aerosol penetrating fluids, degreasers, and spray lubricants are conductive and leave flammable residues behind. Spraying them inside a ceiling fixture or lamp socket can cause electrical shorts, melt internal plastic components, and create fire risks once a new bulb generates operating heat.
- Do not pull outward on stuck screw bases: Pulling or yanking downward on a stuck screw base bends the delicate mounting bracket inside your light fixture and can snap the internal brass contact tab. Work the threads out gently in a flat rotational path.
If a socket has rusted so thoroughly that the metal base tears into shreds without moving, stop working. Continuing to pry with force will twist the entire interior electrical socket out of its mounting, which can rip the building wires behind the ceiling drywall. At that point, replacing the entire fixture or calling a licensed electrician is the safest and most practical choice.
Clean dirty sockets and stop thread corrosion early
Once you successfully free a stuck bulb, spend a few minutes inspecting the fixture before installing a replacement. Taking simple preventive steps guarantees that the next bulb you screw in will back out smoothly years down the road without sticking.
Walk through this maintenance checklist before installing your next bulb:
- Inspect the empty socket cup: Shine a flashlight directly into the empty socket. Check the threaded metal cup for white chalky dust, black soot, or green oxidation. If the threaded walls look crusty or pitted, the socket requires gentle cleaning before it can safely accept a new bulb base.
- Scrape away corrosion dry: Make sure the circuit breaker remains completely off. Wrap a piece of coarse dry cloth or a small nylon utility brush around your finger and scrub the interior threads to brush away loose rust and oxidation. Never use steel wool or metal wire brushes inside a light socket, because stray conductive steel fibers can break off, fall behind the socket tab, and cause an instant short circuit when power returns.
- Check the center contact tab: Look at the small brass tab sitting in the center bottom of the socket cup. Over time, heavy-handed installation can flatten this tab against the bottom floor, causing poor electrical contact that leads to arcing, heat buildup, and thread bonding. Use the tip of a small wooden craft stick or a clean screwdriver to gently pry the tab upward a millimeter or two so it makes firm spring contact with the new bulb.
- Apply socket lubricant sparingly: For outdoor porch lights, bathroom vanity strips, or damp basement fixtures exposed to moisture, apply a microscopic film of electrical dielectric grease or bulb socket lubricant across the threads of the new bulb base. This clear silicone compound blocks moisture, halts galvanic corrosion between dissimilar metals, and prevents future seizing without impeding electrical conductivity.
- Do not overtighten the new bulb: Turn the new bulb clockwise until it makes firm contact with the center brass tab, and then stop. Turning until it is finger-snug is all that is required. Cranking down on the bulb crushes the socket threads, deforms the contact tab, and makes the bulb nearly impossible to remove later.
- Match the bulb rating to your fixture: Make sure the bulb you choose matches the fixture design. If you are placing a bulb inside an airtight globe or flush ceiling dome, confirm the package states it is enclosed fixture rated. Using non-enclosed bulbs in sealed fixtures traps extreme heat around the base, which melts internal adhesive rings and bonds the bulb into the socket. If you are replacing specialized lamps, such as when figuring out what is a three way light bulb and how it works, check that the contact rings at the base match the specific socket depth of your lamp.
Choose the right bulb removal tool for your fixture
Having dedicated removal tools on hand saves you from risky improvisations when a bulb sticks or shatters. Different fixture styles and bulb profiles call for distinct tool designs to provide safe leverage without damaging delicate components.
For intact bulbs installed in deep ceiling cans or high outdoor overhangs, look for suction-cup changers designed specifically for smooth-faced bulbs. These tools rely on heavy-duty, pliable rubber cups that press flat against directional indoor/outdoor spotlight and floodlight bulbs (PAR20 or PAR38) as well as wide flood bulbs (BR30). Look for designs that feature an integrated release string or a locking pin mechanism. A release string allows you to break the vacuum seal effortlessly once the bulb is safely lowered, while an anti-rotation pin prevents the suction cup from simply spinning on its mounting pole when you apply turning torque. If you have deep recessed cans, choosing the best spot light bulbs indoor with flat, smooth faces makes using suction removal tools far easier in the future.
For standard household teardrop bulbs (A19 or A21) or round vanity globe bulbs (G25), multi-finger cage changers are the most practical choice. These tools feature flexible, rubber-coated plastic fingers that slide over the curve of the glass to grip the bulb evenly from all sides. Check that the fingers have high-friction rubber sleeves, which grab smooth glass firmly without requiring excessive crushing pressure that might crack thin decorative globes.
For broken bases where the glass has shattered entirely, keep a tapered broken-bulb extractor tool in your utility kit. These extractors feature a stepped, heavy rubber head that wedges securely into standard medium screw bases (E26) and smaller candelabra bases (E12). When you press the rubber tip into the open metal collar, the ridged rubber grips the jagged inside edges of the base, allowing you to back the metal shell out safely without using metal pliers near the socket walls. Make sure any extractor you choose includes standard female threads at the base so you can attach it to a universal threaded extension pole when tackling high ceilings.

- LFR Score8.6
LFR Score is a ranking system developed by lightfansreviews.com. LFR Score has no relationship or impact from any manufacturers or sales agent websites. Learn more
- BrandSTAUBER
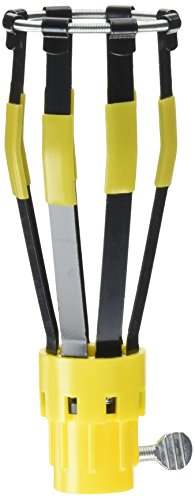
- LFR Score8.4
LFR Score is a ranking system developed by lightfansreviews.com. LFR Score has no relationship or impact from any manufacturers or sales agent websites. Learn more
- BrandBAYCO

- LFR Score8.4
LFR Score is a ranking system developed by lightfansreviews.com. LFR Score has no relationship or impact from any manufacturers or sales agent websites. Learn more
- BrandQWORK

- LFR Score8.2
LFR Score is a ranking system developed by lightfansreviews.com. LFR Score has no relationship or impact from any manufacturers or sales agent websites. Learn more
- BrandQWORK

- LFR Score8.2
LFR Score is a ranking system developed by lightfansreviews.com. LFR Score has no relationship or impact from any manufacturers or sales agent websites. Learn more
- BrandMinatee

- LFR Score8.0
LFR Score is a ranking system developed by lightfansreviews.com. LFR Score has no relationship or impact from any manufacturers or sales agent websites. Learn more
- BrandBAYCO

- LFR Score8.0
LFR Score is a ranking system developed by lightfansreviews.com. LFR Score has no relationship or impact from any manufacturers or sales agent websites. Learn more
- BrandLeefasy

- LFR Score7.6
LFR Score is a ranking system developed by lightfansreviews.com. LFR Score has no relationship or impact from any manufacturers or sales agent websites. Learn more
- BrandDreyoo

- LFR Score7.6
LFR Score is a ranking system developed by lightfansreviews.com. LFR Score has no relationship or impact from any manufacturers or sales agent websites. Learn more
- BrandMerdege

- LFR Score7.4
LFR Score is a ranking system developed by lightfansreviews.com. LFR Score has no relationship or impact from any manufacturers or sales agent websites. Learn more
- BrandKOR
Last update on 2026-10-02 / Affiliate links / Images, Product Titles, and Product Highlights from Amazon Product Advertising API


Best Bulb For Exposed Light 2026 That Shines Bright

Best Industrial Light Bulb Reviews: Top Picks for 2026

Best Outdoor Light Bulb Reviews: Top-Rated Picks for 2026

Best LED Reading Light Bulb Reviews - Top Picks for 2026

Best Vintage Light Bulb 2026 With Style And Glow

Best Yellow Fog Light Bulb 2026 For Clearer Night Drives

Best Z Wave Light Bulb 2026 Top Picks For Smart Control

Best Light Bulb For Vanity Mirror 2026 Brightness Boost






