
How To Fix A Ceiling Fan Motor Without The Headache
How To Fix A Ceiling Fan Motor starts with noticing the little warning signs people usually brush off. Maybe the fan hums like it’s struggling through a bad Monday morning. Maybe the blades barely move even though the switch is on full speed. That slow wobble, strange clicking noise, or burning smell isn’t just irritating. It often points to worn bearings, loose wiring, capacitor trouble, or dust buildup choking the motor from the inside out.
Plenty of ceiling fans don’t actually need full replacement parts right away, and that’s where things get interesting. A careful inspection can reveal simple issues hiding behind the housing cover. Loose screws, dried lubrication, or overheating from packed dust can quietly drag performance downhill over time. Motor maintenance sounds technical at first, sure, but many fixes involve basic tools, steady hands, and a bit of patience instead of expensive service calls.
Noise problems usually push people over the edge faster than anything else. That constant rattling during the night can drive anybody nuts. Sometimes the culprit comes from blade imbalance, but other times the motor itself develops internal friction that creates humming or grinding sounds. Cleaning the motor housing, tightening hardware, and checking capacitor condition can dramatically improve how the fan operates without replacing the entire unit.
Heat buildup also deserves attention because ignored motors rarely fix themselves. A fan motor running hot may struggle due to blocked airflow, worn internal components, or electrical stress from faulty connections. Overheating issues can shorten the lifespan of the fan surprisingly fast, especially in humid rooms where dust sticks heavily to internal parts. Catching those problems early helps avoid bigger electrical headaches later on.
Speed inconsistencies frustrate people too because the fan starts acting unpredictable. One day it spins normally, then suddenly crawls along like it’s out of energy. Capacitor failure commonly causes that sluggish behavior, and honestly, it’s more common than many expect. Replacing a capacitor costs far less than installing a whole new ceiling fan, which makes troubleshooting worth the effort.
Some older ceiling fans develop stubborn startup problems after years of daily use. You pull the chain, hear the motor hum, but the blades refuse to move unless pushed manually. That usually hints at capacitor wear or internal motor resistance. Electrical inspection becomes essential at that point because continuing to force the fan can worsen internal damage.
Dust accumulation plays a bigger role than most people think. Ceiling fans constantly pull airborne debris into vents and motor openings. Over time, grime creates insulation around the motor, trapping heat and stressing moving parts. A deep cleaning combined with lubrication can sometimes restore smoother operation almost immediately, which surprises a lot of folks who assumed the motor was completely finished.
How To Fix A Ceiling Fan Motor
A fan that hums but barely moves can make a room feel hotter, louder, and more annoying than it needs to be. The tricky part is that how to fix a ceiling fan motor doesn’t always mean tearing the whole fixture down or buying a new fan right away. Sometimes the real problem is a weak capacitor, a dirty motor housing, loose wiring, or dried-out bearings making the motor work harder than it should. Start with the obvious clues, then work inward instead of guessing and wasting money.
Motor Warning Signs
A ceiling fan motor usually gives fair warning before it quits completely. A steady electrical hum, slow blade movement, random speed drops, or a hot motor housing can all point to stress inside the fan. Don’t shrug off a burning smell either, because that can mean overheated wiring or a failing motor winding. Kill the power first, because poking around a live ceiling fixture is asking for trouble.
Slow startup is one of the most common clues. The fan may hum, twitch, or need a little hand push before the blades begin moving, which usually points toward a bad capacitor rather than a fully dead motor. That small part stores and releases the energy needed to help the motor start and run at the right speed. Once it weakens, the fan acts lazy, uneven, or flat-out stubborn.
Noise tells a story too. A rattling sound often comes from loose blade brackets or screws, but a deeper grinding noise may come from worn bearings or internal friction. A buzzing sound can also come from a cheap wall dimmer connected to a fan motor, which isn’t a great match. Fans need proper fan-rated controls, not light dimmers pretending they can handle motor loads.
Heat is another red flag that deserves respect. A slightly warm motor housing can be normal after long use, but a very hot housing means the motor is struggling. Dust packed inside the vents traps heat, and restricted airflow can shorten motor life faster than people expect. To cut down on future electrical headaches in wet areas, use safe repair habits similar to projects like replace inground pool light, where power control and moisture awareness matter from the start.
Safe First Checks
Start at the breaker, not at the fan. Turn off the circuit, then confirm the wall switch no longer powers the fixture before removing the canopy or motor cover. This one step protects against shock risk, especially in older homes where switch wiring can be weird. A non-contact voltage tester adds another layer of confidence before your hands go near the wires.
Once the power is off, check the obvious mechanical parts before blaming the motor. Loose blades, cracked brackets, and uneven screws can create noise that feels like a motor problem even when the motor is fine. Tighten each blade bracket evenly, then check whether the fan sits level. A wobbly fan forces extra strain through the motor shaft, and over time that can make a small issue snowball.
Dust cleanup sounds boring, but it can make a real difference. Use a soft brush, microfiber cloth, and gentle vacuum suction around the vents and housing. Heavy dust buildup acts like a blanket around the motor, trapping heat and making cooling airflow worse. Skip soaking sprays or dripping cleaners because moisture near electrical parts can create a new problem while trying to fix the old one.
Check the pull chain, wall control, and remote receiver too. A fan that won’t respond properly may have a control failure, not a motor failure. Remote receivers can burn out, pull-chain switches can wear internally, and wall controls can send inconsistent power. Separately, if portable airflow would help while the ceiling fan is down, compare best portable fan for concert picks for a compact backup that doesn’t need ceiling wiring.
Capacitor And Wiring Fixes
The capacitor sits inside the fan housing and often looks like a small black or gray plastic box with wires coming from it. A swollen case, melted spot, leaking material, or burnt smell around it signals a failed capacitor. Even without visible damage, weak capacitors can cause slow speeds, humming, or trouble starting. Match the replacement by microfarad rating and voltage, not by guesswork or similar shape.
Take a photo of the wiring before removing anything. Fan wiring can look messy fast, especially with lights, remote modules, and multiple speed taps packed into a small canopy. Labeling wires helps prevent a frustrating “where did this go?” moment later. A careful swap keeps the speed control circuit intact and avoids creating a bigger issue than the original hum.
Wire nuts deserve a close look because loose connections can mimic motor failure. A fan may flicker, buzz, or randomly stop if a connection is barely hanging on inside the canopy. Tighten only after power is off, and replace cracked or loose wire connectors with properly sized ones. Clean connections help the motor receive steady power, which protects motor windings from extra stress.
Wall controls can quietly sabotage a healthy fan. A light dimmer connected to a fan can create buzzing, overheating, and uneven speed because it chops power in a way motors don’t like. Replace it with a fan-rated speed control or a standard switch designed for motor loads. For rooms where sound matters most, compare best quiet ceiling fans before deciding whether repair or replacement makes better sense.
Cleaning Bearings And Reducing Friction
Some ceiling fan motors use sealed bearings, while older models may allow limited lubrication. Check the manual or model label before adding oil because not every fan is built for it. Using the wrong lubricant can attract dust and gum up moving parts. The goal is less internal friction, not a sticky mess inside the housing.
A grinding or scraping sound usually means something is rubbing where it shouldn’t. Sometimes the blade arms sit slightly uneven after years of use, pulling the motor shaft off balance. Other times, the motor cover shifts and touches a moving part. Realigning the housing and tightening screws can reduce mechanical drag without replacing the motor.
Spin the blades gently by hand after the power is off. They should move smoothly without catching, scraping, or stopping too quickly. Resistance can point toward bearing wear, bent brackets, or debris caught near the motor. That simple hand test gives a practical read on motor movement before you spend money on replacement parts.
Older fans may not be worth deep motor repair if the bearings are badly worn or the motor windings smell burnt. Replacement motors can be hard to match, and labor can cost more than a sensible new fixture. Still, cleaning, tightening, and capacitor replacement are worth trying first because they solve many common complaints. A realistic repair plan saves money while keeping safety, airflow, and long-term reliability in view.
How To Repair A Ceiling Fan Motor That Hums
Nothing ruins a quiet evening faster than a ceiling fan that buzzes nonstop while barely pushing air around the room. That constant humming sound usually means the motor is fighting against electrical resistance, worn parts, or poor airflow inside the housing. A lot of people assume the whole fan is shot at that point, but many humming motors can still be repaired with a little patience and the right troubleshooting steps. The key is narrowing down whether the issue starts with the capacitor, bearings, wiring, or overheating stress before replacing random parts.
Blade Balance And Airflow Problems
Uneven blades can quietly punish a ceiling fan motor over time. One slightly bent blade or loose bracket creates wobbling that forces the motor shaft to compensate constantly. That extra strain increases motor fatigue, especially during long daily use in warm rooms. Tightening blade screws and checking for warped blades can immediately reduce vibration and noise.
A balancing kit helps more than people expect. Small adhesive weights attached to the blades help restore smoother rotation, which reduces unnecessary pressure on internal motor parts. Fans that shake violently often wear down bearings faster because the shaft no longer spins evenly. A smoother fan creates better airflow while also lowering stress on the motor housing.
Ceiling height matters too. Fans mounted too close to the ceiling struggle to circulate air properly, especially in rooms with low clearance. Poor airflow around the motor traps heat and forces the unit to work harder for less cooling performance. Exploring best type ceiling fan living room options can help identify fan styles that move air more efficiently in larger or awkward spaces.
Dust-covered blades quietly reduce efficiency as well. Thick grime changes blade weight and affects airflow balance without people realizing it. A fan spinning with uneven resistance often develops annoying sounds that mimic electrical issues. Regular cleaning protects blade stability, improves circulation, and helps the motor maintain a steadier workload.
Overheating And Burnt Smells
A ceiling fan motor that smells burnt deserves immediate attention. Shut the power off and avoid running the fan again until the source gets checked. Heat buildup can damage motor windings, melt insulation, and increase fire risk if ignored too long. Some motors recover after cleaning and repairs, but severely overheated units may need replacement.
Vent blockage is a common problem inside older ceiling fans. Dust sneaks into motor vents and slowly forms thick layers around internal components. That trapped debris acts like insulation, keeping heat locked inside the housing instead of letting it dissipate naturally. Cleaning those vents carefully restores cooling airflow and reduces stress during operation.
Loose electrical connections also create dangerous heat. A wire nut hanging on by a thread can generate arcing or inconsistent power delivery that forces the motor to strain. Small connection problems often produce faint burning odors long before visible damage appears. Tightening and replacing worn connectors helps stabilize the electrical flow feeding the fan.
Rooms with heavy humidity make overheating worse. Moisture helps dust cling inside the housing while also encouraging corrosion around terminals and switches. Bathrooms, kitchens, and enclosed patios usually expose ceiling fans to harsher conditions than dry bedrooms or hallways. For backup lighting during electrical repair downtime, compare best solar lamps indoor home setups that provide simple indoor illumination without extra wiring.

Speed Problems And Weak Air Circulation
A fan stuck on one slow speed can make a room feel stuffy fast. Weak circulation often traces back to a failing capacitor because the motor no longer receives the energy boost needed for proper speed control. Capacitors wear gradually, which explains why many fans become slower over several months instead of failing instantly. Replacing the capacitor often restores normal fan speed without replacing the motor itself.
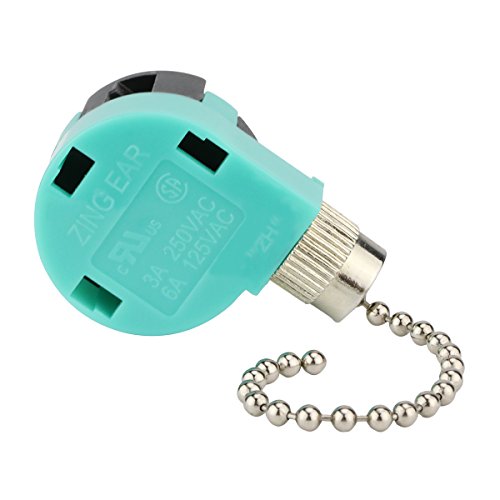
Pull chain switches deserve inspection too. Internal contacts wear down after years of repeated use, especially in busy rooms where the fan speed changes constantly. A damaged switch may interrupt the power sequence controlling motor speeds. Replacing a worn pull chain switch can restore consistent operation surprisingly quickly.
Remote receiver modules also fail more often than people expect. Some receivers overheat inside the canopy, especially if insulation crowds the wiring above the ceiling box. The fan may randomly change speed, stop responding, or refuse to reach high power settings. Disconnecting a faulty receiver and testing the fan directly helps isolate control-related issues.
Blade direction affects airflow more than many realize. During warmer seasons, the blades should rotate counterclockwise to push air downward effectively. A reversed blade direction creates weak circulation even when the motor works normally. Correct rotation improves cooling performance without increasing electrical strain or motor workload.
Motor Replacement Versus Repair
Not every ceiling fan deserves a deep repair project. Older bargain fans sometimes use sealed motors with limited replacement parts available, which complicates repairs quickly. If the housing smells heavily burnt or the motor shaft binds badly, replacement may cost less frustration overall. A realistic repair decision protects both time and long-term reliability.
Fan age matters more than people think. A fifteen-year-old fan exposed to constant humidity, dust, and daily use may already have weakened wiring or worn insulation beyond the visible issue. Replacing one failed part might only reveal another weak component later. Still, many mid-range and premium fans respond well to capacitor swaps, cleaning, and bearing maintenance.
Ceiling box stability should also enter the conversation before reinstalling or replacing anything. A weak or loose ceiling box creates wobbling that damages even healthy motors over time. Reinforcing the mount protects the fan from unnecessary vibration and extends overall lifespan. Strong support helps maintain quieter operation while reducing wear on moving components.
Energy efficiency can influence replacement choices too. Some older motors consume more electricity while producing weaker airflow than newer fan designs. Repairing a small issue makes sense when the fan still performs efficiently overall. But if the motor constantly overheats, struggles at full speed, or develops repeated electrical problems, replacement often becomes the safer and more cost-effective path.
Long Term Maintenance Habits
Ceiling fan motors last longer with simple maintenance instead of neglect followed by panic repairs. Dusting the blades monthly prevents buildup from drifting into the housing vents over time. Small cleaning habits protect motor airflow, reduce wobbling, and help the fan stay quieter during operation. Five minutes of upkeep can prevent hours of repair later.
Seasonal inspections catch problems early before they become expensive. Check blade screws, canopy hardware, pull chains, and wall controls every few months. Loose parts create vibration that slowly transfers stress into the motor assembly itself. Tightening those areas regularly helps preserve motor stability and smoother rotation.
Listen carefully to changes in sound rather than ignoring them. Fans rarely jump from healthy to dead overnight. Buzzing, clicking, grinding, or speed fluctuations usually build gradually over time. Spotting those changes early makes troubleshooting easier while lowering the odds of severe electrical damage.
Room conditions matter too. Kitchens collect greasy dust, bathrooms trap humidity, and enclosed porches expose motors to temperature swings that indoor living rooms rarely experience. Matching the fan style and motor type to the room environment helps avoid repeated breakdowns. A little preventative care keeps air circulation reliable while reducing stress on the motor year after year.


Best Small Flush Mount Ceiling Fans 2026 Ultimate Picks

Best Smart Ceiling Fan India 2026 For Effortless Comfort

Best Smart Ceiling Fans with Lights for 2026: Top Picks

Best Smart Home Non Ceiling Fans 2026 For Ultimate Comfort

Best Outdoor Misting Ceiling Fan 2026 For Ultimate Comfort

Best Ceiling Fans With Lights For Vaulted Ceilings 2026 Top Picks

Best Outdoor Ceiling Fans For Porch 2026 With Style And Breeze

Best WiFi Enabled Ceiling Fan 2026 For Effortless Comfort





