
How to Mount Table Fan on Wall Without Hassle
How to mount table fan on wall sounds simple at first, yet plenty of setups end up shaky, noisy, or flat-out unsafe. Loose brackets, poor airflow angles, and overloaded screws can turn a quick DIY task into an annoying headache. A solid wall-mounted setup creates better circulation, clears crowded desks, and helps small rooms feel less stuffy during hot afternoons. Done properly, the fan stays stable, runs quieter, and doesn’t wobble every time the oscillation kicks in.
Space usually becomes the real problem. Tiny bedrooms, compact apartments, workshops, and cluttered corners don’t leave much breathing room for bulky fan stands. Mounting a table fan higher on the wall helps push air farther across the room instead of blasting one spot nonstop. That little adjustment can make a surprisingly big difference, especially in areas where heat tends to linger near electronics, cooking spaces, or upper bunk beds. Better airflow often matters more than simply buying a larger fan.
Wall placement also affects comfort more than people expect. A fan pointed too high may barely cool the seating area, while one mounted too low can create constant direct airflow that dries out skin and eyes. Careful positioning improves circulation without making the room feel like a wind tunnel. Folks dealing with humid indoor air usually notice the biggest improvement once the fan angle lines up correctly with windows or cross-ventilation paths.
Noise reduction plays a major role too. Fans mounted on weak drywall anchors or uneven surfaces often rattle like crazy after a few days. That constant buzzing can get under anyone’s skin, especially at night. Strong mounting hardware, balanced weight distribution, and stable brackets help reduce vibration dramatically. Secure installation protects both the fan motor and the wall itself from long-term damage.
Electrical safety shouldn’t get brushed aside either. Dangling cords stretched across walkways create tripping hazards and can strain the fan’s wiring over time. Cleaner cable management keeps the setup tidy while reducing unnecessary stress on the plug connection. Some people even position mounted fans near extension outlets without considering heat buildup or power strip limits. A little planning upfront prevents those frustrating issues later.
Heat circulation changes from room to room, so there’s no cookie-cutter placement that works everywhere. Kitchens may need airflow aimed outward to move cooking heat away faster. Garages and workshops often benefit from side-angle circulation to prevent stagnant hot spots. Bedrooms usually feel more comfortable with indirect airflow rather than a constant blast directly toward the bed. Smart positioning creates steadier cooling without forcing the fan to run at maximum speed all day.
Mounting a table fan can also extend the fan’s usability in busy households. Elevated placement keeps blades farther away from pets, children, and accidental bumps from furniture movement. That extra clearance helps reduce dust buildup near floor level too. While cleaning still matters, wall-mounted fans often stay cleaner longer compared to units sitting near carpets or crowded shelves.
Plenty of people rush into drilling holes without checking wall materials first. Concrete, brick, wood studs, and drywall all require different anchors and screw types. Using the wrong hardware can leave the fan sagging within days. Strong support matters because oscillating fans constantly shift weight during operation. Reliable mounting support keeps the fan stable during continuous daily use instead of turning maintenance into a recurring chore.
How To Mount Table Fan On Wall
A crowded room gets uncomfortable fast once the fan takes over the desk, blocks a shelf, or sits right where someone needs to walk. That’s why how to mount table fan on wall becomes more than a quick DIY trick; it’s a practical way to free up space, improve airflow, and keep cooling where it actually helps. A wall-mounted table fan can work well in bedrooms, kitchens, workshops, laundry corners, and small apartments, but only if the bracket, wall surface, height, and cord path all make sense together. Skip those details, and the fan may rattle, sag, or blow air in every direction except the one you need.
Wall Mounting Basics
Wall mounting starts with one honest question: can the wall carry the fan’s weight while it vibrates and oscillates? A table fan isn’t heavy like a ceiling fan, but its motor movement still adds stress to screws, anchors, and brackets. Drywall alone can be risky unless proper anchors are used, while concrete, brick, or a wood stud usually gives a stronger bite. The goal is stable support, not just a fan that looks secure for the first few minutes.
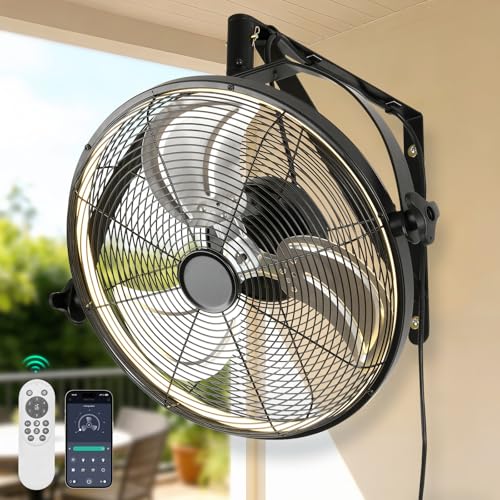
Most table fans weren’t designed to hang from a wall, so the mounting method needs extra care. Some models have a rear handle or base shape that fits a custom bracket, while others need a shelf-style support instead of direct hanging. That difference matters because forcing the wrong setup can bend the grille, strain the motor housing, or tilt the fan at an awkward angle. A safer setup keeps the fan’s center of gravity close to the wall.
Placement affects comfort as much as hardware. Mounting the fan too high can send airflow above the sitting area, leaving the room still stuffy. Mounting it too low can blow straight into faces, papers, food, or plants, which gets old pretty quickly. A good starting point is usually slightly above seated head height, angled down just enough for steady room circulation.
Power access deserves attention before any holes are drilled. A dangling cord looks messy and can become a tripping hazard if it runs across a walkway. Keep the plug within reach, avoid stretching the wire tight, and don’t trap the cord behind the bracket. Clean cable routing protects both electrical safety and the fan’s long-term usability.
Choose The Right Wall Spot
The best wall spot isn’t always the empty patch that looks convenient. Air needs a clear path, so shelves, curtains, tall cabinets, and open doors can block or redirect the breeze. A fan mounted near a corner may create decent airflow in a small room, but it can also bounce air awkwardly if the angle is too tight. Give the fan enough open space to move air across the room instead of slamming it into nearby clutter.
Heat pockets tell you where the fan should work hardest. Kitchens often hold warm air near cooking areas, while bedrooms can trap heat around beds, wardrobes, or electronics. A mounted fan can push warm air away from those zones and support natural cross-ventilation through windows. For rooms that already use overhead airflow, compare airflow habits with best ceiling fans cooling before deciding whether the wall fan should assist or redirect the breeze.
Noise also changes by location. A fan mounted on a thin partition wall may sound louder than the same fan on brick or a stud-backed surface. Vibrations can travel through hollow walls, especially at night when the room is quiet. Rubber washers, a firm bracket, and a flatter mounting surface help reduce that annoying buzz. Small hardware choices can make daily comfort feel noticeably better.
Think about cleaning access too. A fan mounted above a tall cabinet may seem tidy, but wiping the grille becomes a chore if a stool is needed every time. Dust buildup reduces airflow and can make the fan smell musty in humid rooms. A reachable height keeps maintenance simple, which means the fan is more likely to stay clean. That matters because clean blades move air more efficiently than dusty ones.
Pick Hardware That Holds
Hardware choice can make or break the whole setup. A basic screw in drywall may hold for a short while, then loosen as the fan vibrates day after day. Use anchors rated for the fan’s weight, and leave extra safety margin because oscillation adds movement. For wood studs, longer screws usually provide a firmer grip than short decorative screws. The wall should feel solid before the fan ever turns on.
Concrete and brick need masonry bits and wall plugs that match the screw size. Forcing a screw into a poorly drilled hole can crack the surface or leave the plug spinning uselessly. Drill straight, clear the dust, then seat the anchor snugly before tightening the bracket. That simple sequence creates stronger holding power and avoids a loose mount that keeps needing fixes.
A bracket should support the fan without squeezing fragile plastic parts. Some table fans have curved bases that sit better on a small wall shelf than a hook. Others can be secured with a U-bracket or adjustable strap if the motor housing remains clear. The safest method protects the fan’s motor vents, grille, oscillation knob, and tilt mechanism.
Don’t ignore the fan’s expected life, especially if it already rattles or runs hot. A worn motor mounted on the wall can become louder because vibration transfers into the bracket. Before drilling, check whether the fan is still worth mounting or whether replacement makes more sense. For a broader lifespan check, compare warning signs with how long ceiling fans last and apply the same common-sense thinking to motor noise, wobble, and overheating.
Set The Height And Angle
Height controls how the breeze feels in real life. A fan mounted just above seated head level usually spreads air better than one placed near the ceiling. Higher placement can help move warm air, but the airflow may miss the body if the fan cannot tilt downward. The sweet spot gives comfortable cooling without blasting one person nonstop.
Angle matters more than raw speed. A fan aimed directly at a bed or desk can feel harsh after a while, even on a low setting. Aim slightly across the room so air moves around the space instead of hitting one narrow target. That indirect flow often feels cooler because it reduces stagnant air without creating a constant wind-in-the-face feeling.
Rooms with windows need a smarter angle. A fan can pull cooler evening air inward or push hot indoor air outward, depending on placement. Mounting it across from a window can help circulate fresh air, while placing it near a doorway can move air between rooms. The trick is matching air direction to the room’s natural ventilation path.
Decor still counts, especially in bedrooms and living spaces. A wall-mounted fan can look awkward if it clashes with lighting, shelves, or wall color. Small visual details, like cord covers and tidy placement, make the setup feel intentional instead of patched together. For rooms where color balance matters, pair practical cooling with softer design choices like navy blue lamp shade ideas that help the wall area look less random.
Prepare The Fan Before Mounting
Preparation saves a lot of frustration. Clean the fan grille, blades, and rear housing before mounting because dust is harder to remove once the fan is on the wall. Check that the tilt joint holds firmly and the oscillation function works without grinding. A fan with loose joints will only feel worse once gravity starts pulling on it from a mounted position.
Inspect the base carefully. Some table fan bases are wide, heavy, and easy to support on a shelf bracket. Others are narrow or oddly shaped, which can make them unstable unless secured with straps. The fan should sit flat or hang evenly, with no twisting pressure on the plastic shell. Balanced placement protects fan stability and keeps vibration under control.
Test the power cord length before drilling. Hold the fan in the planned location and check whether the plug reaches the outlet without pulling tight. A stretched cord can tug the fan out of position or wear down near the plug. Use a safe extension only if needed, and keep it away from heat, water, and foot traffic. Cord safety is part of the installation, not an afterthought.
Mark the wall only after checking the fan’s full movement range. Oscillating fans need side clearance so the grille doesn’t hit curtains, cabinets, hanging plants, or wall decor. Tilt the fan through its likely angles and watch for contact points. A few extra inches of clearance can prevent scratches, noise, and annoying repositioning later.
Best Way To Mount Table Fan On Bedroom Wall
Small rooms get uncomfortable fast once heat starts building around beds, desks, and electronics. A wall-mounted fan can solve that problem without stealing floor space or turning the room into a maze of cords and furniture. The trick is making the setup feel safe, quiet, and actually useful instead of looking like a rushed weekend project. A few careful adjustments can completely change how the room feels during hot nights or humid afternoons.
Reduce Vibration And Noise
A noisy fan can ruin sleep faster than warm air. Some wall-mounted table fans sound fine during the first hour, then start rattling once the motor heats up or the oscillation kicks harder against the bracket. Thin walls tend to amplify that vibration, especially in apartments or older homes where drywall flexes easily. Adding rubber washers between the bracket and wall helps absorb some of that movement and reduces constant buzzing.
Loose screws cause more problems than many people expect. Even a tiny wobble can slowly widen the mounting holes over time, making the fan feel unstable after a few weeks. Tighten hardware carefully, but don’t overtighten plastic fan parts because cracks around the housing can spread later. A balanced setup creates smoother airflow and helps the motor sound less strained.
Blade condition matters too. Dust buildup on one side of the blade can create uneven spinning, which leads to extra shaking during higher speeds. Wipe blades regularly with a damp cloth and check for bent sections near the edges. A clean fan often feels stronger simply because the airflow stays more consistent. That simple maintenance step protects both motor efficiency and overall comfort.
Older fans sometimes become noisy because internal parts loosen naturally over years of use. If the fan hums loudly even after cleaning and tightening, the motor bearings may already be wearing out. Before replacing the entire setup, compare airflow and motor behavior with guides like how to update ceiling fan ideas that focus on improving circulation and reducing outdated cooling issues indoors.
Keep Airflow Comfortable At Night
Direct airflow feels refreshing for a while, then suddenly becomes irritating around midnight. Dry eyes, cold shoulders, and sore throats usually come from poor fan positioning instead of fan power alone. A wall-mounted fan should circulate air around the room instead of blasting one fixed spot for hours. Slight side angles often create gentler cooling that feels more natural during sleep.
Oscillation settings deserve more attention than most people give them. Constant side-to-side movement spreads air evenly and prevents one area from getting too cold. Some people prefer locking the fan in place, but fixed airflow can become annoying in smaller bedrooms. Test both modes for a few nights before deciding which setup feels less disruptive.
Humidity changes how airflow feels on the skin. In sticky rooms, stronger circulation helps sweat evaporate faster and makes the room feel cooler without lowering the temperature itself. Dry rooms react differently because nonstop airflow can pull moisture away from skin and sinuses. The best setup balances air movement with comfort instead of running the highest speed nonstop.
Window placement affects nighttime cooling more than fan size in many homes. A mounted fan near a window can help pull cooler evening air inside while pushing stale warm air outward. That cross-breeze effect often feels stronger than simply turning the fan speed higher. Even compact rooms can feel noticeably fresher with smarter airflow direction.
Prevent Wall Damage Over Time
Wall damage usually starts small. Tiny cracks around screws, soft drywall spots, or shifting anchors can slowly weaken the entire setup if ignored. Oscillating fans constantly move weight from side to side, so weak hardware tends to loosen faster than people expect. Checking the mount every few months helps prevent bigger repair headaches later.
Paint damage happens more often near humid kitchens, bathrooms, or laundry spaces. Warm airflow mixed with moisture can weaken cheap paint finishes and create peeling around brackets. A backing plate or wider mounting surface spreads the pressure more evenly and protects the wall from concentrated stress points. That extra support improves long-term durability.
Brick and concrete walls need attention too. Poor drilling technique can chip edges around anchors, especially if the hole size doesn’t match the wall plug correctly. Dust left inside the hole can also weaken the grip over time. Cleaning drilled holes before inserting anchors creates stronger mounting support and helps screws tighten more securely.
Outdoor-facing walls sometimes collect more moisture than interior walls, especially during seasonal weather swings. Fans mounted there may need rust-resistant hardware to avoid corrosion around screws and brackets. Areas exposed to humidity fluctuations often benefit from ideas similar to quality outdoor ceiling fans setups that focus on airflow durability and moisture resistance in changing conditions.

Handle Small Spaces More Efficiently
Tight spaces need smarter airflow, not just stronger fans. A wall-mounted table fan can free up desks, counters, and floor corners that already feel cramped with storage bins, chairs, or laundry baskets. That extra breathing room changes how the room functions day to day. Small apartments especially benefit from vertical space usage instead of stacking more objects across the floor.
Fan placement near shelving takes patience. Airflow blocked by books, storage cubes, or hanging clothes loses effectiveness quickly because the breeze never spreads properly. A slightly angled position often works better than aiming the fan straight across a cluttered room. Open airflow paths help cooling reach farther without forcing the motor to work harder.
Shared spaces create another challenge. One person may want strong airflow while someone else nearby feels uncomfortable with constant direct wind. Oscillation and medium-speed settings usually create a more balanced setup than leaving the fan locked on high speed. Smart positioning improves shared comfort without turning airflow into an argument every evening.
Wall-mounted fans also reduce accidental bumps from pets, kids, or moving furniture. Floor fans get knocked around surprisingly often in busy homes, especially near beds or gaming setups with loose cables everywhere. Elevated placement keeps the fan safer while helping airflow travel farther across the room. Less clutter around the fan also makes cleaning feel less annoying.
Clean And Maintain The Setup
Dust collects faster than most people realize, especially in bedrooms with fabric curtains, rugs, or pet hair floating around. Dirty fan blades reduce airflow and force the motor to work harder just to move the same amount of air. Cleaning every few weeks keeps the breeze stronger and helps reduce that stale dusty smell some fans develop over time. Regular care supports better airflow performance.
Always unplug the fan before cleaning. A microfiber cloth works well for light dust, while greasy buildup near kitchens may need mild soap and warm water. Avoid soaking the motor housing because moisture trapped inside can damage electrical parts later. Careful cleaning keeps the fan running smoother without risking unnecessary wear.
Check screws and brackets during cleaning sessions instead of waiting for problems to appear. Vibration slowly loosens hardware, especially if the fan runs daily during warmer months. Tightening loose points early helps prevent larger issues like sagging brackets or tilted airflow angles. Those quick checks improve mounting stability and help the setup last longer.
Watch for airflow changes too. Weak circulation, grinding noises, or slower blade startup can signal motor strain before complete failure happens. A mounted fan that suddenly sounds rough usually needs attention right away instead of being ignored for weeks. Catching those warning signs early often saves both the wall setup and the fan itself.


Best Small Flush Mount Ceiling Fans 2026 Ultimate Picks

Best Smart Ceiling Fan India 2026 For Effortless Comfort

Best Smart Ceiling Fans with Lights for 2026: Top Picks

Best Smart Home Non Ceiling Fans 2026 For Ultimate Comfort

Best Outdoor Misting Ceiling Fan 2026 For Ultimate Comfort

Best Ceiling Fans With Lights For Vaulted Ceilings 2026 Top Picks

Best Outdoor Ceiling Fans For Porch 2026 With Style And Breeze

Best WiFi Enabled Ceiling Fan 2026 For Effortless Comfort





