
How to Remove a Broken Light Bulb from the Socket Safely
Dealing with how to remove a broken light bulb from the socket can feel like one of those small household problems that suddenly turns stressful. Glass shards, exposed metal, and the fear of electric shock make many people freeze, unsure of the next move. Still, with the right mindset and a few practical techniques, this situation becomes manageable rather than intimidating. It’s not about brute force, it’s about control, patience, and knowing what actually works.
Most broken bulbs fail at the worst possible time, often after being overtightened or weakened by heat over months of use. Understanding why bulbs break inside the socket helps reduce panic and prevents repeating the same mistake later. Whether the glass shattered completely or left a jagged rim, the solution depends on cutting power first and choosing the safest removal method. That simple step alone separates a calm fix from a risky one.
From using household items to applying gentle leverage, several proven approaches exist that don’t require special tools. The key factor is keeping pressure even while avoiding contact with sharp edges. Once the base is out, checking the socket for damage ensures the next bulb seats properly and lasts longer. This process turns an annoying accident into a quick confidence boost around basic home care.
Why a Broken Bulb in the Socket Feels So Stressful
A shattered bulb stuck in a socket triggers a very specific kind of anxiety. There’s exposed metal, sharp glass, and the nagging worry that one wrong move could lead to a shock or injury. For many people, how to remove a broken light bulb from the socket becomes a mental roadblock rather than a simple task. That stress usually comes from uncertainty, not from the actual danger involved.
Most households have dealt with this at least once, yet it always feels unfamiliar when it happens. According to consumer safety reports, minor cuts from broken glass are among the most common home injuries, which explains why hesitation kicks in fast. The key factor here is not strength or tools, but confidence built on clear steps. Once the process is broken down, the fear loses its grip.
Another layer of stress comes from timing. Bulbs often break when you’re already in a hurry or dealing with poor lighting, which adds pressure. In those moments, people are tempted to rush, and that’s when mistakes happen. Slowing down and focusing on safe removal habits turns a tense moment into a controlled fix.
There’s also the concern about damaging the socket itself. Many worry that twisting too hard will ruin the fixture or wiring behind it. In reality, most sockets are sturdier than they look, as long as you avoid sudden force. Understanding this helps you approach the task with steadier hands and a calmer mindset.
Cutting Power and Preparing the Area First
Before touching anything, cutting the power is non-negotiable. Turning off the light switch isn’t always enough, especially in older homes with mixed wiring. Flipping the breaker ensures there’s no current flowing, which immediately reduces risk. This single action changes how to remove a broken light bulb from the socket from dangerous to manageable.
Preparation also means protecting yourself from glass. Wearing gloves, even basic work gloves, shields your hands from sharp edges. Safety glasses add another layer of protection, especially if the bulb shattered unevenly. These small precautions highlight the importance of personal safety over speed.
Clearing the area below the fixture matters more than people realize. Broken glass can fall unexpectedly once the base loosens. Laying down a cloth or paper catches debris and makes cleanup easier. This step supports a clean and controlled workspace, which lowers stress throughout the process.
Lighting the area properly is another overlooked detail. A flashlight or headlamp lets you see the metal base clearly, avoiding blind twisting. Poor visibility leads to slips, which cause cuts. Good lighting reinforces precision over guesswork, especially in tight fixtures.
Using Household Items to Grip the Broken Base
One of the most effective tricks involves items already at home. A raw potato, cut in half, can be pressed firmly into the broken bulb base. The soft surface grips the metal without sharp contact, allowing a slow twist. This method is popular because it emphasizes control without force.
Another option is needle-nose pliers, but they require extra care. Inserting them gently into the base and spreading them slightly creates enough tension to turn. The danger comes from applying too much pressure, which can deform the socket. Used correctly, pliers offer steady leverage with minimal risk.
Some people reach for duct tape or thick rubber bands to improve grip. Wrapped tightly around the base, these materials reduce slipping. While not always successful, they’re worth trying before moving to more aggressive tools. This approach highlights progressive problem-solving, starting simple and escalating only if needed.
It’s important to avoid makeshift tools that could crack the socket. Screwdrivers, for example, often cause more harm than good. The goal is to turn the base, not pry it out. Keeping this distinction in mind reinforces gentle rotation over prying.
Handling Different Types of Light Bulbs Safely
Not all bulbs behave the same when they break. Incandescent bulbs often leave a thin metal shell, while compact fluorescent bulbs can shatter more dramatically. Knowing what type you’re dealing with changes the approach. This awareness is central to how to remove a broken light bulb from the socket without surprises.
Fluorescent fixtures add another layer of complexity. They’re longer, fragile, and sometimes wired differently. If you’re unsure about sizing or compatibility, resources like measure bulb guides help prevent future mishaps. Preparation here reduces the chance of repeat breakage.
LED bulbs rarely shatter like older designs, but when they fail, their bases can still stick. Heat expansion often causes them to seize inside the socket. Letting the fixture cool completely before removal is critical. This patience underscores temperature awareness as a safety factor.
Outdoor fixtures present their own challenges due to moisture and corrosion. Rusted sockets grip bulb bases tightly, increasing breakage risk. Regular maintenance and choosing quality products, similar to those highlighted in outdoor light brands, can reduce these issues. Prevention here becomes as valuable as the fix itself.
What Not to Do When Removing a Broken Bulb
Panic leads to poor choices, and this task is no exception. Twisting aggressively or using excessive force often damages the socket. Once that happens, a simple fix turns into a replacement job. Avoiding this mistake keeps repair costs and frustration low.
Another common error is skipping the power cutoff. Even experienced DIYers sometimes assume a switch is enough. That assumption can lead to shocks, especially in older wiring systems. Respecting electricity is a core principle of safe home maintenance.
Using bare hands is another risky move. Even small glass shards can cause deep cuts. Gloves aren’t optional here; they’re essential. This habit reinforces protective gear as a baseline standard, not an afterthought.
Finally, don’t rush to install a new bulb immediately. Inspect the socket for damage or debris first. A damaged socket increases the chance of another break. Taking this pause supports long-term fixture health rather than short-term convenience.
Reducing the Chances of Future Breakage
Prevention starts with how bulbs are installed. Overtightening is one of the leading causes of broken bases. Turning until snug, then stopping, protects both bulb and socket. This simple habit reinforces moderation over force.
Heat management also plays a role. Using bulbs rated for the fixture prevents overheating, which weakens glass over time. Switching to LEDs where possible reduces heat buildup significantly. This choice highlights energy efficiency paired with safety.
Regular cleaning of sockets helps too. Dust and corrosion increase friction, making bulbs harder to remove later. A quick wipe with the power off keeps threads smooth. This small task supports easier maintenance down the line.
Upgrading fixtures or converting older systems can also help. For example, transitioning older fluorescent setups using guides like convert tubes reduces breakage risk and improves efficiency. Long-term solutions often save more stress than repeated fixes.
When Extra Grip and Tools Become Necessary
Sometimes the broken base refuses to budge, no matter how careful you are. In those moments, it’s important to pause and reassess rather than forcing the issue. Applying steady, even pressure with the right tool often succeeds where brute force fails. This approach keeps how to remove a broken light bulb from the socket focused on precision, not frustration.
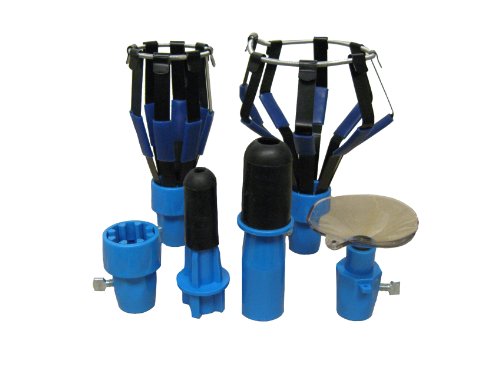
Specialty bulb extractors are designed for exactly this scenario. They expand inside the base, gripping the metal evenly as you turn. Unlike improvised tools, these reduce the chance of bending the socket threads. Their biggest benefit is controlled torque without slipping, which protects the fixture.
If extractors aren’t available, locking pliers can work when used carefully. Adjusting them to a snug fit avoids crushing the base. Small, incremental turns are safer than one hard twist. This technique highlights patience as a practical tool, not just a mindset.
It’s also wise to stop if resistance feels abnormal. Excessive stiffness can indicate corrosion or internal damage. Continuing could crack the socket housing. Knowing when to stop reinforces judgment over stubbornness in home repairs.
Dealing With Stuck Bulbs Caused by Heat and Corrosion
Heat is a quiet contributor to stuck bulbs. Over time, repeated heating and cooling causes metal bases to expand and contract, tightening their grip. This is common in enclosed fixtures or lamps used for long hours. Recognizing heat as a factor reframes how to remove a broken light bulb from the socket as a thermal issue, not just mechanical.
Letting the fixture cool completely before attempting removal is essential. Rushing while it’s warm increases the chance of tearing the base. Some people even wait several hours to be safe. This delay emphasizes temperature control as a safety step.
Corrosion adds another layer of difficulty, especially in humid areas. Rust binds metal threads together, making rotation harder. Applying a small amount of penetrating oil to the base edges can help, but only with power fully off. This method highlights chemical assistance used sparingly.
Outdoor and grow-light fixtures face this issue more often. Heat lamps used around plants, similar to setups discussed in led heat lamp guides, generate sustained warmth that accelerates wear. Choosing quality fixtures and bulbs reduces long-term seizure. Prevention here saves time and frustration later.
Inspecting the Socket After Removal
Once the broken base is out, the job isn’t quite finished. Inspecting the socket ensures it’s safe for a new bulb. Look for bent threads, scorch marks, or leftover debris. This check protects against repeat failures and reinforces fixture safety before reuse.
Debris inside the socket can prevent proper contact. A soft brush or dry cloth removes residue without damaging components. Avoid liquids unless absolutely necessary. This gentle cleanup supports clean electrical contact.
If the center contact appears flattened, it may need slight adjustment. Using a non-metal tool to lift it gently restores connectivity. This step should be done cautiously, with power still off. It highlights minor adjustments that prevent flickering.
When damage looks significant, replacing the socket is safer than improvising. Cracks or melted insulation are warning signs. Ignoring them risks shorts or future breakage. Choosing safety here underscores long-term reliability over quick fixes.
Choosing the Right Replacement Bulb
Selecting a replacement isn’t just about wattage. Matching the bulb type and base size to the fixture matters just as much. Incorrect sizing increases stress on the socket threads. This choice directly affects how to remove a broken light bulb from the socket next time, or whether you need to at all.
LED bulbs offer a clear advantage in many fixtures. They run cooler and weigh less than incandescent options. Reduced heat means less expansion and seizure over time. This benefit highlights cool operation as a preventive feature.
Specialty lighting introduces additional considerations. Decorative or patterned lights, such as those explained in gobo light discussions, often require precise installation. Overtightening these can ruin both bulb and effect. Careful handling preserves both function and design.
Checking manufacturer recommendations also helps. Fixtures often list compatible bulb types and limits. Following these guidelines reduces strain and extends lifespan. This habit reinforces manufacturer guidance as practical wisdom, not fine print.

Building Confidence for Future Home Fixes
Successfully handling a broken bulb builds quiet confidence. It turns a once-dreaded task into a familiar routine. That confidence carries over to other small repairs around the home. Mastery here reinforces self-reliance through experience.
Each time you apply these steps, hesitation decreases. The process becomes less about fear and more about method. Knowing what works removes the guesswork. This shift highlights knowledge as a stress reducer.
Sharing these tips with others also helps. Many people avoid basic fixes simply because no one showed them how. Passing along safe methods spreads confidence. This ripple effect underscores practical skills as shared value.
In the end, the lesson goes beyond lighting. It’s about approaching household problems calmly and deliberately. Small wins like this add up. They shape a mindset built on preparedness rather than panic.


Best Outdoor Light Bulb Reviews: Top-Rated Picks for 2026

Best Yellow Fog Light Bulb 2026 For Clearer Night Drives

Best Z Wave Light Bulb 2026 Top Picks For Smart Control

Best Vintage Light Bulb 2026 With Style And Glow

Best LED Reading Light Bulb Reviews - Top Picks for 2026

Best Light Bulb to Mimic Sunlight - Top Picks 2026

7 best light bulb to heat dog house picks that work

Best Bluetooth Speaker Light Bulb 2026 With Style And Power





